11
【
Step 5
】
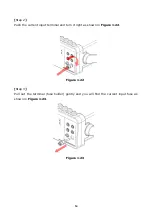
Replace with the new standard fuse.
【
Step 6
】
Insert the voltage setting selector container back into the.
【
Step 7
】
Make sure the power switch on the front panel is in
“
Power OFF
”
condition before
plugging as shown in
Figure 1-18
.
DCV
ACV
FREQ
NULL
CONT
TEMP
STORE
DIGITS
TRIGGE R
ESC
SHIFT
ENTER
CONFIG
OFF
Power Switch
Condition
Figure 1-18
【
Step 8
】
After finishing the above procedures, you can plug in your power cord as shown in
Figure 1-19
.
Figure 1-19
Содержание DL-1060
Страница 1: ...INSTRUCTION MANUAL 6 1 2 DIGITAL MULTIMETER DL 1060 DL 1060G DL 1060VG DL 1060R DL 1060VR B71 0180 31...
Страница 91: ...85 3 4 10 Self test Notice Do not use SELF TEST since it is used only for an after sales service operation...
Страница 146: ...7F Towa Fudosan Shin Yokohama Bild 2 18 13 Shin Yokohama Kohoku ku Yokohama Kanagawa 222 0033 Japan http www texio co jp...

