


Installation
Premier Elite Series Installation Manual
46
INS176-15
Subnet mask
= 255.255.255.0,
Gateway
= 192.168.0.1 &
DNS
= 192.168.0.1
Click
Save
and
Restart
, you can then close the web browser. The
unit will
restart
during this period.
Re-scan for wireless networks on the WiFi device and connect to the
Wi-Fi router.
In the web browser on a PC on the same network, you should be able to connect to
the
ComWiFi
with the new IP address you have given it. This will prove the settings
have been accepted.
In this example the IP address assigned to the
ComWiFi
is within the
DHCP Pool, and should therefore be reserved so that it cannot be
used by another device.
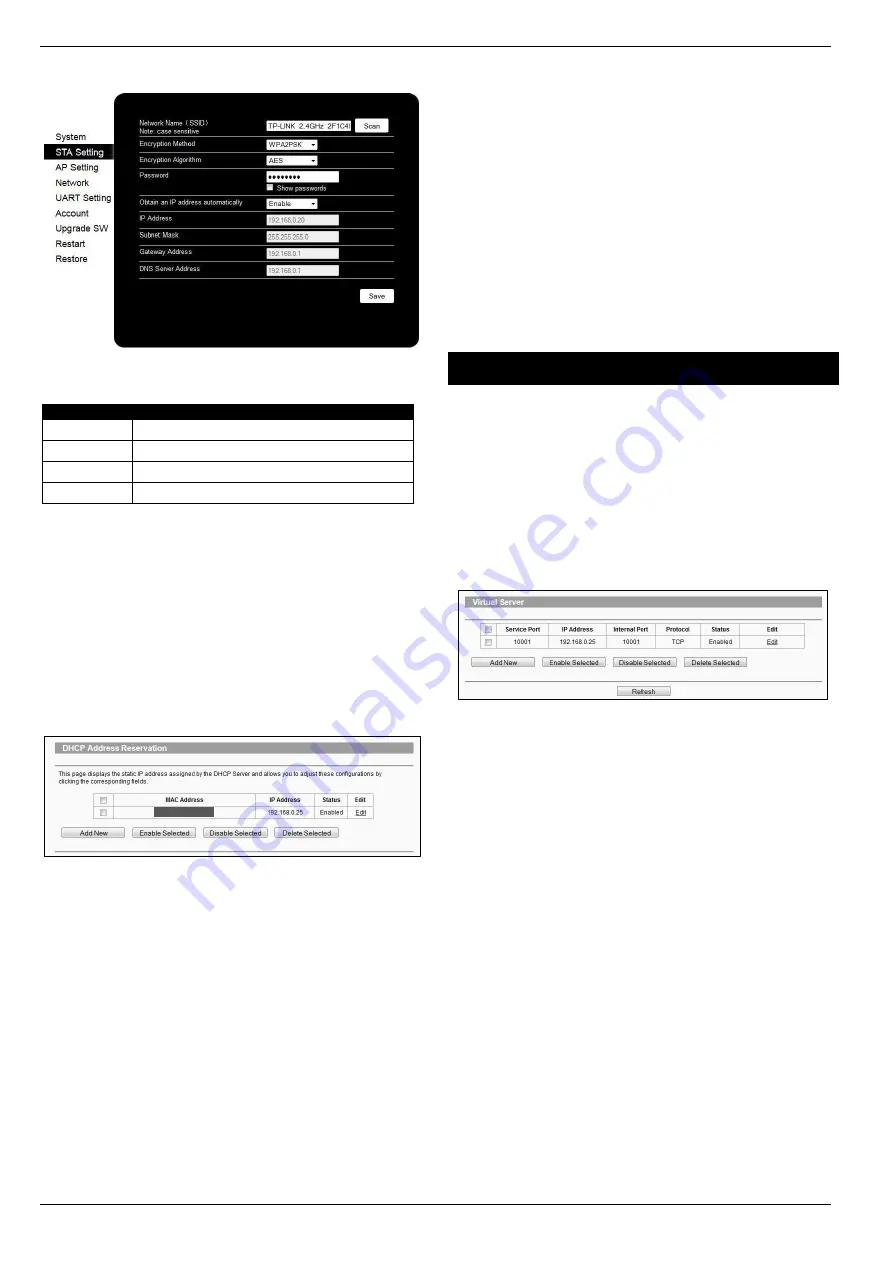
DHCP Reservation
On the PC check for DHCP or Address reservation. You should have
something like this.
Click
Add New
or whatever the router displays and enter the required
details. The
MAC
address you noted down on page 44
will be
required, as will the IP address of the
ComWiFi
. Once you have
entered the details press
Save
.
Manually Assigning an IP Address
(Outside DHCP
pool)
With this method you will be assigning an address to the
ComWiFi
which is outside of the DHCP pool. IP address ranges go from 1-254.
In the example in the previous section we can see that the IP address
range on the router starts at 192.168.0.50 and ends at 192.168.0.199.
We now have the option of assigning an address between 2-49 or
200-254.
On the WiFi enabled device where you accessed the
ComWiFi
do
the following.
•
Click on the
STA
Setting tab on the left side of the screen.
•
Ensure Obtain an IP Address Automatically is
Disabled
.
•
Under the
'Network Name
' click on
Scan
and then select the
Wi-Fi network. This is the name of the wireless router (SSID) that
is connected to the internet.
•
Enter the router password if required.
•
Enter the chosen IP address for example 192.168.0.25
•
Enter the subnet mask (usually 255.255.255.0) but can be found
on the router.
•
Enter the Gateway IP address (the router)
•
Enter the DNS Server details (usually same as the router)
•
Click
Save.
•
When prompted
Restart
the device.
•
Re-scan for wireless networks on the WiFi device and connect
to the WiFi router.
If you cannot find all of the required details on the router, simply follow the instructions
to automatically assign and IP address, and then disable DHCP and overtype the IP
address with the one you have chosen that is outside the DHCP pool.
In the web browser on a PC on the same network you should now be able to connect
to the
ComWiFi
with the new IP address you have given it. This will prove the settings
have been accepted.
Port Forwarding
WARNING: Care should be taken when opening ports as this can
leave the router vulnerable to malicious attacks.
To allow the system to communicate with the outside world, and vice
versa, port forwarding must be enabled on the router for the
ComWiFi
. The below example is typical, however please check the
router's documentation or the manufacturers website for more
information. This will be required in order to use the app remotely.
To setup Port Forwarding do the following.
•
Connect to the Router
•
Look for settings for "Forwarding”, or "Por
t Forwarding" these
could be under advanced settings, or in the Firewall settings.
Each manufacturer is different.
Once you have found the option you will have something like this.
•
Add a new rule using the
ComWiFi
IP address and Port Number
you used earlier.
Some routers may require use of the MAC address to allow port forwarding.
Please check with the manufacturer’s documentation or website for details.
Remote Connections (WAN)
Before attempting to connect to the system from a remote location,
please read the section on Port Forwarding, this will need to be done
to allow access from outside of the LAN.
Fixed IP address (Uncommon)
If you have a fixed IP address internet connection, complete all of the
details above, BUT replace the
Host Address
with the Fixed IP
address provided by the Internet Service Provider.
Dynamic IP Address (most common)
It is most likely that you have a Dynamic IP address assigned by the
service provider. This basically allows the Local system to connect to
the outside world (Internet WAN), and can change frequently.
Because of the nature of Dynamic addresses you will need a third
party service to manage the IP address to ensure you can always
connect to the system.
You should search for a
Dynamic DNS
service provider, who may or
may not charge a fee for the service. Once you have the service the
Host Address
will be replaced by the details given to you by the
DDNS provider.
Record the details here
IP Address
Subnet Mask
Gateway
DNS


