14
ECO II FEEDING rev.06
ECO II FEEDING
Blend curve settings:
Select the ingredient and dosage according to the animal age (section 6.1.2.1).
Select the blend curve used by each drop (section 6.3).
Disable the Continuous Feeding option (section 5.3).
Set the start time of each feed cycle (section 6.2).
Enable the “Active Feed Cycles in Curve” option (section 5.3).
Select active feed cycles according to the animal age (section 6.1.2.2).
• Option 6
(steady feed cycles with blend curves and feed blends)
Principle of Operation:
The controller delivers feed according to the settings of each drop's blend
curve: when the feed cycle of a blend curve is active, the controller sends the
feed blend and dosage that suit the drop's animal age. These feed cycles are
performed on a daily basis.
Refer to section 2.4.3 to get information about the drops’ filling process when
using feed cycles.
Settings:
Enable the blend curve (section 5.3).
Enable feed blends (section 5.3).
Blend curve settings:
Select the ingredient and dosage according to the animal age (section 6.1.2.1).
Select the blend curve used by each drop (section 6.3).
Disable the Continuous Feeding option (section 5.3).
Set the start time of each feed cycle (section 6.2).
Disable the “Active Feed Cycles in Curve” option (section 5.3).
Select on which feed cycle(s) the drops are being filled (section 6.3).
63
ECO II FEEDING rev.06
ECO II FEEDING
11. TRANSFER MENU
11.1 Screen Contrast
1. Simultaneously press and hold the right
and left arrow keys for 5 seconds to display
the system menu.
2. Choose
6. Contrast
and press Enter.
3. Set the screen contrast to the desired
intensity then press Enter to validate.
4.Simultaneously press and hold the right
and left arrow keys for 5 seconds to exit
from the system menu.
11.2 Communication Speed
1. Simultaneously press and hold the right
and left arrow keys for 5 seconds to display
the system menu.
2. Choose
5. Comm Speed
and press Enter.
3. Set the communication speed to the
desired value: select the high speed mode if
the controller uses the A-BOX communication
system or select the low speed if it uses
AGNET.
4. Simultaneously press and hold the right
and left arrow keys for 5 seconds to exit
from the system menu.
11.3 Update/Backup Process
with a USB Drive
The USB drive allows upgrading the firmware
or software of your controller. The USB drive
can also be used to make a backup of your
controller settings or to copy these settings
on another controller of the same type.
The classic memory stick has been replaced
by a USB drive but can still be used in some
particular cases.
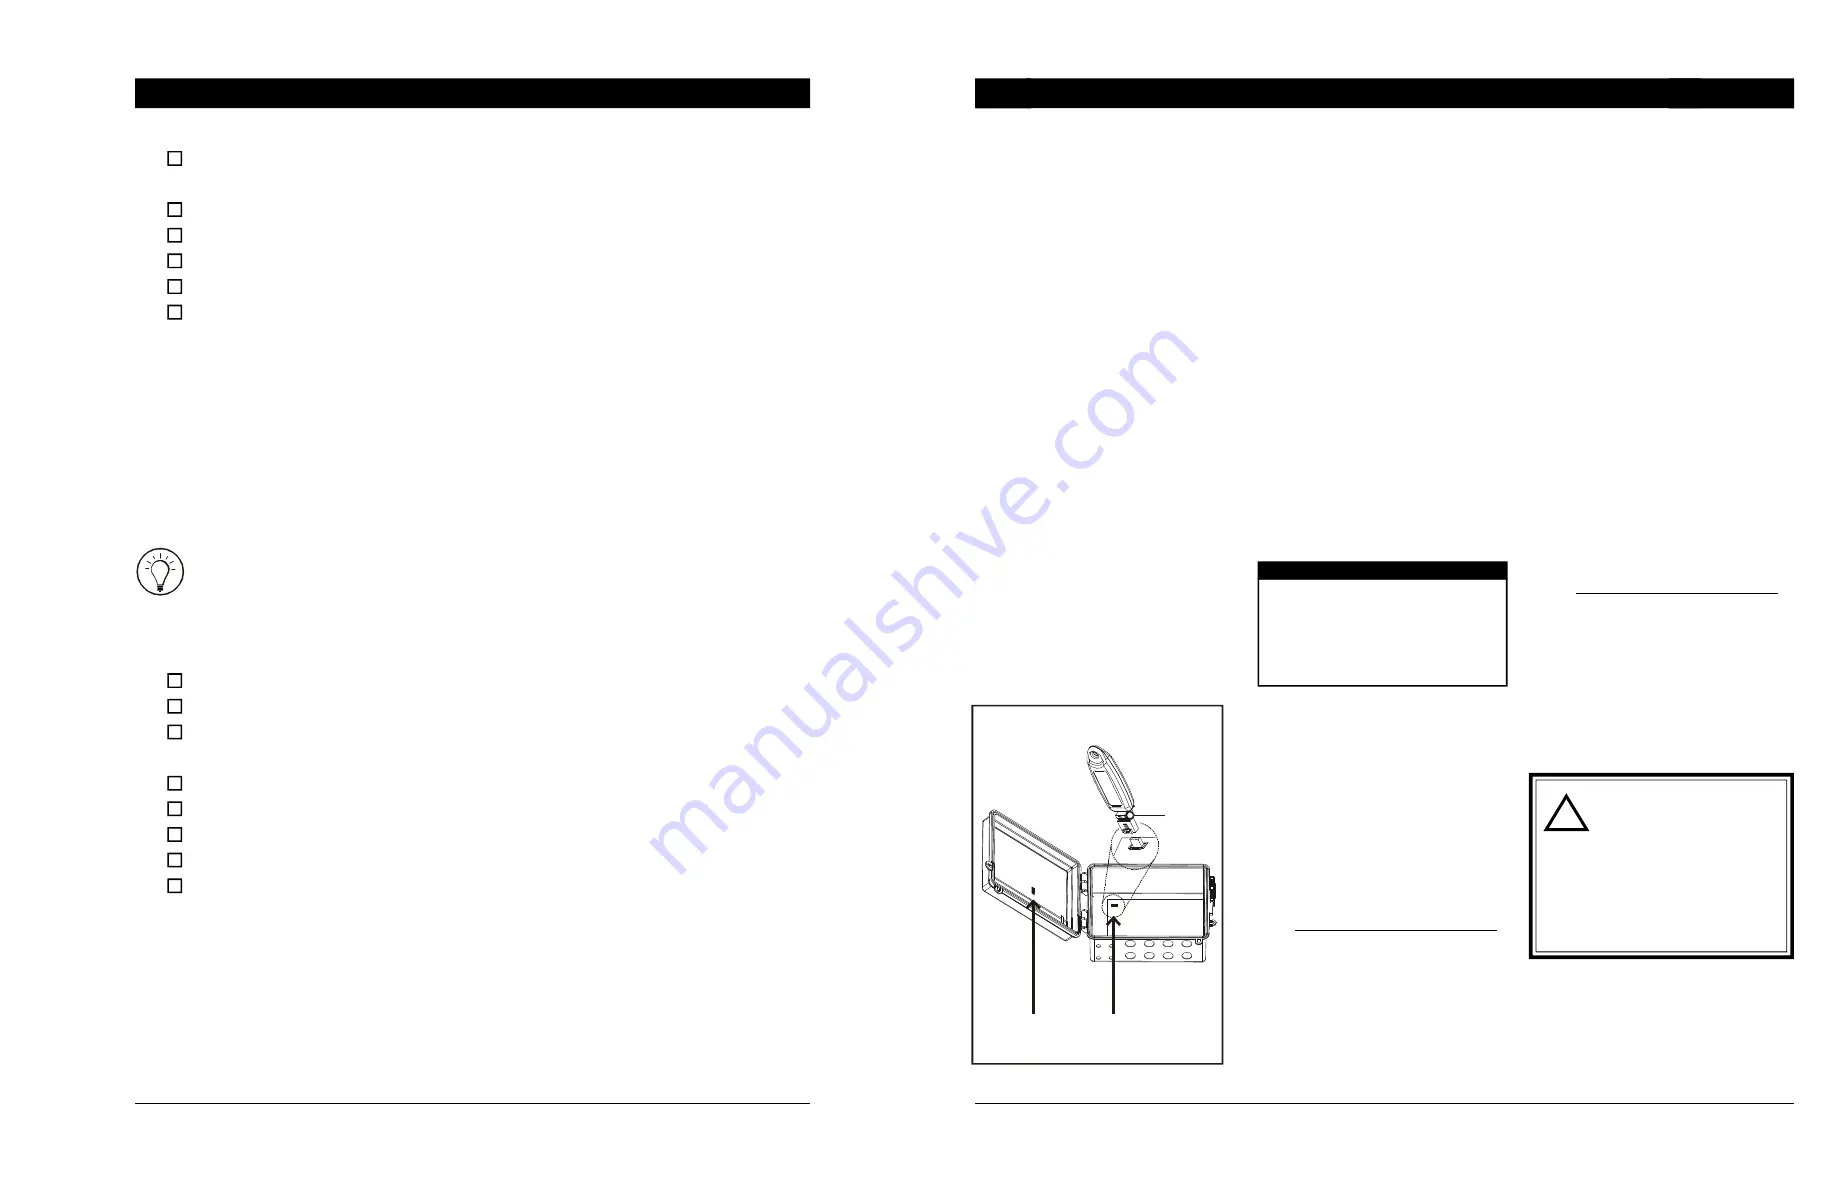
1. Lift the latch to open the front door of the
controller.
2. Insert the USB drive in the connector
behind the front door.
3. Close the front cover.
4. Simultaneously press and hold the right
and left arrow keys for 5 seconds to display
the transfer menu.
5. Select the desired option:
1. MemStick -> Control
Choose
1. MemStick -> Control
to load a
new configuration file into your controller.
This transfer will update your controller’s
software and parameter settings.
When selecting this option, a list of all
configuration files located on the card is
displayed (*.DMP files). Select the desired
file and then press Enter to start the transfer.
Note that the controller can only read the
files that are located at the root of the USB
dr
i
ve.
It cannot access any sub-directory!
2. Control -> MemStick
Choose
2. Control -> MemStick
to save your
controller settings on the USB drive. The
saving process will start as soon as you enter
this menu.
The controller will create a new
CONTROLLER~1.DMP file at the root of the
USB drive. If this file name already exists, it
will be saved under a different name
(“CONTROLLER~2.DMP” for instance). This
way, the controller will never erase a file on
the card.
3. Update Firmware
Choose
3. Update Firmware
to download a
new firmware file into your controller. This
process will not affect your parameter
settings.
When selecting this option, a list of all
firmware files located on the USB drive is
displayed (*.PKG files). Select the desired file
and then press Enter to start the transfer.
Note that the controller can only read the
files that are located at the root of the USB
drive. It cannot access any sub-directory!
4. Save Event Buffer
Choose
4. Save Event Buffer
to save the event
buffer of the controller on your USB card.
The file will have a *.txt extension. (USB
card only!)
Classic memory
stick
Locking
device
Connector for
the USB card
Connector for the
classic memory stick
1. MemStick -> Control
2. Control -> MemStick
3. Update Firmware
4. Save Event Buffer
5. Comm Speed
6. Contrast
Transfer menu
(Available soon)
Simultaneously press and hold the right
and left arrow keys for 5 seconds to exit
from the system menu.
Remove the USB drive from the
connector when the transfer is over!
!


