


Rear Brakes: 4C-3
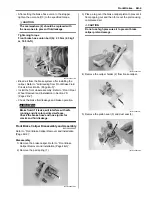
• Install the return spring (3) and lining indicator (4).
NOTE
Align the boss of lining indicator (4) with
wide spline on the brake cam shaft.
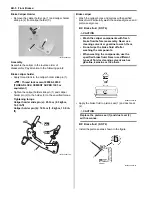
• Install the rear brake cam lever (5) to the rear brake
cam shaft.
NOTE
When installing the brake cam lever, align the
punched mark “D” with “E”.
• Tighten the cam lever nut (6) to the specified torque.
Tightening torque
Rear brake cam lever nut (b): 11 N·m (1.1 kgf-m,
8.0 lb-ft)
• Install the final gear assembly to the vehicle. Refer to
“Final Gear Assembly Removal and Installation in
Section 3B (Page 3B-23)”.
Rear Brake Disassembly and Assembly
B831G24306005
Refer to “Rear Brake Assembly Removal and Installation
(Page 4C-2)”.
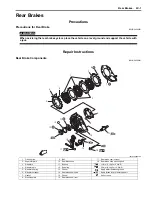
Disassembly
1) Remove the gasket (1) and dowel pins (2).
2) Remove the rear brake steel plates (3) along with
the friction plates (4).
3) Remove the rear brake pressure plate (5) and balls.
3
4
I831G1430008-01
“E”
“D”
5
(b)
6
I831G1430009-02
1
2
2
I831G1430010-02
3
4
I831G1430011-01
5
I831G1430012-01
Содержание 2009 LT-A750XK9
Страница 2: ......
Страница 4: ......
Страница 5: ...SUPPLEMENTS L LT A750XK9 09 MODEL 10 LT A750XPK9 09 MODEL 11 ...
Страница 29: ...0A 15 General Information 99565 01010 013 CD ROM Ver 13 ...
Страница 57: ...0B 28 Maintenance and Lubrication 09915 40610 Oil filter wrench Page 0B 12 Page 0B 12 ...
Страница 68: ...0C 11 Service Data ...
Страница 310: ...1K 5 Exhaust System ...
Страница 482: ...4D 6 Parking Brake ...
Страница 528: ...6B 13 Steering Handlebar ...
Страница 555: ...Exterior Parts 9D 1 Body and Accessories Exterior Parts Repair Instructions Exterior Parts Construction B831G29406001 ...
Страница 581: ......
Страница 631: ...4A 6 Brake Control System and Diagnosis ...