


Engine Mechanical: 1D-14
5) Remove the following parts from the vehicle.
• Front fender (1). Refer to “Front Side Exterior
Parts Removal and Installation in Section 9D
(Page 9D-6)”.
• Rear fender (2). Refer to “Rear Side Exterior Parts
Removal and Installation in Section 9D (Page 9D-
9)”.
• Mud guard (Left and Right) (3). Refer to “Rear
Side Exterior Parts Removal and Installation in
Section 9D (Page 9D-9)”.
6) Remove the shift lever assembly. Refer to “Shift
Lever Assembly Removal and Installation in Section
5A (Page 5A-24)”.
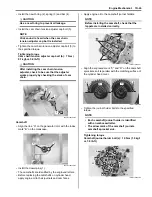
7) Disconnect the spark plug cap (4).
8) Disconnect the starter motor lead wire (5) and
ground lead wire (6).
9) Disconnect the radiator inlet hose (7) and outlet hose
(8).
10) Remove the air cleaner box. Refer to “Air Cleaner
Box Removal and Installation (Page 1D-5)”.
11) Remove the throttle body assembly. Refer to
“Throttle Body Removal and Installation (Page 1D-
9)”.
12) Disconnect the speed sensor coupler (9) and clamp.
1
2
3
I831G1140052-02
4
I831G1140053-01
5
6
I831G1140054-01
8
7
I831G1140055-02
I831G1140056-01
I831G1140057-01
9
I831G1140058-02
Содержание 2009 LT-A750XK9
Страница 2: ......
Страница 4: ......
Страница 5: ...SUPPLEMENTS L LT A750XK9 09 MODEL 10 LT A750XPK9 09 MODEL 11 ...
Страница 29: ...0A 15 General Information 99565 01010 013 CD ROM Ver 13 ...
Страница 57: ...0B 28 Maintenance and Lubrication 09915 40610 Oil filter wrench Page 0B 12 Page 0B 12 ...
Страница 68: ...0C 11 Service Data ...
Страница 310: ...1K 5 Exhaust System ...
Страница 482: ...4D 6 Parking Brake ...
Страница 528: ...6B 13 Steering Handlebar ...
Страница 555: ...Exterior Parts 9D 1 Body and Accessories Exterior Parts Repair Instructions Exterior Parts Construction B831G29406001 ...
Страница 581: ......
Страница 631: ...4A 6 Brake Control System and Diagnosis ...