


Propeller Shafts: 3D-19
12) Unlock the nut with a chisel.
13) Shift into the reverse gear.
14) Remove the rear output shaft yoke (10).
15) Remove the oil seal.
Installation
CAUTION
!
The removed oil seal, nut, circlips and O-ring
must be replaced with a new ones.
1) Install the oil seal into the final gear case with the
special tool.
Special tool
: 09913–70210 (Bearing installer set)
2) Apply grease to lip of the oil seal.
: Grease 99000–25160 (Water resistance
grease)
3) Shift into the low gear.
4) Apply thread lock to the rear output shaft.
: Thread lock cement 99000–32030
(THREAD LOCK CEMENT SUPER 1303 or
equivalent)
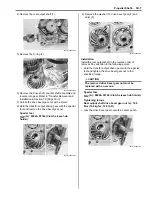
5) Install the rear output shaft yoke (1) and washer (2).
Tighten the rear output shaft nut (3) to the specified
torque.
Tightening torque
Rear output shaft nut (a): 100 N·m (10.0 kgf-m,
72.5 lb-ft)
6) Lock the rear output shaft nut (3) with a center
punch.
7) Apply grease to the bearings and dust seal lip.
: Grease 99000–25010 (SUZUKI SUPER
GREASE A or equivalent)
10
I831G1340069-02
I831G1340070-01
I831G1340071-01
1
2
(a)
3
I831G1340072-02
I831G1340073-01
Содержание 2009 LT-A750XK9
Страница 2: ......
Страница 4: ......
Страница 5: ...SUPPLEMENTS L LT A750XK9 09 MODEL 10 LT A750XPK9 09 MODEL 11 ...
Страница 29: ...0A 15 General Information 99565 01010 013 CD ROM Ver 13 ...
Страница 57: ...0B 28 Maintenance and Lubrication 09915 40610 Oil filter wrench Page 0B 12 Page 0B 12 ...
Страница 68: ...0C 11 Service Data ...
Страница 310: ...1K 5 Exhaust System ...
Страница 482: ...4D 6 Parking Brake ...
Страница 528: ...6B 13 Steering Handlebar ...
Страница 555: ...Exterior Parts 9D 1 Body and Accessories Exterior Parts Repair Instructions Exterior Parts Construction B831G29406001 ...
Страница 581: ......
Страница 631: ...4A 6 Brake Control System and Diagnosis ...