5.
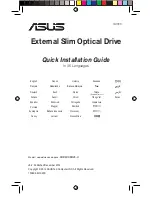
Repeat step 3, and push the cleaner pusher (280) to the two portions of the lens cleaning base (280).
Note
This is an important procedure to determine the distance between the lens and lens cleaner. Be sure to perform this
procedure securely.
Lens cleaning base (280) assembly
or lens cleaning base (280)
Lens cleaning base (280) assembly
or lens cleaning base (280)
Positioning dowel
Positioning dowel
Positioning hole
Cleaner pusher (280)
Cleaner pusher (280)
Lens cleaners
Positioning hole
6.
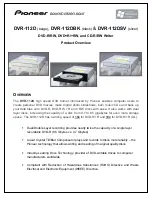
Remove the cleaner pusher (280), and check that the lens cleaners are attached to the lens cleaning base (280)
assembly and lens cleaning base (280) as shown in the illustration. If the lens cleaners are not attached to the correct
position, perform steps 3 to 5 again.
Before attaching cleaners
After attaching cleaners
ODS-D280U/ODS-D280F
3-15
Содержание ODS-D280F
Страница 4: ......
Страница 9: ...Frame Wiring 10 3 Revision History ODS D280U ODS D280F 5 ...
Страница 10: ......
Страница 12: ......
Страница 42: ...Hold the shaded portions Keep away a screwdriver Objective lens Actuator ODS D280U ODS D280F 1 30 ...
Страница 158: ......
Страница 238: ......
Страница 248: ...Possible cause A cartridge is remaining in the unit ODS D280U ODS D280F 6 4 ...
Страница 274: ......
Страница 278: ......
Страница 300: ......
Страница 304: ......
Страница 306: ......
Страница 307: ......