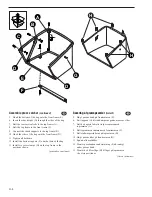
Montér græsopsamleren
(fortsat)
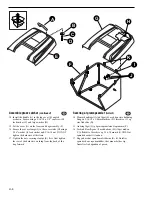
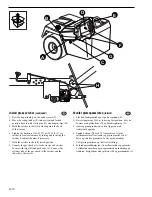
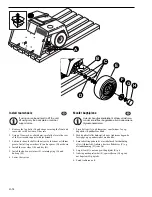
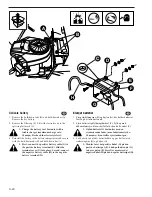
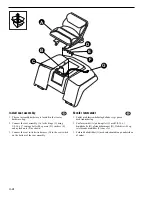
3. Støt den færdigsamlede pose på bærearmene (F).
4. Rejs svingarmene (E) op i lodret og låst position, hvor de
fæstnes med glatboltene (G) og hårnålesplitterne (D).
5. Anbring græsopsamleren, så den ligger an mod
traktorens bagplade.
6. Spænd boltene (H) med 75 N.m moment. Afprøv
spillerummet mellem traktor og græsopsamler ved at
hæve og sænke opsamleren. Justér om nødvendigt.
7. Løft græsopsamleren op i helt rejst stilling.
8. Forbind gasstøddæmperne (A) mellem traktor og opsamler.
Cylinderenden sættes på græsopsamleren og skaftenden på
traktoren. Fastgør dem med splitterne (B) og preshætterne (C).
DA
H-10
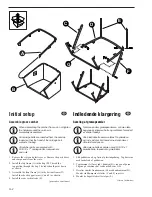
Install grass catcher
(continued)
3. Rest the bag assembly on the catcher arms (F).
4. Move the swing latches (E) into vertical and locked
position. Secure with clevis pins (G) and hairpin clips (D).
5. Hold the catcher so that it fits flush against the back
of the tractor.
6. Tighten the hardware (H) to 75 N.m (55 ft. lbs.) Test
catcher-to-tractor clearance by raising and lowering the
catcher. Readjust the arms if necessary.
7. Hold the catcher in the fully raised position.
8. Connect the gas shocks (A) to the tractor and catcher.
Secure with clips (B) and push caps (C). Connect the
cylinder side of the gas shock to the catcher and the
rod side to the tractor.
GB
H
B
A
C
G
F
E
D
Содержание Baron
Страница 8: ...vi ...
Страница 36: ...A 28 ...
Страница 62: ...B 26 ...
Страница 106: ...C 44 ...
Страница 126: ......
Страница 140: ...D 34 ...
Страница 182: ...E 42 ...
Страница 222: ...F 40 ...
Страница 248: ...G 26 ...
Страница 288: ...D 40 ...

