54(77)
3.7 Installation of Blades
Blades are extremely sharp and please put on gloves before installation
and please be very careful to avoid cut during the installation.
Steps:
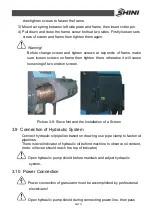
1) Put rotate blades into groove, match hole sites with fixing block then tighten
bolts to fit blades to cutter groove and front end face of fixing block.
2) Fix upper fixed blades in fixed mount then screw screws to fasten blades;
screw adjusting bolts to fasten lower fixed blades in fixing block.
3) Use feeler gauge to inspect gap between fixed blades and rotate blades.
Normal range is 0.5~1.5mm; if not, change the gap by adjusting fixed blades
then tighten fixing screw of fixed blades.
Picture 3-8: Installation of Fixed and Rotate Blades
Notice!
Make sure tighten set screws to avoid personal injuries and machine
damage.
During adjusting blade gaps, do not adjust the gap too close to avoid
blades contacts and damages. Rotate cutter shaft for a few rounds to
adjust gap to a suitable range.
3.8 Installation of Screen and Frame
1) Put screen into frame, match hole sites at two ends and fasten screws.
Place the frame under crushing chamber.
2) Insert two bars from frame to hole site at two sides of crushing chamber,
Содержание SGS-6080S
Страница 1: ...SGS S Single shaft Shredders Date May 2014 Version Ver B English...
Страница 2: ......
Страница 8: ...8 77...
Страница 24: ...24 77 2 3 3 Cutting Chamber Structure Picture 2 8 Cutting Chamber Structure...
Страница 31: ...31 77 2 3 12 Pushing Device Assembly Picture 2 12 Pushing Device Assembly...
Страница 34: ...34 77 2 3 15 Hydraulic System 2 3 15 1 Principle of Hydraulic System Picture 2 14 Principle of Hydraulic System...
Страница 37: ...37 77 2 4 Wiring Diagram 2 4 1 Wiring Diagram Picture 2 16 Wiring Diagram...
Страница 38: ...38 77 2 4 2 Control Wiring Diagram Picture 2 17 Control Wiring Diagram 1...
Страница 39: ...39 77 Picture 2 18 Control Wiring Diagram 2...
Страница 40: ...40 77 2 4 3 Electrical Components Layout Picture 2 19 Electrical Components Layout 1...
Страница 41: ...41 77 Picture 2 20 Electrical Components Layout 2...


