
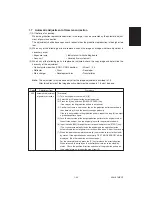


ADJUSTMENT
1 - 62
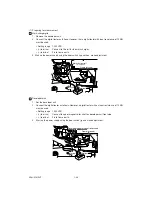
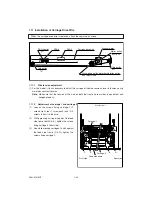
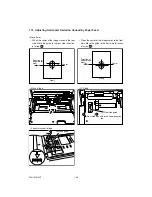
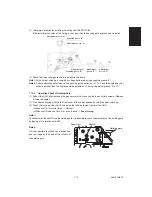
Exit side frame
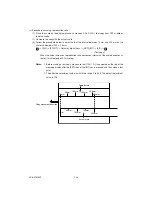
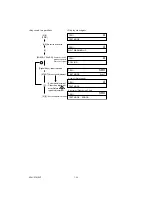
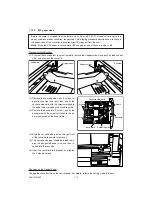
1.11 Installation of Carriage Drive Wire
When the carriage drive wire is replaced, attach the new wire as shown:
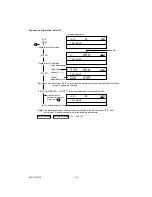
1.11.1
Wire tension adjustment
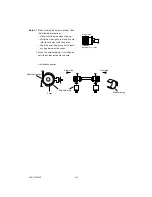
(1) For this model, it is unnecessary to adjust the carriage drive wire tension since its tension spring
maintains constant tension.
Note:
Make sure that the tension of the wire on both the front and rear sides is equivalent and
hanged properly.
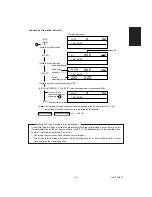
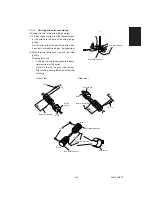
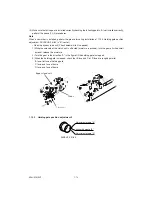
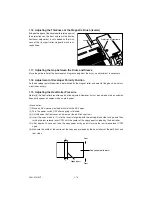
1.11.2
Adjustment of carriage 1 and carriage 2
(1)
Loosen the screws fixing carriage-1 (2
screws; front, rear, 1 screw each) and -2 (2
screws in front) to the wire.
(2)
While pressing carriage-2 against the feed
side frame (both A & B), tighten the screws
fixing carriage-2 (front side).
(3)
Also while pressing carriages 1 and 2 against
the feed side frame (C & D), tighten the
screws fixing carriage-1.
Carriage-1
Carriage-2
Feed-side frame
Front side
Rear side
C
A
B
D
Motor pulley
39.75/3GT-Z28
CRG-1
CRG-2
27
27
Carriage drive wire
Wire windup pulley/motor deceleration pulley
Idle pulley
CRG-2 pulley
Scanner motor
27
Idle pulley
3GT-Z24
Содержание AR-650
Страница 103: ...MAINTENANCE 2 6 Rear drive system 38 36 37 3 54 54 54 54 54 54 96 12 81 63 63 46 ...
Страница 104: ...2 7 MAINTENANCE ADF front sectional view 100 104 109 105 106 102 108 99 101 103 107 98 ...
Страница 118: ...SUPPLIES 3 6 9 REMOVE 1 1 2 10 REMOVE 11 TURN OVER 13 REMOVE 15 REMOVE 14 REMOVE 12 REMOVE 16 INSTALL 2 2 1 ...
Страница 119: ...3 7 SUPPLIES 18 INSTALL 2 1 19 INSTALL 2 1 20 CONNECT 21 INSTALL 2 2 2 1 22 CLOSE 1 3 2 23 INSTALL 17 CONNECT ...
Страница 122: ...SUPPLIES 3 10 13 CONNECT 15 CLOSE 2 1 14 CLOSE 1 2 16 TURN ON 17 PRESS 18 END ...
Страница 125: ...3 13 SUPPLIES 5 OPEN 2 1 6 DISCONNECT 7 REMOVE 2 1 9 8 REPLACE 2 1 9 INSTALL 1 2 10 CONNECT 11 CLOSE 1 2 12 CLOSE 2 1 ...
Страница 126: ...SUPPLIES 3 14 13 TURN ON 14 PRESS 15 END 5 DEVELOP UNIT 1 REMOVE 3 2 3 5 4 2 REMOVE 3 INSTALL 4 FILL 5 INSTALL 10 ...
Страница 168: ...Select Direct Connection and then click Next button Select Communications Port COM1 and then click Next button 5 4 ...
Страница 169: ...Click Finish button then Virtual Modem installation is completed 5 5 ...
Страница 179: ...To make the connection ONLINE mode click button before firmware downloading 5 15 ...
Страница 194: ......
Страница 195: ...MEMO ...
Страница 196: ...MEMO ...
Страница 197: ...MEMO ...
Страница 198: ...MEMO ...
Страница 199: ...MEMO ...