


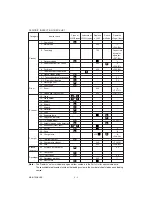


MAINTENANCE
2 - 4
Clean at
Lubricate at
Replace
Check
Remarks
Category
Item to check
400,000 copies 400,000 copies
x 1,000
while on <Page-Item>
Transfer
89-4. Transfer belt separation
A
L
belt
auxiliary roller bearing and GCB
90. ADU pick-up roller
A
91. ADU feed roller
A
92. ADU separation belt
A
93. Transport rollers 1 to 4
A
ADU
94. ADU aligning roller
A
95. GCB bush and plastic bush
L
96. Drive gear tooth faces
W
97. Exit/ADU switching gate and Main
A
unit eixt section/ADU relay roller
48. PFP pick-up roller
100
<P11-I43>
49. PFP feed roller
100
*24
<P11-I21>
50. PFP separation roller
AV
100
*14
<P12-I21>
51. PFP aligning roller
A
PFP
52. Paper guide
53. Tray drive worm wheel and
W
*12
gear (tooth faces)
54. PFP drive gear (tooth faces)
W
55. GCB bush and plastic bush
L
98. ADF pick-up roller
400
<P81-I18>
99. ADF feed roller
400
<P81-I14>
100. ADF separation pad
400
<P81-I53>
101. Transport belt
400
<P84-I22>
102. ADF aligning roller
A
ADF
103. ADF reversal roller
A
104. ADF empty sensor
105. ADF aligning sensor
106. ADF size sensor
107. Exit sensor
108. ADF timing sensor
109. Transport belt cleaning brush
56. LCF pick-up roller
400
<P17-I19>
57. LCF feed roller
400
*24
<P17-I9>
58. LCF separation roller
AV
400
*14
<P17-I40>
59. Manual pick-up roller
100
<P18-I19>
60. Manual feed roller
100
<P18-I15>
61. Manual separation roller
AV
100
*14, *24
LCF
<P16-I32>
62. Paper guide
63. Paper feed system drive gears
W
64. GCB bush and plastic bush
L
65. Gear
W
*15
66. Worm and worm wheel
W
*15
67. Worm shaft
W
*15
68. Wire pulley shaft
W
*15
Note:
When lubricating, do not allow oil to come in contact the rollers, belts and belt pulleys.
Содержание AR-650
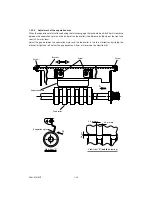
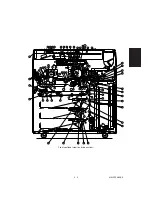
Страница 103: ...MAINTENANCE 2 6 Rear drive system 38 36 37 3 54 54 54 54 54 54 96 12 81 63 63 46 ...
Страница 104: ...2 7 MAINTENANCE ADF front sectional view 100 104 109 105 106 102 108 99 101 103 107 98 ...
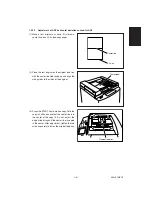
Страница 118: ...SUPPLIES 3 6 9 REMOVE 1 1 2 10 REMOVE 11 TURN OVER 13 REMOVE 15 REMOVE 14 REMOVE 12 REMOVE 16 INSTALL 2 2 1 ...
Страница 119: ...3 7 SUPPLIES 18 INSTALL 2 1 19 INSTALL 2 1 20 CONNECT 21 INSTALL 2 2 2 1 22 CLOSE 1 3 2 23 INSTALL 17 CONNECT ...
Страница 122: ...SUPPLIES 3 10 13 CONNECT 15 CLOSE 2 1 14 CLOSE 1 2 16 TURN ON 17 PRESS 18 END ...
Страница 125: ...3 13 SUPPLIES 5 OPEN 2 1 6 DISCONNECT 7 REMOVE 2 1 9 8 REPLACE 2 1 9 INSTALL 1 2 10 CONNECT 11 CLOSE 1 2 12 CLOSE 2 1 ...
Страница 126: ...SUPPLIES 3 14 13 TURN ON 14 PRESS 15 END 5 DEVELOP UNIT 1 REMOVE 3 2 3 5 4 2 REMOVE 3 INSTALL 4 FILL 5 INSTALL 10 ...
Страница 168: ...Select Direct Connection and then click Next button Select Communications Port COM1 and then click Next button 5 4 ...
Страница 169: ...Click Finish button then Virtual Modem installation is completed 5 5 ...
Страница 179: ...To make the connection ONLINE mode click button before firmware downloading 5 15 ...
Страница 194: ......
Страница 195: ...MEMO ...
Страница 196: ...MEMO ...
Страница 197: ...MEMO ...
Страница 198: ...MEMO ...
Страница 199: ...MEMO ...