ADJUSTMENT
1 - 66
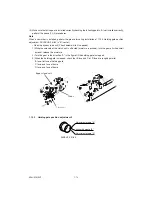
1.12.1
Adjusting the lens magnification
Notes:
1. This adjustment must be carried out only when the scanner lens unit has been removed or
replaced.
2. Before this adjustment, check that the primary scanning reproduction ratio of the printer is
corrected.
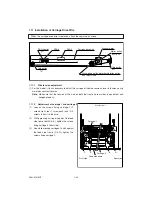
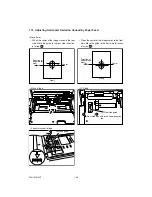
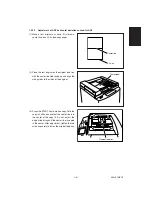
(1) Place the scale on the original glass, and make an A4 100% copy.
(2) Compare the copied scale with the actual scale to measure the error in the reproduction ratio.
(3) Follow the procedure below to make adjustment so that the distance between each mark of both
scales becomes equal.
Notes:
3. After adjusting the lens magnification, be sure to adjust the deviation in the CCD primary
scanning direction.
<Procedure>
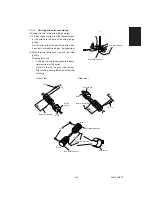
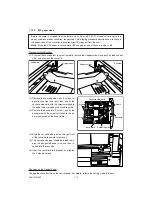
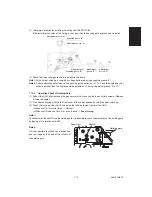
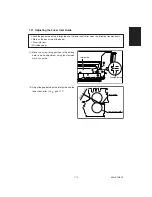
(1) Remove the original glass, lens cover (11 screws), damp heater unit and lens shield bracket (2
screws).
(2) Screw in the 2 lens magnification adjustment pins into the oblong holes on the lens base.
Notes:
4. When screwing in the pin, take care not to nip the harness under the lens base.
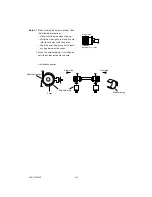
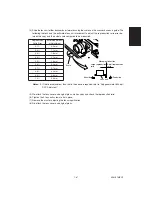
(3) Loosen the 2 screws fixing lens unit.
Copy movement direction
Copied scale
Actual scale
Lens magnification adjustment pins
Lens base
Feed side
Exit side
Содержание AR-650
Страница 103: ...MAINTENANCE 2 6 Rear drive system 38 36 37 3 54 54 54 54 54 54 96 12 81 63 63 46 ...
Страница 104: ...2 7 MAINTENANCE ADF front sectional view 100 104 109 105 106 102 108 99 101 103 107 98 ...
Страница 118: ...SUPPLIES 3 6 9 REMOVE 1 1 2 10 REMOVE 11 TURN OVER 13 REMOVE 15 REMOVE 14 REMOVE 12 REMOVE 16 INSTALL 2 2 1 ...
Страница 119: ...3 7 SUPPLIES 18 INSTALL 2 1 19 INSTALL 2 1 20 CONNECT 21 INSTALL 2 2 2 1 22 CLOSE 1 3 2 23 INSTALL 17 CONNECT ...
Страница 122: ...SUPPLIES 3 10 13 CONNECT 15 CLOSE 2 1 14 CLOSE 1 2 16 TURN ON 17 PRESS 18 END ...
Страница 125: ...3 13 SUPPLIES 5 OPEN 2 1 6 DISCONNECT 7 REMOVE 2 1 9 8 REPLACE 2 1 9 INSTALL 1 2 10 CONNECT 11 CLOSE 1 2 12 CLOSE 2 1 ...
Страница 126: ...SUPPLIES 3 14 13 TURN ON 14 PRESS 15 END 5 DEVELOP UNIT 1 REMOVE 3 2 3 5 4 2 REMOVE 3 INSTALL 4 FILL 5 INSTALL 10 ...
Страница 168: ...Select Direct Connection and then click Next button Select Communications Port COM1 and then click Next button 5 4 ...
Страница 169: ...Click Finish button then Virtual Modem installation is completed 5 5 ...
Страница 179: ...To make the connection ONLINE mode click button before firmware downloading 5 15 ...
Страница 194: ......
Страница 195: ...MEMO ...
Страница 196: ...MEMO ...
Страница 197: ...MEMO ...
Страница 198: ...MEMO ...
Страница 199: ...MEMO ...


