


1 - 55
ADJUSTMENT
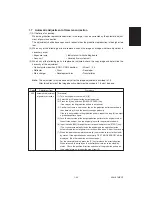
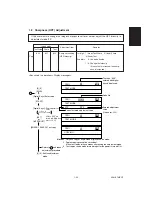
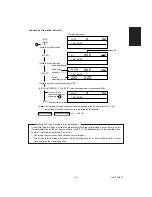
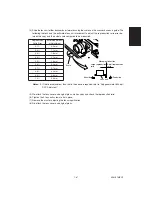
Image mode
Adjustment item
Remarks
Text/Photo
Photo
Text
Code
620
621
622
Sharpness setting
(HPF intensity)
1st digit : 1 (fixed): Text/Photo 2 (fixed): Photo
3 (fixed): Text
2nd digit :
0: Use default value
1~9: Change the intensity
(If the value is increased, the sharp-
ness is increased)
1.8
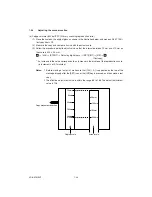
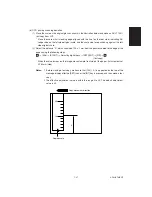
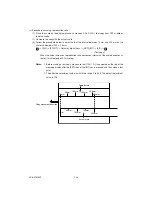
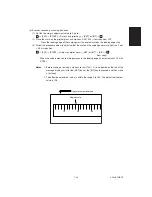
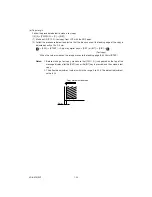
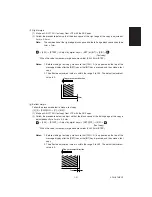
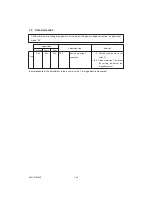
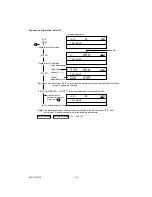
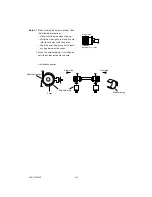
Sharpness (HPF) Adjustment
If the user wants to change the image sharpness to softer or harder, adjust the HPF intensity in
adjustment mode “05”.
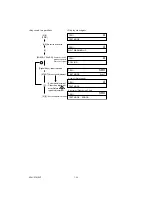
<Keys used in operation><Display messages>
100%
100%
A3
A
XXX
[0] [5]
[PWR]
[START]
[SET]
or
[INTERRUPT]
[ENERGY SAVER]: Test copy
Return to and repeat
adjustment procedure
[0] [9]
[Digital Keys]
[Digital Keys]: Enter code.
ZZZ
YYY
[C]
100%
A3
A
100%
A3
A
A3
:
Enter adjustment
value.
use to
correct value
Values “ZZZ” are
stored in BC-RAM in
place of “YYY”.
1
: Exit the adjustment
mode.
1
The code “XXX”
entered with digital
keys is displayed.
Code No.
TEST MODE
TEST MODE
TEST MODE
COPYING
Entered adjustment
value
(If no enter, YYY)
Current entered adjustment value
Notes:
1. Only one copy of single-sided originals can be made.
2. Duplex copying cannot be carried out.
Make test copies in these modes after exiting the adjustment mode.
3. Test copies can be made immediately after the power is turned ON.
Содержание AR-650
Страница 103: ...MAINTENANCE 2 6 Rear drive system 38 36 37 3 54 54 54 54 54 54 96 12 81 63 63 46 ...
Страница 104: ...2 7 MAINTENANCE ADF front sectional view 100 104 109 105 106 102 108 99 101 103 107 98 ...
Страница 118: ...SUPPLIES 3 6 9 REMOVE 1 1 2 10 REMOVE 11 TURN OVER 13 REMOVE 15 REMOVE 14 REMOVE 12 REMOVE 16 INSTALL 2 2 1 ...
Страница 119: ...3 7 SUPPLIES 18 INSTALL 2 1 19 INSTALL 2 1 20 CONNECT 21 INSTALL 2 2 2 1 22 CLOSE 1 3 2 23 INSTALL 17 CONNECT ...
Страница 122: ...SUPPLIES 3 10 13 CONNECT 15 CLOSE 2 1 14 CLOSE 1 2 16 TURN ON 17 PRESS 18 END ...
Страница 125: ...3 13 SUPPLIES 5 OPEN 2 1 6 DISCONNECT 7 REMOVE 2 1 9 8 REPLACE 2 1 9 INSTALL 1 2 10 CONNECT 11 CLOSE 1 2 12 CLOSE 2 1 ...
Страница 126: ...SUPPLIES 3 14 13 TURN ON 14 PRESS 15 END 5 DEVELOP UNIT 1 REMOVE 3 2 3 5 4 2 REMOVE 3 INSTALL 4 FILL 5 INSTALL 10 ...
Страница 168: ...Select Direct Connection and then click Next button Select Communications Port COM1 and then click Next button 5 4 ...
Страница 169: ...Click Finish button then Virtual Modem installation is completed 5 5 ...
Страница 179: ...To make the connection ONLINE mode click button before firmware downloading 5 15 ...
Страница 194: ......
Страница 195: ...MEMO ...
Страница 196: ...MEMO ...
Страница 197: ...MEMO ...
Страница 198: ...MEMO ...
Страница 199: ...MEMO ...