


ADJUSTMENT
1 - 46
1.5.3
Adjusting the scanner section
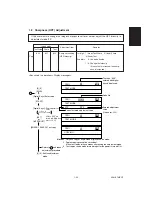
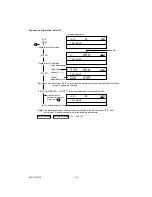
(a) Polygonal motor 600 dpi/PPC (Primary scanning reproduction ratio)
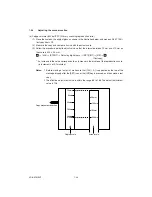
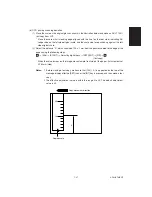
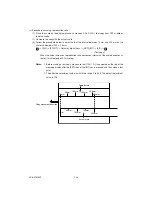
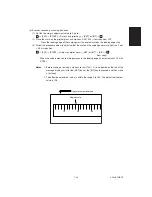
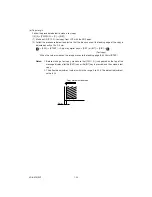
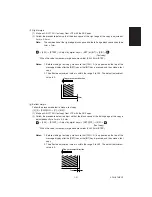
(1) Place the scale on the original glass as shown in the illustration below, and make an A4/LT 100%
test copy from LCF.
(2) Measure the copy and compare its size with the actual scale.
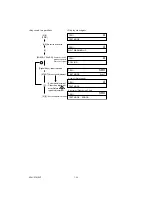
(3) Follow the procedure below to adjust value so that the interval between 10 mm and 210 mm on
the scale is 200 ± 0.5 mm.
1
→
[405]
→
[START]
→
Adjust by digital keys
→
[SET]/[INT]
→
[E/S]
→
1
(Test copy)
* An increase in the value corresponds to an increase in the division of the reproduction scale
(in increments of 0.1mm/step)
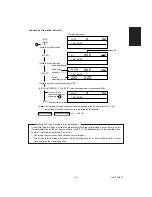
Notes:
1. Before making a test print, make sure that [100% A] is appeared on the top of the
message dispaly after the [SET] icon or the [INT] key is pressed, and then make a test
copy.
2. The effective adjustment value is within the range 86 to 168. The default adjustment
value is 128.
10mm
50mm
50mm
100mm
100mm
150mm
150mm
200mm
200mm
210mm
0mm
0mm
Copied scale
Actual scale
Copy movement direction
Содержание AR-650
Страница 103: ...MAINTENANCE 2 6 Rear drive system 38 36 37 3 54 54 54 54 54 54 96 12 81 63 63 46 ...
Страница 104: ...2 7 MAINTENANCE ADF front sectional view 100 104 109 105 106 102 108 99 101 103 107 98 ...
Страница 118: ...SUPPLIES 3 6 9 REMOVE 1 1 2 10 REMOVE 11 TURN OVER 13 REMOVE 15 REMOVE 14 REMOVE 12 REMOVE 16 INSTALL 2 2 1 ...
Страница 119: ...3 7 SUPPLIES 18 INSTALL 2 1 19 INSTALL 2 1 20 CONNECT 21 INSTALL 2 2 2 1 22 CLOSE 1 3 2 23 INSTALL 17 CONNECT ...
Страница 122: ...SUPPLIES 3 10 13 CONNECT 15 CLOSE 2 1 14 CLOSE 1 2 16 TURN ON 17 PRESS 18 END ...
Страница 125: ...3 13 SUPPLIES 5 OPEN 2 1 6 DISCONNECT 7 REMOVE 2 1 9 8 REPLACE 2 1 9 INSTALL 1 2 10 CONNECT 11 CLOSE 1 2 12 CLOSE 2 1 ...
Страница 126: ...SUPPLIES 3 14 13 TURN ON 14 PRESS 15 END 5 DEVELOP UNIT 1 REMOVE 3 2 3 5 4 2 REMOVE 3 INSTALL 4 FILL 5 INSTALL 10 ...
Страница 168: ...Select Direct Connection and then click Next button Select Communications Port COM1 and then click Next button 5 4 ...
Страница 169: ...Click Finish button then Virtual Modem installation is completed 5 5 ...
Страница 179: ...To make the connection ONLINE mode click button before firmware downloading 5 15 ...
Страница 194: ......
Страница 195: ...MEMO ...
Страница 196: ...MEMO ...
Страница 197: ...MEMO ...
Страница 198: ...MEMO ...
Страница 199: ...MEMO ...