96
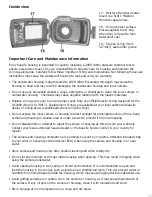
2) Gently push the O-ring down into the groove. The O-ring should be evenly seated in the groove.
3) Close the housing door to firmly seat O-ring and open housing again to inspect that O-ring is
completely seated into groove. Be careful that there are no obstructions, like the wrist strap,
trapped between the housing door and O-ring.
Great Underwater Pictures Made Easy
There are many differences between taking pictures underwater compared to taking pictures on land.
The following are some helpful tips on taking great pictures underwater.
Crystal Clear water
Crystal Clear water is essential for taking great underwater pictures. Tiny particles suspended in the
water cause low visibility and diminishes picture quality. Limit your shooting distance to 1/10 of the
water visibility. For example, if the visibility is 40 feet (12 m), keep your shooting distance to within 4
feet (1.2m). Avoid stirring up the sea floor with your fins.
When using a Sea Dragon Flash and/or photo-video lighting accessory in low visibility water, these
suspended particles may cause small spots to appear in your picture (known as “backscatter”).
Backscatter can be minimized by moving the flashhead or lighthead farther away from the camera
lens. When using the camera’s onboard flash, keep your shooting distance within 4” to 12” (10 to
30cm)
Stay close to the subject
The ideal shooting distance for sharp colorful pictures is within 6ft (2m) shooting distance, and closer
is better. The less water there is between you and the subject, the better the picture results. When
using an external flash or photo-video lighting accessory, keep in mind that light does not travel very
far underwater, so the closer you are to your subject the more colorful the pictures will be.

