background image

Advanced Features

Printing with a Linked Printer (Option) (For RZ2XX, unavailable)

56

Make necessary settings.

You can set the following functions:

• Image Processing mode
• Pencil
• Enlargement/Reduction ratio
• Scanning level

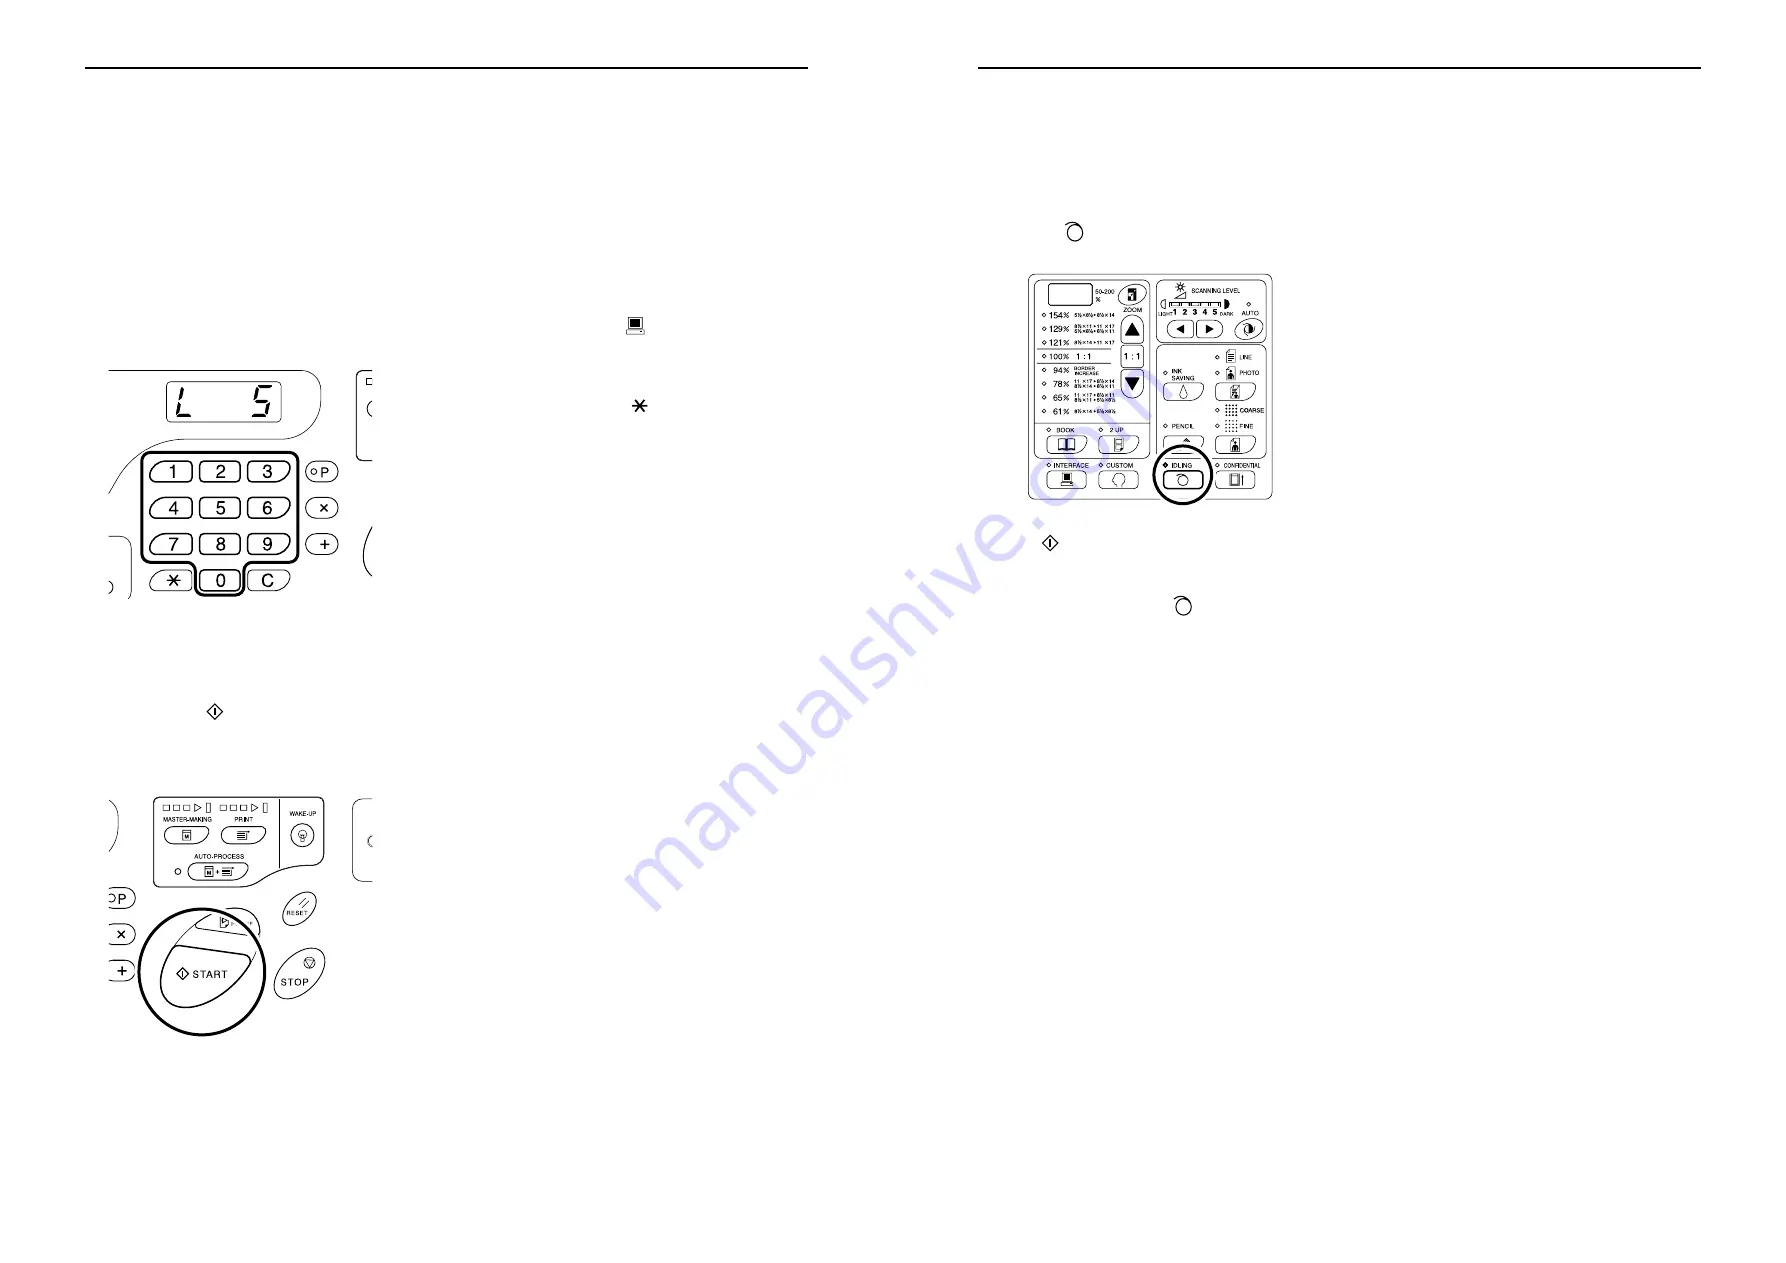
Enter the number of copies to be 
printed, using the Print Quantity 
keys.

The specified number is shown on the Print Quan-
tity Display.

Note:

• If you enter an incorrect number, press the 

[C]


key to clear the number, and then enter the cor-
rect number.

Press the 

 key.

The original is scanned and the specified number 
of copies are printed by the Linked Printer.

Important!:

• You cannot change the settings for the print 

speed, position, and density.

Note:

• If an error is shown on the Linked Printer, check 

if the preset size of paper differs from the paper 
size set on the Linked Printer.

)

p.57

• If data is received from a computer while you 

are operating the machine, that data may be 
given a higher priority for making a master. To 
give a higher priority to printing with the Linked 
Printer, press the 

 key to turn off its indica-

tor.

Tip:

• Because of the Auto Switch function, you do not 

need to press the 

[

]

 key every time. If the 

number of copies to be printed is lower than a 
certain number, the Linked Printer is automati-
cally selected for printing. If it is equal to or 
larger than the certain number, the machine is 
automatically selected for printing.
The Custom Setting mode allows you to change 
the initial setting for this Link-free volume. (Ini-
tial setting: 20 copies)

)

p.57

• Auto Switch function is not activated immedi-

ately after the power switch is on. Please wait 
for 15 to 60 seconds to move on to the next 
step. (It depends on the settings on Linked 
Printer.)

Advanced Features

Idling Action [Idling]

53

Idling Action [Idling]

Idling action prevents the machine from printing the first several copies with faint ink after the Print Cylinder(Drum) 
has been exchanged or the machine has not been used for an extended period of time. Idling action before the mas-
ter-making process assures consistent print quality from the start.

Press the 

 key to turn on its indicator.

When the indicator is on, place an original, and then 
press the 

 key. After idling is executed, the master-

making process is started.

Note:

• To clear the mode, press the 

 key again to turn off 

its indicator.

• Idling setting is not executed if the master-making 

operation is not performed.

Tip:

About Auto Idling Action 
  (For RZ2XX, unavailable)


If the machine is not operated for a specified period 
of time, the indicator is automatically lighted and 
idling action is automatically executed when the next 
master-making operation is performed.
This function is called Auto Idling Action.
The Custom Setting mode allows you to change the 
initial setting for the above Auto Idling time.

)

p.57

Riso Kagaku Technical Training Center Version

Содержание RZ200AW

Страница 1: ...Riso Kagaku Technical Training Center Version...

Страница 2: ...MEMO Riso Kagaku Technical Training Center Version...

Страница 3: ...nses resulting from the use of this product or included manuals FCC Warning For RZ390UI RZ310UI and RZ220UI Models Only This equipment has been tested and found to comply with the limits for a Class A...

Страница 4: ...navailable 34 Enlarging and Reducing Originals Enlargement Reduction 35 Enlarging and Reducing by Standard Ratios Standard 35 Enlarging and Reducing with the Zoom Function Zoom For RZ2XX unavailable 3...

Страница 5: ...navailable 34 Enlarging and Reducing Originals Enlargement Reduction 35 Enlarging and Reducing by Standard Ratios Standard 35 Enlarging and Reducing with the Zoom Function Zoom For RZ2XX unavailable 3...

Страница 6: ...nses resulting from the use of this product or included manuals FCC Warning For RZ390UI RZ310UI and RZ220UI Models Only This equipment has been tested and found to comply with the limits for a Class A...

Страница 7: ...Indicator p 50 Allows the printer to print and group copies as specified programmed printing When activated the indicator above the key lights 1 2 3 4 5 6 7 8 10 11 12 13 14 15 16 17 18 19 20 21 9 We...

Страница 8: ...White Sheet Option 18 ADF Original Release Dial Option Use to release originals fed into the ADF unit when a paper jam occurs 19 ADF Scanner Glass For RZ3XX option 20 Front Cover 21 Ink Cartridge Cap...

Страница 9: ...White Sheet Option 18 ADF Original Release Dial Option Use to release originals fed into the ADF unit when a paper jam occurs 19 ADF Scanner Glass For RZ3XX option 20 Front Cover 21 Ink Cartridge Cap...

Страница 10: ...Indicator p 50 Allows the printer to print and group copies as specified programmed printing When activated the indicator above the key lights 1 2 3 4 5 6 7 8 10 11 12 13 14 15 16 17 18 19 20 21 9 We...

Страница 11: ...ty environments Failure to do so may result in fire Important Avoid installing the machine in the locations listed below Failure to observe this precaution may lead to machine failure Locations with e...

Страница 12: ...for an original written using a pencil Each time you press the key the function is switched on and off When activated the indicator above the key lights 9 Dot Screen Selection Key Indicator For RZ2XX...

Страница 13: ...for an original written using a pencil Each time you press the key the function is switched on and off When activated the indicator above the key lights 9 Dot Screen Selection Key Indicator For RZ2XX...

Страница 14: ...ty environments Failure to do so may result in fire Important Avoid installing the machine in the locations listed below Failure to observe this precaution may lead to machine failure Locations with e...

Страница 15: ...mar gin or reverse the top and bottom of the original Then restart printing from the beginning Storing Environment Store printing paper in a level dry area Storing the paper in an excessively humid a...

Страница 16: ...en using paper whose sizes and weight are supported by the machine it may not pass through the machine depending on such factors as paper finish ambient conditions and storage conditions Keep this in...

Страница 17: ...en using paper whose sizes and weight are supported by the machine it may not pass through the machine depending on such factors as paper finish ambient conditions and storage conditions Keep this in...

Страница 18: ...mar gin or reverse the top and bottom of the original Then restart printing from the beginning Storing Environment Store printing paper in a level dry area Storing the paper in an excessively humid a...

Страница 19: ...ze of the original Bound originals can also be used on the Stage Glass You can feed automatically up to 50 original sheets when using the optional ADF Automatic Document Feeder unit Note Use the Stage...

Страница 20: ...2mm RZ370 117 16 161 4 291mm 413mm RZ310 81 4 117 16 210mm 290mm RZ230 97 8 141 16 251mm 357mm RZ220 81 4 141 16 210mm 357mm RZ200 81 4 117 16 210mm 290mm Before Starting to Use Preparing to Print 19...

Страница 21: ...2mm RZ370 117 16 161 4 291mm 413mm RZ310 81 4 117 16 210mm 290mm RZ230 97 8 141 16 251mm 357mm RZ220 81 4 141 16 210mm 357mm RZ200 81 4 117 16 210mm 290mm Before Starting to Use Preparing to Print 19...

Страница 22: ...ze of the original Bound originals can also be used on the Stage Glass You can feed automatically up to 50 original sheets when using the optional ADF Automatic Document Feeder unit Note Use the Stage...

Страница 23: ...entangled Do not place heavy objects on the machine The objects might fall and cause injury Contact your service representative before moving the machine BCaution Do not open any covers or move the ma...

Страница 24: ...er than B4 Set to Legal Letter Statement or A4 B5 z For thick paper Set to Before Starting to Use Preparing to Print 23 Note When closing the Paper Receiving Tray first slide the Paper Stopper to the...

Страница 25: ...er than B4 Set to Legal Letter Statement or A4 B5 z For thick paper Set to Before Starting to Use Preparing to Print 23 Note When closing the Paper Receiving Tray first slide the Paper Stopper to the...

Страница 26: ...entangled Do not place heavy objects on the machine The objects might fall and cause injury Contact your service representative before moving the machine BCaution Do not open any covers or move the ma...

Страница 27: ...te You can change the settings for print position and density After changing the settings press and then check the proof copy result p 46 p 49 7 Press the key again The specified number of copies is p...

Страница 28: ...ey is lighted Press the key to wake up the machine Note If data is received from a computer while the machine is being operated that data may be given a higher priority for making a master To give a h...

Страница 29: ...ey is lighted Press the key to wake up the machine Note If data is received from a computer while the machine is being operated that data may be given a higher priority for making a master To give a h...

Страница 30: ...te You can change the settings for print position and density After changing the settings press and then check the proof copy result p 46 p 49 7 Press the key again The specified number of copies is p...

Страница 31: ...lows you to change the initial setting for the Image Processing mode p 57 Mode Type of Originals Line Only text contained e g word processing file printout newspaper Photo Only photos contained Duo Bo...

Страница 32: ...r Note You can also use the printer driver to stop the master making or printing process at any point For details see the User s Guide of the printer driver By checking which Progress Arrow segments l...

Страница 33: ...r Note You can also use the printer driver to stop the master making or printing process at any point For details see the User s Guide of the printer driver By checking which Progress Arrow segments l...

Страница 34: ...lows you to change the initial setting for the Image Processing mode p 57 Mode Type of Originals Line Only text contained e g word processing file printout newspaper Photo Only photos contained Duo Bo...

Страница 35: ...s the key or the key Setting up for Scanning Originals Scanning Originals Written with Pencils Pencil For RZ2XX unavailable 33 Scanning Originals Written with Pencils Pencil For RZ2XX unavailable This...

Страница 36: ...ther Mode Equivalent Lpi COARSE 53 FINE 106 Setting up for Scanning Originals Enlarging and Reducing Originals Enlargement Reduction 35 Enlarging and Reducing Originals Enlargement Reduction You can e...

Страница 37: ...ther Mode Equivalent Lpi COARSE 53 FINE 106 Setting up for Scanning Originals Enlarging and Reducing Originals Enlargement Reduction 35 Enlarging and Reducing Originals Enlargement Reduction You can e...

Страница 38: ...s the key or the key Setting up for Scanning Originals Scanning Originals Written with Pencils Pencil For RZ2XX unavailable 33 Scanning Originals Written with Pencils Pencil For RZ2XX unavailable This...

Страница 39: ...ntents Scanning Level Adjustment You can adjust the scanning level according to the density of text and images on originals With Auto selected the density of originals is pre scanned and the optimum s...

Страница 40: ...cator Note To clear the setting press the key again to turn off its indicator Setting up for Scanning Originals Printing Originals Side by Side 2 Up Printing 39 Printing Originals Side by Side 2 Up P...

Страница 41: ...cator Note To clear the setting press the key again to turn off its indicator Setting up for Scanning Originals Printing Originals Side by Side 2 Up Printing 39 Printing Originals Side by Side 2 Up P...

Страница 42: ...ntents Scanning Level Adjustment You can adjust the scanning level according to the density of text and images on originals With Auto selected the density of originals is pre scanned and the optimum s...

Страница 43: ...hat Auto Process is always set to ON when you reset or start the machine p 57 Setting up for Scanning Originals Printing Originals Side by Side 2 Up Printing 41 Paper orientation Before printing check...

Страница 44: ...stom Setting mode you can complete 2 Up printing by pressing the key only once p 57 z Two original printing Press the key to start the first scan After the scan a interval time alarm sounds Before the...

Страница 45: ...stom Setting mode you can complete 2 Up printing by pressing the key only once p 57 z Two original printing Press the key to start the first scan After the scan a interval time alarm sounds Before the...

Страница 46: ...hat Auto Process is always set to ON when you reset or start the machine p 57 Setting up for Scanning Originals Printing Originals Side by Side 2 Up Printing 41 Paper orientation Before printing check...

Страница 47: ...2 Turn the Horizontal Print Position Adjustment Dial beside the Paper Feed Tray to adjust the horizontal position Turn the dial upward to shift the print position to the left and turn the dial downwa...

Страница 48: ...y Print Density Adjustment For RZ2XX unavailable 47 Adjusting the Print Density Print Density Adjustment For RZ2XX unavailable You can select the print density from five levels Press the keys under to...

Страница 49: ...y Print Density Adjustment For RZ2XX unavailable 47 Adjusting the Print Density Print Density Adjustment For RZ2XX unavailable You can select the print density from five levels Press the keys under to...

Страница 50: ...2 Turn the Horizontal Print Position Adjustment Dial beside the Paper Feed Tray to adjust the horizontal position Turn the dial upward to shift the print position to the left and turn the dial downwa...

Страница 51: ...is finished for all groups the pro grammed content is cleared However it is not cleared when Auto Process has been set to ON Note Printing is stopped each time a routine for one set is finished If yo...

Страница 52: ...ed Printing 51 1 Press the P key to turn on its indi cator The print quantity entry mode is started Note To clear the mode press the P key again to turn off its indicator If the mode is quitted the se...

Страница 53: ...ed Printing 51 1 Press the P key to turn on its indi cator The print quantity entry mode is started Note To clear the mode press the P key again to turn off its indicator If the mode is quitted the se...

Страница 54: ...is finished for all groups the pro grammed content is cleared However it is not cleared when Auto Process has been set to ON Note Printing is stopped each time a routine for one set is finished If yo...

Страница 55: ...n number the machine is automatically selected for printing The Custom Setting mode allows you to change the initial setting for this Link free volume Ini tial setting 20 copies p 57 Auto Switch funct...

Страница 56: ...onnecting a Linked Printer consult your dealer Using a Linked Printer needs some settings to be made p 63 Only a single preset size of paper can be output from the tray of a Linked Printer The Custom...

Страница 57: ...onnecting a Linked Printer consult your dealer Using a Linked Printer needs some settings to be made p 63 Only a single preset size of paper can be output from the tray of a Linked Printer The Custom...

Страница 58: ...n number the machine is automatically selected for printing The Custom Setting mode allows you to change the initial setting for this Link free volume Ini tial setting 20 copies p 57 Auto Switch funct...

Страница 59: ...tween the machine and a Linked Printer p 65 99 Initial Setting Restoration Resets all Custom Setting mode settings to the initial settings factory default Item No Changeable Items Parameter Selection...

Страница 60: ...ies 20 copies 30 copies 40 copies 50 copies Item No Changeable Items Parameter Selection 0 1 2 3 4 5 Advanced Features Customizing the Initial Settings Custom Setting Mode 59 15 Beep sound Specify how...

Страница 61: ...ies 20 copies 30 copies 40 copies 50 copies Item No Changeable Items Parameter Selection 0 1 2 3 4 5 Advanced Features Customizing the Initial Settings Custom Setting Mode 59 15 Beep sound Specify how...

Страница 62: ...tween the machine and a Linked Printer p 65 99 Initial Setting Restoration Resets all Custom Setting mode settings to the initial settings factory default Item No Changeable Items Parameter Selection...

Страница 63: ...the Print Quantity keys The Print Quantity Display shows the current parameter setting for the selected item number Note For items No 70 through 72 the operation pro cedures differ Item No 70 and 71 p...

Страница 64: ...Note To clear the operation press the key again to turn off its indicator 2 Enter an item number using the Print Quantity keys The item numbers are as follows IP address for the machine 70 IP address...

Страница 65: ...Note To clear the operation press the key again to turn off its indicator 2 Enter an item number using the Print Quantity keys The item numbers are as follows IP address for the machine 70 IP address...

Страница 66: ...the Print Quantity keys The Print Quantity Display shows the current parameter setting for the selected item number Note For items No 70 through 72 the operation pro cedures differ Item No 70 and 71 p...

Страница 67: ...Unit Cover Grasp the Master Making Unit Cover Lever and open the Master Making Unit Cover 5 Open the Master Roll Holder Advanced Features Customizing the Initial Settings Custom Setting Mode 65 Setti...

Страница 68: ...Turn the Ink Cartridge counterclockwise and then pull it out Unlock 3 Remove the cap from a new Ink Car tridge Turn the cap of the Ink Cartridge to remove the cap Important Do not touch or give impact...

Страница 69: ...Turn the Ink Cartridge counterclockwise and then pull it out Unlock 3 Remove the cap from a new Ink Car tridge Turn the cap of the Ink Cartridge to remove the cap Important Do not touch or give impact...

Страница 70: ...Unit Cover Grasp the Master Making Unit Cover Lever and open the Master Making Unit Cover 5 Open the Master Roll Holder Advanced Features Customizing the Initial Settings Custom Setting Mode 65 Setti...

Страница 71: ...erial paper Master material plastic Japanese paper Material of the cut out component plastic metal included and paper Ejected Master Master material plastic Japanese paper Ink material petroleum hydro...

Страница 72: ...r return the Master Making Unit to the original position and then close the Front Cover Replacing and Disposing Consumables Emptying the Master Disposal Box 71 Emptying the Master Disposal Box 1 Pull...

Страница 73: ...r return the Master Making Unit to the original position and then close the Front Cover Replacing and Disposing Consumables Emptying the Master Disposal Box 71 Emptying the Master Disposal Box 1 Pull...

Страница 74: ...erial paper Master material plastic Japanese paper Material of the cut out component plastic metal included and paper Ejected Master Master material plastic Japanese paper Ink material petroleum hydro...

Страница 75: ...nt Cylinder Drum When replacing with a color cylinder drum or dealing with paper jams remove the Print Cylinder Drum take a nec essary procedure and then install the cylinder drum Important Make sure...

Страница 76: ...ative to the guide Note If you manually rotate the Print Cylinder Drum make sure to rotate it so that the and marks meet shown as below after the installa tion 6 Return the units to the original posi...

Страница 77: ...ative to the guide Note If you manually rotate the Print Cylinder Drum make sure to rotate it so that the and marks meet shown as below after the installa tion 6 Return the units to the original posi...

Страница 78: ...nt Cylinder Drum When replacing with a color cylinder drum or dealing with paper jams remove the Print Cylinder Drum take a nec essary procedure and then install the cylinder drum Important Make sure...

Страница 79: ...s small and lights up when the entire master is consumed z Empty Disposal Box Indicator Lights when the Master Disposal Box is full z Replace Ink Cartridge Indicator Blinks when the remaining ink quan...

Страница 80: ...iodically with a soft cloth If using cleanser use an appropriate one recommended by your authorized service representative BCaution Because the machine exterior is plastic never use alcohol or solvent...

Страница 81: ...iodically with a soft cloth If using cleanser use an appropriate one recommended by your authorized service representative BCaution Because the machine exterior is plastic never use alcohol or solvent...

Страница 82: ...s small and lights up when the entire master is consumed z Empty Disposal Box Indicator Lights when the Master Disposal Box is full z Replace Ink Cartridge Indicator Blinks when the remaining ink quan...

Страница 83: ...rocedures Location No Error No Cause Action 1 A 06 Any obstacle exists under the Paper Feed Tray or on paper Check if any obstacle exists under the Paper Feed Tray or on paper If an obstacle exists re...

Страница 84: ...Drum 1 Pull out the Print Cylinder Drum p 73 2 If you find jammed paper remove it BCaution When putting your hand into the machine to remove paper do not touch the paper separation hook The sharp tip...

Страница 85: ...Drum 1 Pull out the Print Cylinder Drum p 73 2 If you find jammed paper remove it BCaution When putting your hand into the machine to remove paper do not touch the paper separation hook The sharp tip...

Страница 86: ...rocedures Location No Error No Cause Action 1 A 06 Any obstacle exists under the Paper Feed Tray or on paper Check if any obstacle exists under the Paper Feed Tray or on paper If an obstacle exists re...

Страница 87: ...stment to optimize the print density depending on the master 1 light 5 dark H6 Sample copy density adjustment master Perform adjustment for the print density for sample copy depending on the master Th...

Страница 88: ...r quit the Book shadow editing p 38 9 b 01 A card has not been set to the Key Card Counter option Set a card to the Key Card Counter Location No Error No Cause Action Troubleshooting Check Error Displ...

Страница 89: ...r quit the Book shadow editing p 38 9 b 01 A card has not been set to the Key Card Counter option Set a card to the Key Card Counter Location No Error No Cause Action Troubleshooting Check Error Displ...

Страница 90: ...stment to optimize the print density depending on the master 1 light 5 dark H6 Sample copy density adjustment master Perform adjustment for the print density for sample copy depending on the master Th...

Страница 91: ...rased central shadow is too narrow Using the Custom Setting mode set the Width of central shadow for Book shadow editing again p 57 Vertical blank lines are found on printed copies The Thermal Print H...

Страница 92: ...Troubleshooting Troubleshooting Tips 91 An error indication does not disappear even though consumables ink master roll are set The consumables ink master roll have not been correctly set After insert...

Страница 93: ...Troubleshooting Troubleshooting Tips 91 An error indication does not disappear even though consumables ink master roll are set The consumables ink master roll have not been correctly set After insert...

Страница 94: ...rased central shadow is too narrow Using the Custom Setting mode set the Width of central shadow for Book shadow editing again p 57 Vertical blank lines are found on printed copies The Thermal Print H...

Страница 95: ...n Or attach tape as described below to solve the problem When printing thick paper such as cards corners of the paper contacted and damaged the master Make another master and print with the new master...

Страница 96: ...o the size and thickness of paper p 21 The Paper Arrangers are not properly set For RZ2XX unavailable Set the Paper Arrangers properly p 21 The corrugators are not properly set For RZ3XX unavailable S...

Страница 97: ...o the size and thickness of paper p 21 The Paper Arrangers are not properly set For RZ2XX unavailable Set the Paper Arrangers properly p 21 The corrugators are not properly set For RZ3XX unavailable S...

Страница 98: ...n Or attach tape as described below to solve the problem When printing thick paper such as cards corners of the paper contacted and damaged the master Make another master and print with the new master...

Страница 99: ...duction ratio Printing Area max 117 16 161 4 291mm 413mm Print Reproduction Ratio Zoom 50 200 Standard reproduction ratio enlargement 141 122 116 Standard reproduction ratio reduction 94 87 82 71 Prin...

Страница 100: ...or less sheet Original Size max min When using the Stage Glass 115 16 39 16 50mm 90mm 1111 16 17 297mm 432mm When using the ADF unit option 39 16 51 2 90mm 140mm 1111 16 17 297mm 432mm Original Paper...

Страница 101: ...or less sheet Original Size max min When using the Stage Glass 115 16 39 16 50mm 90mm 1111 16 17 297mm 432mm When using the ADF unit option 39 16 51 2 90mm 140mm 1111 16 17 297mm 432mm Original Paper...

Страница 102: ...duction ratio Printing Area max 117 16 161 4 291mm 413mm Print Reproduction Ratio Zoom 50 200 Standard reproduction ratio enlargement 141 122 116 Standard reproduction ratio reduction 94 87 82 71 Prin...

Страница 103: ...age 301 2 W 253 8 D 26 H 775mm W 645mm D 660mm H Weight Approx 210lb 95 kg Appendixes Specifications 101 RISO RZ310 Note The specifications are subject to change without prior notice Master making pri...

Страница 104: ...D 660mm H When in storage 301 2 W 253 8 D 26 H 775mm W 645mm D 660mm H Weight Approx 210lb 95 kg Appendixes Specifications 103 RISO RZ220 Note The specifications are subject to change without prior n...

Страница 105: ...D 660mm H When in storage 301 2 W 253 8 D 26 H 775mm W 645mm D 660mm H Weight Approx 210lb 95 kg Appendixes Specifications 103 RISO RZ220 Note The specifications are subject to change without prior n...

Страница 106: ...age 301 2 W 253 8 D 26 H 775mm W 645mm D 660mm H Weight Approx 210lb 95 kg Appendixes Specifications 101 RISO RZ310 Note The specifications are subject to change without prior notice Master making pri...

Страница 107: ...ub Control Panel 10 T Troubleshooting 80 Troubleshooting Tips 90 Two original side by side Printing 39 V Vertical Position 48 W Wake up Key 8 White Sheet 79 Z Zoom Key 10 36 Zoom Ratio 36 Appendixes F...

Страница 108: ...Installation 12 Interface Indicator 11 30 56 Interface Key 11 30 56 Introduction to Machine 6 IP Address 60 63 J Jam Indicator 80 Job Separation 59 Job Separator IV 98 K Key Card Counter V 98 L Line...

Страница 109: ...Installation 12 Interface Indicator 11 30 56 Interface Key 11 30 56 Introduction to Machine 6 IP Address 60 63 J Jam Indicator 80 Job Separation 59 Job Separator IV 98 K Key Card Counter V 98 L Line...

Страница 110: ...ub Control Panel 10 T Troubleshooting 80 Troubleshooting Tips 90 Two original side by side Printing 39 V Vertical Position 48 W Wake up Key 8 White Sheet 79 Z Zoom Key 10 36 Zoom Ratio 36 Appendixes F...

Страница 111: ...MEMO Riso Kagaku Technical Training Center Version...

Страница 112: ...Riso Kagaku Technical Training Center Version...

Отзывы: