24
7.14
Freeze protection (when used)
9
WARNING
: NEVER use automotive or standard glycol
antifreeze, even ethylene glycol made for hydronic systems.
Use only glycol fluids certified by a glycol manufacturer
as suitable for use with stainless steel, verified in glycol
manufacturer’s literature.
Throroughly clean and flush any system that has used glycol
before installing the new Family PRO boiler. Provide the
Family PRO boiler owner with a material safety data sheet
(MSDS) on the glycol used (if requested).
− Determine glycol fluid quantity using total system water
content, following the glycol manufacturer’s instructions.
Remember to include expansion tank water content.
− Local codes may require a backflow preventer or actual
disconnect from city water supply.
7.15
Casing removal
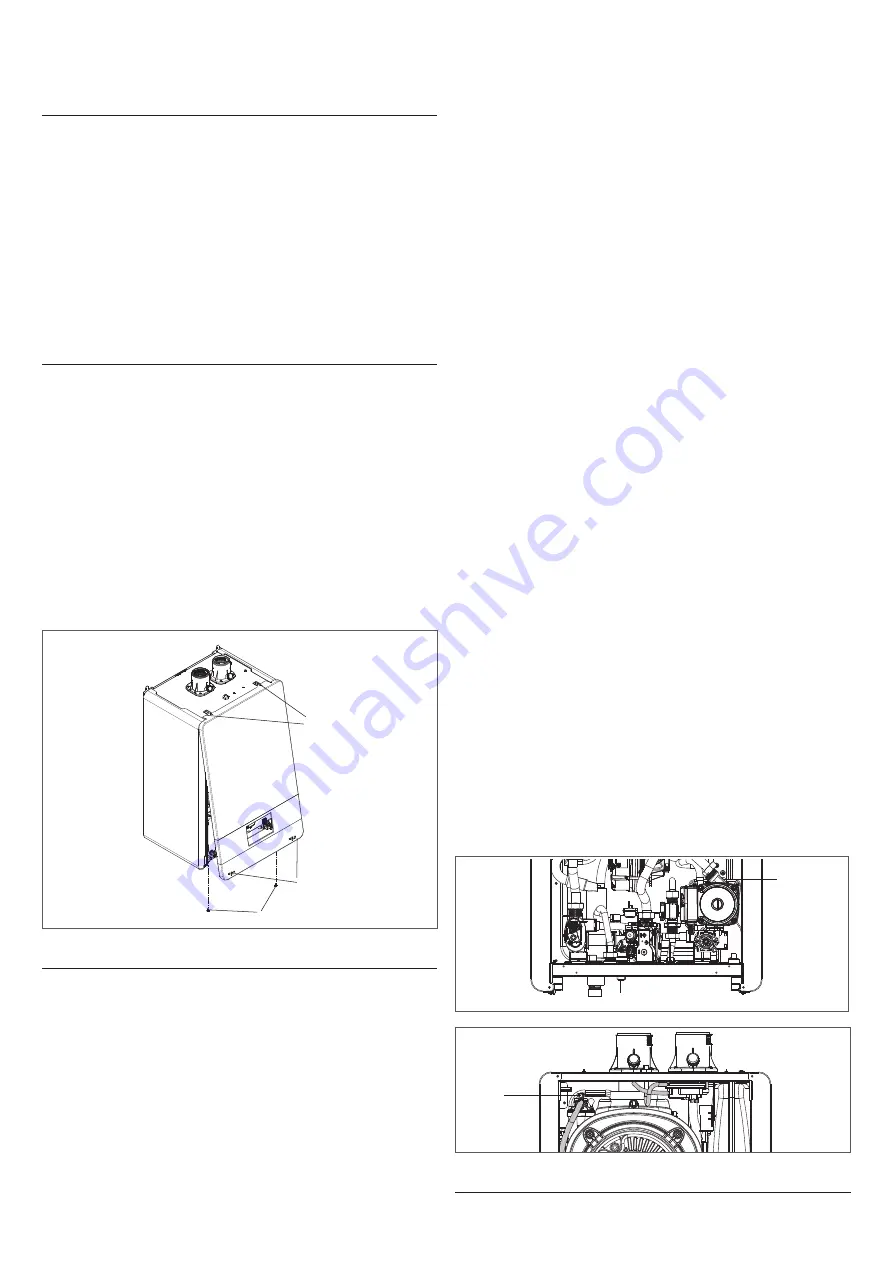
To access the components inside, remove the casing as
indicated below:
- locate and unscrew the 2 screws (A - figure beside ) that
fix the casing to the boiler
- by leveraging the fixing clips (C), unhinge the lower part
of the casing
- lift the casing upwards to release it from the top tabs
(B), then remove it.
NOTICE
: If the side panels have been removed, reassemble them
in the initial position by referring to the adhesive labels on the
side walls.
NOTICE
: If the front panel has been permanently removed it must
be replaced.
NOTICE
: The noise absorbing panels inside the front and side
walls ensure an airtight seal for the air supply duct.
NOTICE
: It is therefore ESSENTIAL, after removing any of the casing,
to correctly reposition the panels to ensure limited air leakage.
C
B
A
7.16
Initial filling of the system and air purge
NOTE:
The initial filling of the system and each later refill must be
done with the electrical supply ON and the boiler in OFF mode.
NOTE:
Whenever the boiler is electrically powered, the automatic
venting cycle starts.
Once the hydraulic connections have been carried out, fill the
heating system.
- For existing systems, the entirety of the system mush be
drained and flushed with a pH neutral solution.
- See the Application Guide (available on HVAC Partners) for
system piping recommendations.
- Follow all local codes and regulations for installation and
piping of boiler.
This operation must be carried out when the system is cold by
following the steps below:
− Ensure both supply and return service valves are open.
− Open the cap of the automatic air vent valve (A) by two or
three turns to allow a continuous venting of the air, leave the
plug of the valve (A) open permanently with the operation of
the boiler.
− Connect the supplied silicone tube to the manual air vent
valve (D) and take a bin to collect the water that eventually
comes out after the air purge.
− Open the manual air vent valve (D).
9
WARNING
: Frontal water flushing can occur and cause
instant severe burns or death from scalds while acting on
the manual air vent valve of the heat exchanger. Act on this
valve only if the system is cold.
− Make sure the cold water inlet tap is open.
− Open the filling tap (B).
− Switch on the electrical power supply to the boiler leaving it
in OFF mode.
− Wait until only water comes out continuously from the manual
air vent valve, close the valve (D).
− Check the pressure value on the screen: when the pressure
indicated by the sensor is between 15-21 psi (1-1.5 bar) close
the filling tap (B).
− Switch off and (after few seconds) switch on the electrical
power supply and leave the boiler in OFF mode for starting
the venting cycle.
NOTE:
see section “11.7.1 Boiler configuration”.
− Begin venting all manual air vents in the system, starting at
the lowest first. It may be necessary to go back and add water
to the system to increase the pressure until the entire system
has been filled.
− Check the operation of the pressure relief valve by lifting the
lever from the seat. Purge air through this valve by keeping
open until only water comes out.
− Be sure boiler is in “OFF” mode. Open hot water tap(s) to
remove air from the DHW circuit. Keep open until only water
exits the tap to ensure the air is removed.
− Inspect the system for leaks, fixing any if found.
After the bleeding cycle the boiler is ready to operate.
If there is still air present during operation, repeat the bleeding
cycle.
9
WARNING
: Eliminate all system leaks. Continual fresh
makeup water will reduce boiler life. Minerals can build up
in the heat exchanger, reducing heat transfer, overheating
heat exchanger, and causing heat exchanger failure.
The system may have residual substances that could affect water
chemistry. After the system has been filled and leak tested,
verify water pH and chlorine/chloramines concentrations are
acceptable (see section “7.13 Check/control water chemistry”
9
CAUTION
: It is important that you purge the system of air to
avoid damage to the boiler
B
A
D
7.17
Refill of the system
When the system needs to be refilled and an air purge is not
Содержание Family PRO 42 IS
Страница 75: ...75 ...


