PART VI HOW TO REPLACE THE PARTS
6-1
ENGLISH
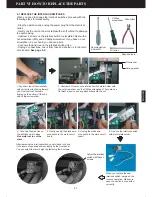
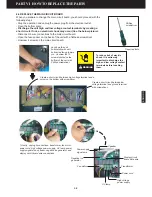
6.1 REPLACE THE INTERLOCK SWITCHES
When you need to change the interlock switches, proceed with the
following steps for disassembly.
- Stop the operation and unplug the power plug from the electrical
outlet.
- Gently, lay the unit on the work table with a soft mat not to damage
the outer casing.
- Unscrew 2 screws on the interlock switch metal plate holder with a
nut screwdriver (M3) and a Phillips screwdriver. If you have no nut
screwdriver on your hand, you can use pliers.
- Cut down the wire ties on the interlock switch wires.
- Unplug 2 connections, one is from fuse and another is to the main
circuit board.
See page 3-2.
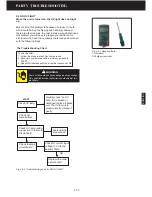
Required tools
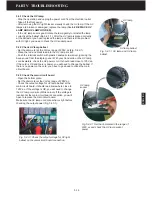
1. Lay down the unit horizontally
with unit bottom led facing toward
you. Unscrew the 10 screws
located on the bottom of the unit
with Phillips screwdriver.
2. Unscrew 2 screws on the interlock switch metal holder with
the nut screwdriver and the Phillips screwdriver. There are one
flat washer and one spring washer beneath the nut.
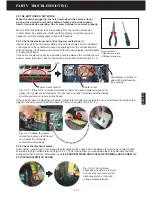
3. Cut down the wire ties on
the interlock switch wires.
Be careful not to cut the
wires.
4. Gently unplug the black wire
connection to the main circuit
board.
5. Unplug the white wire
connection to the main circuit
board.
6. Remove the interlock switch
with metal plate holder.
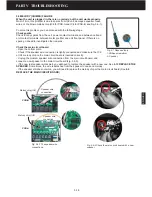
After replacing the interlock switch, you will have to check
if the levers are pushed down correctly by the front panel.
You can adjust the lever height by fastening the 2 screws.
Adjust the interlock
switch with these 2
screws.
Phillips
screwdriver
Nut screwdriver
5.5mm/ M3
Wire cutter
Wire ties
Flat washer
Spring washer
When you replace the new
interlock switch, simply do the
reverse operation. Make sure
each connection is connected
correctly.
Содержание R200T
Страница 69: ...ENGLISH NOTES ...

