background image

Chapter 4 — Printing from the Mac OS

54

8.

Click on the Options button to continue reviewing the 
document’s settings.

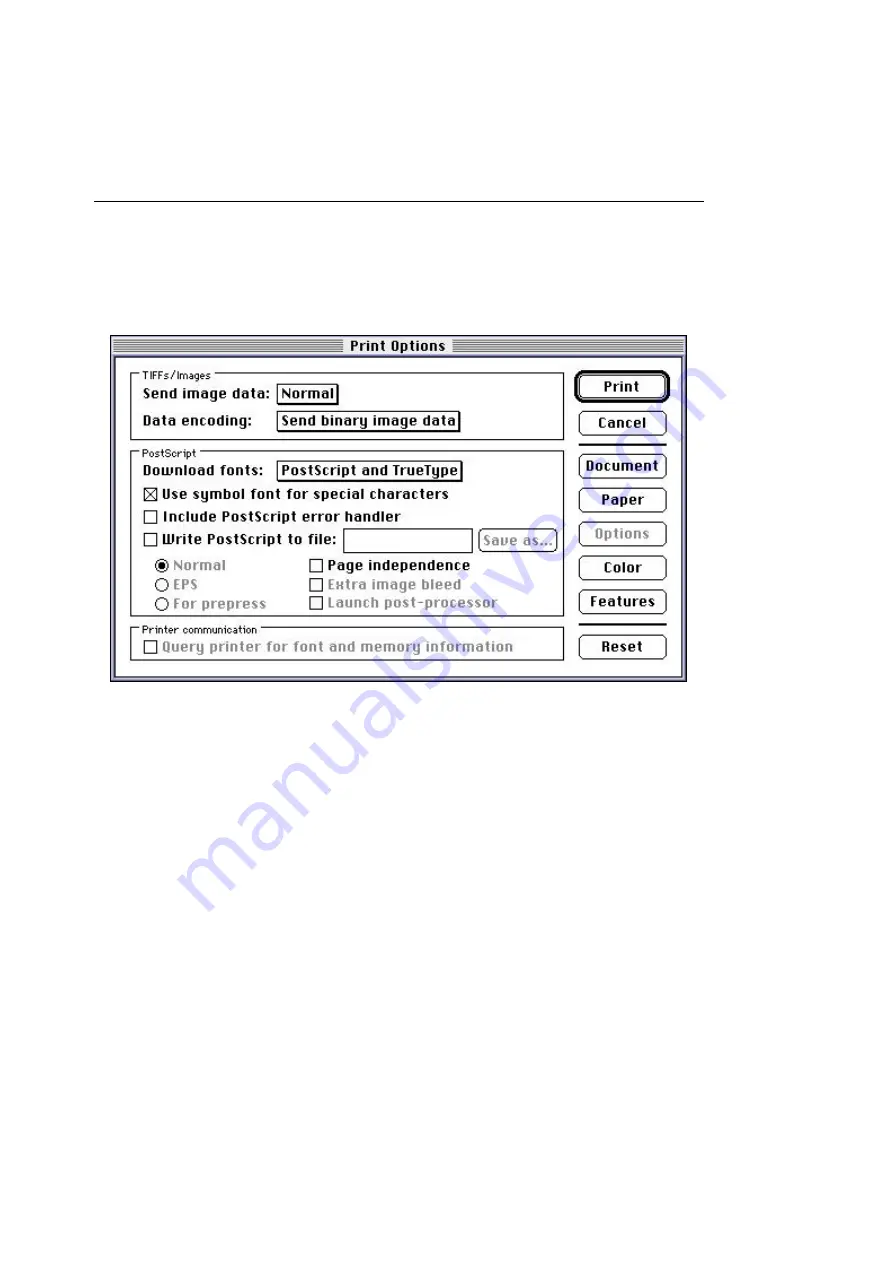
The Print Options window displays, similar to the one 
shown in Figure 4-13.

Figure 4-13  Adobe PageMaker 6.0 Print Options Window

9.

Verify that the settings in the Print Options window 
match your intended output:

• TIFF and image handling

• PostScript handling

• Printer communication

Содержание ColorScript 310

Страница 1: ...ColorScript 310 330 Printer User s Guide...

Страница 2: ...This page is intentionally left blank...

Страница 3: ...ColorScript 310 330 Printer User s Guide Revision 1 1 March 1997...

Страница 4: ...This page is intentionally left blank...

Страница 5: ...oto realistic 24 bit 300 dpi color prints from a variety of Macintosh Windows 3 1 and Windows 95 applications The ColorScript 310 330 is a dye sublimation thermal transfer printer It operates by evapo...

Страница 6: ...l external hard disk drives Connectivity using LocalTalk Thinnet Ethernet 10Base T Ethernet Parallel and SCSI interfaces Intended Audience This User s Guide is for pre press and graphic design profess...

Страница 7: ...om the Mac OS This chapter describes the installation of the ColorScript 310 330 printer software and printing from some of the more popular graphics and page layout applications for the Macintosh Ope...

Страница 8: ...Maintaining and Troubleshooting Your Printer This chapter includes instructions for cleaning and servicing the printer explanations of printer controls and indicators and a troubleshooting section de...

Страница 9: ...Connecting the Power Cord 8 Connecting the Printer Cable 9 Non SCSI Connections 11 SCSI Connections 13 Switching the Printer On 18 Chapter 2 Loading Paper and Film Loading a Stack of Paper or Film 22...

Страница 10: ...Printing from Windows Setting Up the Printer 73 Installing Windows 3 1 Printer Software 74 Setting Up the Printer in Windows 95 79 Calibrating Color 87 Printing from Various Applications 88 Adobe Ill...

Страница 11: ...inter 147 Cleaning the Thermal Print Head 148 Servicing the Printer 148 Understanding the Printer Controls and Indicators 149 Status Indicator LEDs 149 LCD Messages 151 Keypad Controls 152 Verifying P...

Страница 12: ...Table of Contents x This page is intentionally left blank...

Страница 13: ...nter Connectors 9 Figure 1 7 Printer Cable Connections 10 Figure 1 8 Connecting the 50 pin HD SCSI Cable to the SCSI Printing Port 16 Figure 2 1 Removing the Paper Cassette 22 Figure 2 2 Paper Cassett...

Страница 14: ...ndow 53 Figure 4 13 Adobe PageMaker 6 0 Print Options Window 54 Figure 4 14 Adobe PageMaker 6 0 Print Color Window 55 Figure 4 15 Adobe Photoshop 3 0 5 Page Setup Window 57 Figure 4 16 Adobe Photoshop...

Страница 15: ...22 Corel Draw 6 0 Printer Properties Window 112 Figure 5 23 Corel Draw 6 0 Layout Tab in the Print Options Window 113 Figure 5 24 Corel Draw 6 0 Separations Tab in the Print Options Window 114 Figure...

Страница 16: ...List of Figures xiv This page is intentionally left blank...

Страница 17: ...particularly near air conditioning ducts Provide at least two inches of clearance between the printer and walls or cabinets NOTE The ColorScript 310 330 printer is designed for use in a normal office...

Страница 18: ...ake time to carefully read and follow all steps in this chapter To unpack the ColorScript 310 330 printer 1 Remove the various accessories and packaging materials from the shipping carton Remove the t...

Страница 19: ...or your computer See Connecting the Printer Cable on Page 9 to determine what type of printer cable to use 2 With a partner carefully lift the printer from its box onto a suitable table or desk Cardbo...

Страница 20: ...pad the paper cassette during shipping Refer to Chapter 2 Loading Paper and Film for detailed instructions on opening the paper cassette 4 Remove all packing materials from the printer Pull the print...

Страница 21: ...bbon Cover Paper Paper Jam Out Open Out Keypad Buttons Menu Select Reprint Printer Cover LED Indicators Paper Feed Door Paper Cassette Power Switch LCD Printer Cover Switch Thinnet Ethernet 36 pin Par...

Страница 22: ...per Cassette Parts Metal Flanges Side Rail Lock Side Rail Paper Tray Metal Lift Plate Plastic Paper Guide Paper Stop Paper Cassette Cover Metal Paper Guide Media Detect Switch Paper Stop Plastic Paper...

Страница 23: ...for your country The voltage switch is recessed into the printer s rear cover directly above the AC power receptacle If you need to change the voltage settings use a flat bladed screwdriver to flip t...

Страница 24: ...ity does not provide three wire grounded power receptacles the power outlet should be upgraded to a three pronged grounded outlet Do not use a two pronged grounding adapter to plug your printer into a...

Страница 25: ...cable Thinnet Ethernet Coaxial cable 10Base T Ethernet Category 5 cable Parallel PC parallel port cable 50 pin High density SCSI SCSI 2 cable Figure 1 6 Typical Printer Connectors NOTE The large 50 p...

Страница 26: ...rinting through special Raster mode SCSI printer drivers When using the SCSI printer driver you can speed up printing from Raster bitmap applications like Adobe Photoshop by printing to the ColorScrip...

Страница 27: ...tem administrator if you are not sure which type of cable you need To connect your ColorScript 310 330 printer to your computer or network 1 Verify that your printer and computer are both turned off 2...

Страница 28: ...Chapter 1 Installing Your Printer 12 LocalTalk network wiring You can still attach your ColorScript 310 330 printer to your computer and your LocalTalk network consult your computer s...

Страница 29: ...dobe Photoshop support SCSI printing through special Raster mode SCSI printer drivers When using the SCSI printer driver you can speed up printing from Raster bitmap applications like Adobe Photoshop...

Страница 30: ...I port on your computer Refer to your computer documentation or SCSI adapter documentation if you are not sure which type of cable you need To connect your ColorScript 310 330 printer to your computer...

Страница 31: ...r SCSI adapter to identify the SCSI addresses used in your computer Your computer documentation or your SCSI adapter documentation will have details about any included utility software Table 1 2 SCSI...

Страница 32: ...evices attached to your computer than to change the SCSI ID of the printer s SCSI input port 4 Verify that your computer printer and any other connected SCSI devices are turned off 5 Plug the 50 pin H...

Страница 33: ...the SCSI chain NOTE The SCSI port on Macintosh computers is marked with a symbol NOTE The SCSI port on most PCs is on an add on card It may be marked with the acronym SCSI 7 Switch on the ColorScript...

Страница 34: ...isplays in the LCD 2 Press the Select button to toggle between PS for PostScript mode and RAST for Raster mode 3 Once you ve selected PostScript mode wait for the LCD to return to Ready Switching the...

Страница 35: ...plays a series of start up messages When the start up sequence finishes the LCD reads READY MEDIA SIZE RIBBON TYPE INTERPRETER TYPE Media sizes include A5 A4 A and Super A for the ColorScript 310 prin...

Страница 36: ...s lit and Replace Ribbon displays in the LCD follow the ribbon loading instructions in Chapter 3 Changing Printer Ribbons If the Paper Out icon remains lit and Replace Paper displays in the LCD follow...

Страница 37: ...Switching the Printer On 21 This page is intentionally left blank...

Страница 38: ...Chapter 1 Installing Your Printer 22...

Страница 39: ...us paper or specialized transparency film sizes including A5 A4 A and Super A The ColorScript 330 prints to various paper or transparency film sizes including A4 A3 A Super A B and Super B This chapte...

Страница 40: ...ation transfer paper or transparency film To load paper or film 1 Remove the paper cassette from the front of the printer by lifting the cassette slightly and pulling it toward you Set the paper casse...

Страница 41: ...arency film or vice versa remove any remaining paper or transparency film from the tray If you are not changing media size go to Step 8 on Page 25 Figure 2 3 Pressing the Paper Lift Down Metal Flanges...

Страница 42: ...l Locks 5 Adjust the side rails to accommodate the new media The side rails have a geared action move them by pressing together or spreading apart at the center of each rail Make sure the media size i...

Страница 43: ...down NOTE Dye sublimation transfer paper has a shiny surface on the print side and a satin finish on the back The paper must be inserted shiny side down Avoid touching the print side of paper or film...

Страница 44: ...tion 11 Set the paper cassette cover on the paper tray so that the cover is fully seated on the paper tray 12 Set the media detect switch to match the media type in the paper cassette The green plasti...

Страница 45: ...14 Slide the paper cassette gently into the printer until it stops Using the Manual Feed Tray You can feed paper or film manually into the ColorScript 310 330 printer Paper or transparency film in th...

Страница 46: ...ilm print side down Feed the media carefully under the metal guides and through the slots in the paper guides Figure 2 10 Using the Manual Feed Tray 4 Push the media into the printer until it stops Th...

Страница 47: ...CMYK Monochrome Continuous black The multicolored ribbons contain sets of individual bands of dye that print in successive passes yellow prints first then magenta then cyan If you are using four color...

Страница 48: ...you often switch from one ribbon type to another consider purchasing extra ribbon cassettes so you can quickly change ribbons without removing them from their cassettes Removing the Ribbon Cassette WA...

Страница 49: ...400 F during operation Take care not to touch the print head if the printer has been operating 2 Using both hands place your thumbs in the handles on each side of the ribbon cassette The dye ribbon r...

Страница 50: ...stalling the printer s first ribbon there will be no ribbon in the ribbon cassette Go to Installing a New Ribbon on Page 32 5 Remove the spent ribbon Installing a New Ribbon 1 Once you have removed th...

Страница 51: ...right side of the ribbon cassette indicated by an R on the cassette 2 Holding the ribbon cassette by the handles lower it gently into the printer Verify that the gears engage and both spindles settle...

Страница 52: ...kip the rest of this procedure and follow the instructions in Printing in Monochrome Mode on Page 35 4 Press downward gently on the printer cover until it clicks into place The red front panel indicat...

Страница 53: ...front panel until MONOCHROME appears in the LCD 3 Press the Select button to display ON in the LCD 4 Once the Monochrome mode is selected wait for the LCD to return to Ready The ColorScript 310 330 p...

Страница 54: ...Chapter 3 Changing Printer Ribbons 36 This page is intentionally left blank...

Страница 55: ...nection to your printer port If you have a SCSI printer driver you can also print to the ColorScript 310 330 printer using a SCSI connection To connect your ColorScript printer to your computer refer...

Страница 56: ...computer Follow the procedure in Configuring the Printer to set up the ColorScript 310 330 printer Configuring the Printer Make sure that the ColorScript 310 330 printer is turned on and connected to...

Страница 57: ...ones or if your computer is not on an AppleTalk network you will not see an AppleTalk Zones field 2 Select your LaserWriter printer driver from the choices displayed in the upper left corner of the Ch...

Страница 58: ...f there is a color printer icon to the left of the ColorScript 310 330 printer name your printer is already properly set up and you can print to the selected ColorScript 310 330 printer See Printing f...

Страница 59: ...re ColorScript Printer Setup NOTE If your Setup window displays the correct ColorScript PPD as shown in Figure 4 4 you do not need to set up the printer again Just click on the OK button and you may u...

Страница 60: ...er ColorScript Printer Setup If your computer is unable to automatically set up the printer the Select a PostScript Printer Description File window similar to the one shown in Figure 4 5 displays and...

Страница 61: ...The Setup Status window shown in Figure 4 3 displays for several seconds Then the Setup Status window closes and the name of the installed PPD file appears under the Current Printer Description File...

Страница 62: ...e that synchronizes the colors that print on the ColorScript 310 330 printer with common printing standards Refer to the color calibration software manual included with your Agfa FotoTune software for...

Страница 63: ...to the ColorScript 310 330 printer from five common graphics and page layout programs Adobe Illustrator 5 5 on Page 46 Adobe PageMaker 6 0 on Page 50 Adobe Photoshop 3 0 5 on Page 57 Macromedia Freeha...

Страница 64: ...dobe Illustrator 5 5 1 Choose Page Setup from the File menu The Page Setup Window displays similar to the one shown in Figure 4 6 Figure 4 6 Adobe Illustrator 5 5 Page Setup Window 2 Verify that the P...

Страница 65: ...Setup window The Page Setup settings are the default settings for a new print job Any changes you make in the Print or Print Options windows will only affect the current print job 4 Choose Document Se...

Страница 66: ...Page orientation Output resolution Complex path treatment NOTE Check the Use Page Setup checkbox to revert to the Page Setup settings instead of using the Document Setup settings 6 When all variables...

Страница 67: ...hown in Figure 4 22 Cover page usage Color or Grayscale printing PostScript error notification Figure 4 9 Adobe Illustrator 5 5 Print Options Window 9 When all the settings are correct click OK to clo...

Страница 68: ...6 0 select the ColorScript 310 330 printer from the Chooser see Page 38 for instructions To print to the ColorScript 310 330 printer from Adobe PageMaker 6 0 1 Choose Document Setup from the File menu...

Страница 69: ...our intended output characteristics Change any of the Document Setup variables to suit your needs Paper size Image dimensions Page orientation Margins Layout Number of pages Output resolution 3 When a...

Страница 70: ...indow displays similar to the one shown in Figure 4 11 Figure 4 11 Adobe PageMaker 6 0 Print Document Window 5 Verify that the settings in the Print Document window match your intended output Printer...

Страница 71: ...s settings The Print Paper window displays similar to the one shown in Figure 4 12 Figure 4 12 Adobe PageMaker 6 0 Print Paper Window 7 Verify that the settings in the Print Paper window match your in...

Страница 72: ...document s settings The Print Options window displays similar to the one shown in Figure 4 13 Figure 4 13 Adobe PageMaker 6 0 Print Options Window 9 Verify that the settings in the Print Options windo...

Страница 73: ...he document s settings The Print Color window displays similar to the one shown in Figure 4 14 Figure 4 14 Adobe PageMaker 6 0 Print Color Window 11 Verify that the settings in the Print Color window...

Страница 74: ...ting from the Mac OS 56 12 When you have adjusted all settings to match your output requirements click on the Print button You can print from the Print Document Print Paper Print Options or the Print...

Страница 75: ...ons To print to the ColorScript 310 330 printer from Adobe Photoshop 3 0 5 1 Choose Page Setup from the File menu The Page Setup Window displays similar to the one shown in Figure 4 15 Figure 4 15 Ado...

Страница 76: ...window NOTE Customized settings in the Print and Print Options windows can override settings in the Page Setup window The Page Setup settings are the default settings for a new print job Any changes...

Страница 77: ...ons Use ASCII only for interfaces that do not support binary encoding 7 Click on the Print Options button on the right side of the Print window to change the settings shown in Figure 4 17 Cover page u...

Страница 78: ...ns To print to the ColorScript 310 330 printer from Macromedia Freehand 5 5 1 Choose Page Setup from the File menu The Page Setup Window displays similar to the one shown in Figure 4 18 Figure 4 18 Ma...

Страница 79: ...ndows can override settings in the Page Setup window The Page Setup settings are the default settings for a new print job Any changes you make in the Print or Print Options windows will affect only th...

Страница 80: ...quirements skip to Step 12 on Page 65 6 Click on the Options button in the upper right of the Print window to change the settings shown in Figure 4 20 Cover page usage Color or Grayscale printing Post...

Страница 81: ...ximum color steps Flatness Inclusion or exclusion of invisible layers Complex path treatment Data encoding Binary mode recommended Figure 4 21 Macromedia Freehand 5 5 Output Options Window 9 When all...

Страница 82: ...t of the Print window to change the settings shown in Figure 4 22 Printer type Paper size Halftone and screen resolutions Page orientation Transfer mode Printer marks Page labels Imaging options Figur...

Страница 83: ...arious Applications 65 11 When all the settings are correct click OK to close the Print Options window 12 When you have set all options to match your output requirements click on the Print button in t...

Страница 84: ...press 3 3 select the ColorScript 310 330 printer from the Chooser see Page 38 for instructions To print to the ColorScript 310 330 printer from Quark Express 3 3 1 Choose Page Setup from the File menu...

Страница 85: ...file Resolution Data format Binary recommended Halftone screen 3 When all variables match your output requirements click OK to close the Page Setup window NOTE Customized settings in the Document Setu...

Страница 86: ...n Figure 4 24 Figure 4 24 Quark Express 3 3 Document Setup Window 2 Verify that the Document Setup variables match your intended output characteristics Change any of the Document Setup variables to su...

Страница 87: ...w displays similar to the one shown in Figure 4 25 Figure 4 25 Quark Express 3 3 Print Window 5 Verify that the Print window variables match your intended output characteristics Change any of the Prin...

Страница 88: ...tings shown in Figure 4 26 Cover page usage Color or Grayscale printing PostScript error notification Figure 4 26 Quark Express 3 3 Print Options Window 7 When all variables match your output requirem...

Страница 89: ...eets your requirements This saves the processing time involved in sending another print job from your computer to the printer The Reprint function prints only the last page printed not the last print...

Страница 90: ...Chapter 4 Printing from the Mac OS 72 This page is intentionally left blank...

Страница 91: ...t connection to your printer port Setting Up the Printer Make sure that the ColorScript 310 330 printer is turned on and connected to your network or to your computer If you need to connect your Color...

Страница 92: ...If your printer is connected to your computer by a SCSI connection you do not need to configure the ColorScript 310 330 printer in Windows 3 1 or Windows 95 Your applications will communicate with the...

Страница 93: ...Setting Up the Printer 75 3 Double click the Printers control panel in the Control Panel Window The Printers window displays similar to the one shown in Figure 5 1 Figure 5 1 Printers Window...

Страница 94: ...ters Window 5 Select Install Unlisted or Updated Printer from this list of printers then click the Install button The Install Driver window displays and you can install printer drivers from a diskette...

Страница 95: ...Drivers diskette 8 Select the your ColorScript model name from the list of available printer drivers 9 Click OK The name of your ColorScript 310 330 printer displays in the Installed Printers list box...

Страница 96: ...Parallel port connections choose an available LPT port LPT 1 LPT2 etc Network connections choose an available LaserWriter port c lw1 prn c lw2 prn etc 12 Click OK to close the Connect window 13 Click...

Страница 97: ...connection Use Local connection for parallel port connections For Local connections see Setting Up a Local Printer Connection on Page 80 Use Network connection if you are connected to the ColorScript...

Страница 98: ...indows 95 printer connected by a parallel port connection 1 Insert the Windows 95 ColorScript 310 330 Drivers diskette into your 3 5 inch diskette drive 2 Click the Start button in the Taskbar point t...

Страница 99: ...lect Local printer and click Next If you connected your ColorScript 310 330 printer to your computer over an Ethernet network go to Setting up a Network Printer Connection on Page 82 If you connected...

Страница 100: ...ed to your computer switched on and warmed up Do not connect the printer to your computer when either machine is on Refer to Chapter 1 Installing Your Printer for instructions on connecting the printe...

Страница 101: ...ng a Windows 95 network connection Refer to your Windows 95 user documentation for instructions on connecting to a Windows 95 network To set up a Windows 95 network printer connected by an Ethernet co...

Страница 102: ...zard 5 Select Network printer and click Next If you connected your ColorScript 310 330 printer to your computer by a parallel or SCSI connection Setting Up a Local Printer Connection on Page 80 If you...

Страница 103: ...Enter the letter of the drive that contains the Windows 95 ColorScript 310 330 Drivers diskette If your 3 5 inch diskette drive is drive A enter A If your 3 5 inch diskette drive is drive B enter B 1...

Страница 104: ...er machine is on Refer to Chapter 1 Installing Your Printer for instructions on connecting the printer to your computer 18 Select Yes to print a test page then click Next Printing the test page verifi...

Страница 105: ...t synchronizes the colors that print on the ColorScript 310 330 printer with known image setters Refer to the color calibration software manual included with your Agfa FotoTune software for complete c...

Страница 106: ...on when printing to ColorScript 310 330 printer The following pages describe the special configuration issues involved in printing to the ColorScript 310 330 printer from seven common graphics and pag...

Страница 107: ...10 330 printer continue with this procedure If you have not set up the printer see Setting Up the Printer on Page 73 for instructions on setting up the ColorScript printer in Windows 3 1 or Windows 95...

Страница 108: ...printer pop up menu if the ColorScript 310 330 printer is not your Default printer In a typical Windows environment the default printer will be a monochrome LaserWriter or inkjet printer and an advan...

Страница 109: ...e Page source 4 When all the settings are correct click OK to close the Print Setup window 5 Choose Print from the File menu The Print window displays as shown in Figure 5 9 Figure 5 9 Adobe Illustrat...

Страница 110: ...Chapter 5 Printing from Windows 92 7 When you have set all the options to match your output requirements click Print in the Print window...

Страница 111: ...printer continue with this procedure If you have not set up the printer see Setting Up the Printer on Page 73 for instructions on setting up the ColorScript printer in Windows 3 1 or Windows 95 To pr...

Страница 112: ...les match your intended output characteristics Change any of the Document Setup variables to suit your needs Page size Number of pages Margins Page orientation Output resolution 3 When all variables m...

Страница 113: ...ment window displays similar to the one shown in Figure 5 11 Figure 5 11 Adobe PageMaker 6 0 Print Document Window 5 Verify that the settings in the Print Document window match your intended output Pr...

Страница 114: ...The Print Options window displays similar to the one shown in Figure 5 12 Figure 5 12 Adobe PageMaker 6 0 Print Options Window 7 Verify that the settings in the Print Options window match your intende...

Страница 115: ...rom Various Applications 97 8 Click Color to continue reviewing the document s settings The Print Color window displays similar to the one shown in Figure 5 13 Figure 5 13 Adobe PageMaker 6 0 Print Co...

Страница 116: ...or window match your intended output Composite or Separations handling Printer halftones CMS Setup 10 When you have adjusted all settings to match your output requirements click Print You can print fr...

Страница 117: ...cript 310 330 printer continue with this procedure If you have not set up the printer see Setting Up the Printer on Page 73 for instructions on setting up the ColorScript printer in Windows 3 1 or Win...

Страница 118: ...rinting from Windows 100 2 Verify that the Print window variables match your intended output Change any of the Print window variables to suit your needs Page range Number of copies Copy handling Print...

Страница 119: ...aper size Paper source Screen transfer background border and bleed settings Calibration registration and crop marks Figure 5 15 Adobe Photoshop 3 0 5 Page Setup Window 4 When all variables match your...

Страница 120: ...t up the ColorScript 310 330 printer continue with this procedure If you have not set up the printer see Setting Up the Printer on Page 73 for instructions on setting up the ColorScript printer in Win...

Страница 121: ...ny of the Print window variables to suit your needs Page range Number of copies Printer selection Resolution Printer color profile selection 3 Click Setup to change the Printer Setup variables The Pri...

Страница 122: ...lt settings for a new print job Any changes you make in the Print or Print Options windows will affect only the current print job 4 Verify that the Printer Setup variables match your intended output C...

Страница 123: ...ions window displays showing the Layout tab variables similar to the example shown in Figure 5 18 Figure 5 18 Corel Draw 5 0 Layout Tab in the Print Options Window 7 Verify that the Layout variables m...

Страница 124: ...ample shown in Figure 5 19 Figure 5 19 Corel Draw 5 0 Separations Tab in the Print Options Window 9 Verify that the Separations variables match your intended output Check the Print Separations checkbo...

Страница 125: ...ns window shows the Options tab variables similar to the example shown in Figure 5 20 Figure 5 20 Corel Draw 5 0 Options Tab in the Print Options Window 11 Verify that the Options variables match your...

Страница 126: ...ting from Windows 108 12 When all Print Options settings are correct click OK to close the Print Options window 13 When you have set all the options to match your output requirements click Print in th...

Страница 127: ...f you have already set up the ColorScript 310 330 printer continue with this procedure If you have not set up the printer see Setting Up the Printer on Page 73 for instructions on setting up the Color...

Страница 128: ...Chapter 5 Printing from Windows 110 Figure 5 21 Corel Draw 6 0 Print Window...

Страница 129: ...plications 111 2 Verify that the Print window variables match your intended output Change any of the Print window variables to suit your needs Printer selection Page range Number of copies Page handli...

Страница 130: ...the Print or Print Options windows can override settings in the Printer Properties window The Printer Properties settings are the default settings for a new print job Any changes you make in the Print...

Страница 131: ...window to change the Print Options window The Print Options window shows the Layout tab variables similar to the example shown in Figure 5 23 Figure 5 23 Corel Draw 6 0 Layout Tab in the Print Options...

Страница 132: ...example shown in Figure 5 24 Figure 5 24 Corel Draw 6 0 Separations Tab in the Print Options Window 9 Verify that the Separations variables match your intended output Check the Print Separations check...

Страница 133: ...ws the Options tab variables similar to the example shown in Figure 5 25 Figure 5 25 Corel Draw 6 0 Options Tab in the Print Options Window 11 Verify that the Options variables match your intended out...

Страница 134: ...ting from Windows 116 12 When all Print Options settings are correct click OK to close the Print Options window 13 When you have set all the options to match your output requirements click Print in th...

Страница 135: ...printer continue with this procedure If you have not set up the printer see Setting Up the Printer on Page 73 for instructions on setting up the ColorScript printer in Windows 3 1 or Windows 95 To pr...

Страница 136: ...CMYK conversion Maximum color steps Flatness Inclusion or exclusion of invisible layers Complex path treatment Data encoding 3 When all the settings are correct click OK to close the Output Options w...

Страница 137: ...Printing from Various Applications 119 5 Select the ColorScript 310 330 printer in the Target Printer list box and click OK...

Страница 138: ...he Print window displays similar to the one shown in Figure 5 28 Figure 5 28 Macromedia Freehand 5 5 Print Window 7 Verify that the Print window variables match your intended output Change any of the...

Страница 139: ...Setup window displays similar to the one shown in Figure 5 29 Figure 5 29 Macromedia Freehand 5 5 Printer Setup Window from Print Window 9 Verify that the Page Setup window variables match your intend...

Страница 140: ...OK to close the Page Setup window The Printer Setup window displays 11 When all the settings are correct click OK to close the Printer Setup window The Print window displays 12 When you have set all...

Страница 141: ...printer continue with this procedure If you have not set up the printer see Setting Up the Printer on Page 73 for instructions on setting up the ColorScript printer in Windows 3 1 or Windows 95 To pr...

Страница 142: ...e any of the Document Setup variables to suit your needs Paper size Facing page handling 3 When all variables match your output requirements click OK to close the Document Setup window 4 Choose Print...

Страница 143: ...ies Page range Paper handling Tiling Separations Registration marks Color or grayscale monochrome printing 6 Click Setup in the Print window to change the Printer Setup variables shown in Figure 5 32...

Страница 144: ...r output requirements click Print in the Print window Reprinting the Last Printed Page You can press the Reprint button on the printer s front panel to reprint the last page sent to the ColorScript 31...

Страница 145: ...last print job and several actions can prevent the printer from reprinting the last page Turning off the printer Changing the ribbon type Changing the paper size Starting another print job To reprint...

Страница 146: ...Chapter 5 Printing from Windows 128 This page is intentionally left blank...

Страница 147: ...nal hard disk for storing fonts Adding Memory to the Printer Adding Random Access Memory RAM to the ColorScript 310 330 printer is one of the best ways to improve print speed NOTE Adding memory yourse...

Страница 148: ...tandard memory configurations Although other memory configurations are possible these three memory configurations are the most common and most cost effective memory solutions for most printing require...

Страница 149: ...Adding Memory to the Printer 131 NOTE If you use 32 MB SIMMs in conjunction with smaller SIMMs the 32 MB SIMMs must occupy Bank 1 See Figure 6 3 on Page 134 for SIMM slot locations...

Страница 150: ...proceeding to the next step To install additional memory in the ColorScript 310 330 printer 1 Turn off the ColorScript 310 330 printer 2 Touch the metal surface of the back plate of the printer WARNI...

Страница 151: ...the back plate of the printer Figure 6 1 Removing the Back Plate Screws 5 Pull the back plate and logic board out of the printer Grip the back plate by the grey plastic handle and pull straight back...

Страница 152: ...nged in 2 banks of 2 slots each as shown in Figure 6 3 Figure 6 3 Locating the SIMM Slots on the Logic Board 8 Remove the new SIMMs from their static proof bags SIMMs are shipped and stored in metalli...

Страница 153: ...SIMM in the SIMM Slot WARNING Bank 1 must always be filled Do not install SIMMs in Bank 2 only 10 Press the SIMM into the SIMM clips Rotate the SIMM from 45 to 90 vertical and snap the SIMM securely i...

Страница 154: ...sk to the Printer The ColorScript 310 330 printer comes with a 540 MB internal SCSI hard disk for virtual memory and storing fonts You can increase the printer s font storage capacity by adding an ext...

Страница 155: ...equent drive the next SCSI ID Record the names of the hard drives you plan to attach to the ColorScript 310 330 printer in the Notes column of Table 6 2 Table 6 2 Address Worksheet for Connecting an E...

Страница 156: ...ther SCSI devices attached to the computer 3 Set the SCSI ID of the external hard disk to the number you selected in Step 2 of this procedure The SCSI ID switch on the external hard disk is a small nu...

Страница 157: ...ure 6 5 Connecting the SCSI Cable to the ColorScript 310 330 Printer WARNING Do not connect the external hard disk SCSI cable to the 50 pin HD SCSI port on the ColorScript 310 330 printer The HD SCSI...

Страница 158: ...external hard disk 8 Switch on the ColorScript 310 330 printer 9 Switch on your computer to use the ColorScript 310 330 printer with its external hard disk You may need to format the external hard dis...

Страница 159: ...your computer and the printer Disconnect the ColorScript 310 330 printer from your computer 3 After all SCSI devices are turned off and disconnected from the ColorScript 310 330 printer switch on the...

Страница 160: ...Chapter 6 Upgrading Your Printer 142 7 Reconnect the ColorScript 310 330 printer to your computer 8 Switch on any connected SCSI devices then switch on the printer 9 Switch on your computer...

Страница 161: ...s in the following sections Dye Sublimation Paper Store unused dye sublimation paper in a cool dry flat place Do not touch the shiny side of dye sublimation paper oil from your fingerprints can stain...

Страница 162: ...lies by calling the QMS sales number listed on the last page of this manual When ordering new supplies make a note of the appropriate part numbers listed in Table 7 1 Table 7 2 Table 7 1 Supplies for...

Страница 163: ...1730300 004 Paper Super A 4 Color 1710229 001 Transparency Sheet A4 1730400 001 Paper A3 3 Color 1730400 002 Paper A3 4 Color 1730400 003 Paper Super B 3 Color 1730400 004 Paper Super B 4 Color 17102...

Страница 164: ...Chapter 7 Storing and Ordering Supplies 146 This page is intentionally left blank...

Страница 165: ...rvice Should problems arise refer to the troubleshooting procedures in this chapter to resolve the problems quickly and efficiently Cleaning the Printer Except for regular dusting of the printer occas...

Страница 166: ...pen with 100 isopropyl alcohol before using the cleaning pen To clean the thermal print head 1 Open the top cover If the printer has been in operation allow the print head to cool first 2 Gently swee...

Страница 167: ...Paper jam icon glows red when there is a paper jam If this icon is on remove the paper tray open the printer cover remove the dye ribbon cassette and remove the jammed paper The Replace Paper icon gl...

Страница 168: ...pter 8 Maintaining and Troubleshooting Your Printer 150 remove the ribbon cassette and replace the dye ribbon Refer to Removing the Ribbon Cassette on Page 30 for instructions on changing the dye ribb...

Страница 169: ...MY ribbon is loaded in the ribbon cassette The PS indicates that the printer is ready to accept a PostScript job The values in these fields will vary depending on the paper or transparency film size a...

Страница 170: ...e on Page 71 for complete instructions PC users refer to Reprinting the Last Printed Page on Page 126 Menu button The Menu button toggles between four different printer features that display in the fr...

Страница 171: ...6 Changing the SCSI ID of the Printer s SCSI Input Port on Page 141 Four Times Config Print Prints Configuration Page Verifying Proper Operation on Page 154 Table 8 2 Keypad Menu Controls Press Menu...

Страница 172: ...a test page that provides information about the printer s fonts resolution internal hard disk and communication ports To verify proper printer operation issue a Config Print command using the printer...

Страница 173: ...roperly connected Refer to Connecting the Printer Cable on Page 9 for detailed connection instructions Symptom Problem Solution Prints are streaked or spotted The thermal print head is dirty Clean the...

Страница 174: ...Chapter 2 Loading Paper and Film Replace Ribbon The dye ribbon is exhausted Replace the dye ribbon Refer to Chapter 3 Changing Printer Ribbons Cover Open The printer cover is not completely closed Clo...

Страница 175: ...cript 330 printers Table A 1 Specifications for the ColorScript 310 and ColorScript 330 Model ColorScript 310 ColorScript 330 Print Technol ogy Dye Sublimation Transfer 16 8 Million Colors Resolution...

Страница 176: ...Guard BookOblique ITC Avant Guard DemiOblique Helvetica Helvetica Bold Helvetica Oblique Helvetica BoldOblique Helvetica Condensed Helvetica Condensed Bold Helvetica Condensed Oblique Helvetica Conde...

Страница 177: ...rints Power Source Switch Selected AC100V 120V 10 or AC220V 240V 10 48Hz 62Hz Max Power Consumption 320W 375W Operating Environment 50 95 F 20 80 Relative Humidity Weight 62 lbs 77lbs shipping 71 lbs...

Страница 178: ...the ColorScript 310 Image Size Width Height A5 5 6 142 2mm 7 3 186mm A4 8 203mm 10 7 273mm A 8 2 208 6mm 10 255 4mm Super A 9 4 238 5mm 12 6 320mm Table A 3 Imaging area for the ColorScript 330 Image...

Страница 179: ...s of connectors 25 pin SCSI Connector This common SCSI connector is the standard SCSI connector on Macintosh computers and on many SCSI adapters for IBM compatible PCs See Figure 6 6 on page 140 for a...

Страница 180: ...to the Colorscript 310 330 printer in a slower but more compatible format than binary encoding Some print servers and some cross platform printing environments require ASCII encoding ASPI The Associa...

Страница 181: ...and transferring it onto special paper stock called dye sublimation paper Ethernet A common networking protocol used in both Macintosh and IBM compatible PC networks The hardware required for Ethernet...

Страница 182: ...in electronic circuitry To add memory to your printer you will need to remove the Colorscript 310 330 printer s logic board and add RAM SIMMs to the SIMM slots on the logic board Macintosh Computer Al...

Страница 183: ...ess memory RAM is memory that holds active data used in processing computer functions In the Colorscript 310 330 printer RAM is installed in slots on the logic board Refer to Adding Memory to the Prin...

Страница 184: ...the SCSI interface to connect to the host computer SCSI ID See SCSI Address SCSI Port The physical connector for attaching one SCSI device to another SCSI device SCSI Printing When using a SCSI printe...

Страница 185: ...the Colorscript 310 330 printer that heats to evaporate dye from the dye ribbon in the printing process Thinnet Thinnet cable is a type of Ethernet connector and cable that is commonly used in IBM com...

Страница 186: ...Glossary 168 This page is intentionally left blank...

Страница 187: ...8 Photoshop 3 0 Windows 99 101 Photoshop 3 0 5 Mac OS 57 59 ASCII Encoding 59 B Back panel connectors 5 Binary encoding 59 C Cables printer 9 Calibrating color Mac OS 44 color Windows 87 Capacity pape...

Страница 188: ...ts 144 Front panel buttons and indicators 5 H Hard disk external 136 internal 158 I IBM compatible PC connections 10 Installing printer 1 18 printing software Mac OS 37 38 printing software Windows 3...

Страница 189: ...uttons and indicators 5 installing 1 18 installing a new ribbon 32 internal hard disk 141 LCD panel 151 LEDs 149 loading film and paper 21 27 LocalTalk connector 9 11 maintaining 147 154 not respondin...

Страница 190: ...e Mac OS 37 38 software Windows 3 1 74 78 software Windows 95 79 Prints smudged 155 storing 144 streaked or spotted 155 Q Quark Express 3 3 Mac OS 66 70 Express 3 3 Windows 123 126 R Raster mode 17 Re...

Страница 191: ...43 supplies 143 Supplies ordering 144 storing 143 T Thermal print head 31 Thinnet Ethernet connector 9 Troubleshooting 149 U Unpacking 2 Upgrading your printer 129 142 V Verifying proper operation 154...

Страница 192: ...Index 174 This page is intentionally left blank...

Страница 193: ...io frequency energy and if not installed and used in accordance with this user s guide may cause harmful interference to radio communications Operation of this equipment in a residential area is likel...

Страница 194: ...ts affiliates which may be registered in certain jurisdictions All other product and company names mentioned in this user s guide are the trademarks of their respective owners Contacting QMS Europe B...

Страница 195: ...Toll free helpdesk support Germany call 0130 829413 The Netherlands call 0800 0226550 United Kingdom call 0800 964092 Document History Part Number 1800380 001 Revision 1 1 March 1997...

Страница 196: ...This page is intentionally left blank...

Отзывы: