background image

Promega Corporation · 2800 Woods Hollow Road · Madison, WI  53711-5399 USA · Toll Free in USA 800-356-9526 · 608-274-4330 · Fax 608-277-2516 

39

www.promega.com


TM397 · Revised 12/16

5. 

Touching the

 Analyses

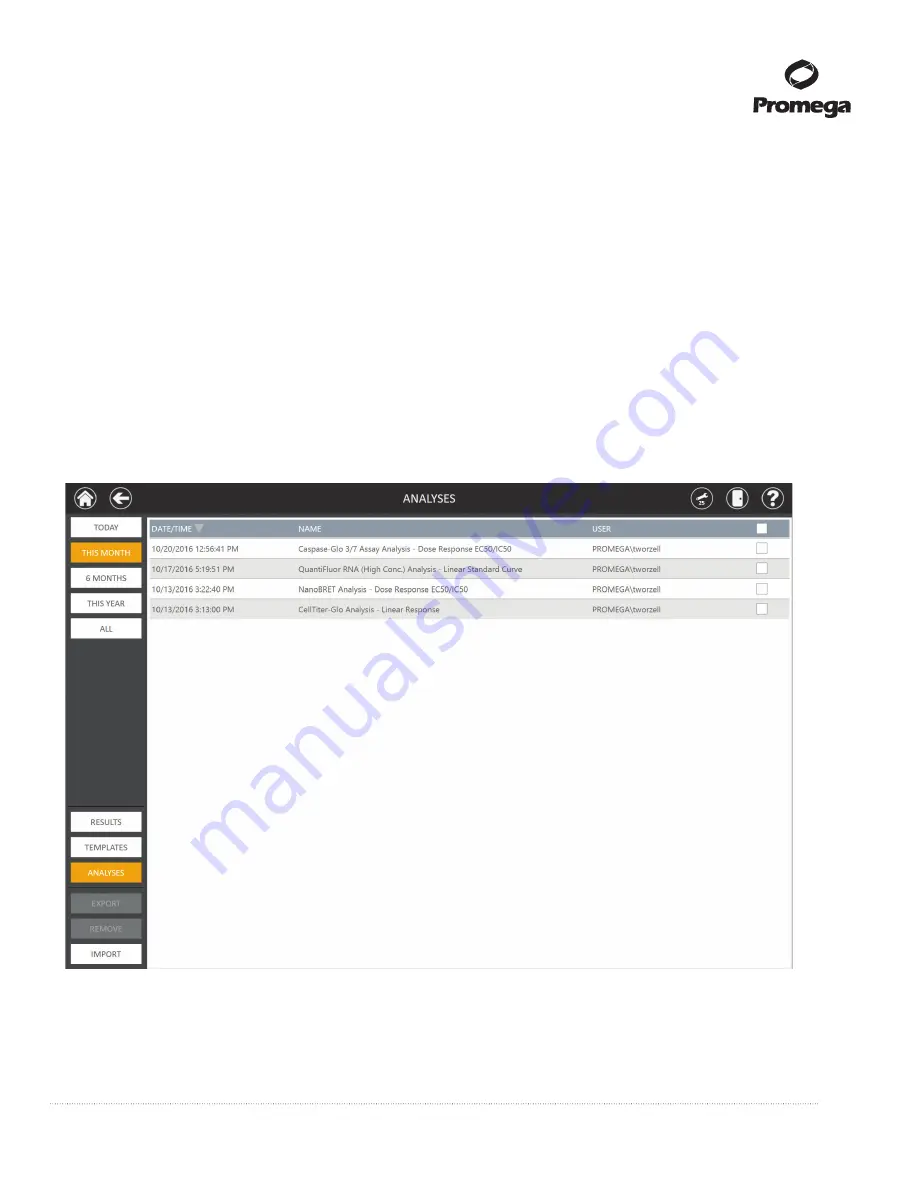
 button displays the ‘Analyses’ screen (Figure 45). On this screen are displayed the 

individual analyses that have been saved. From this screen users can view existing analyses, export/import 
analyses or delete analyses.

6. 

The Left Navigation column of the ‘Analyses’ screen presents the user with several options regarding the 
displayed analyses. 


a.   At the top of the Left Navigation column, the user can filter the analyses by time period: 

Today

This 

Month

, the last 

6 Months

, anytime 

This Year

 or 

All

 of the results.


b.   In the lower section of the Left Navigation column, the user can toggle the display among 

Results

Templates

 and 

Analyses

.


c.   At the bottom of the Left Navigation column, the user can 

Export

 analyses, 

Remove

 analyses or 

Import

 analyses. To select analyses for export or removal, touch the boxes at the far right of the desired 

analysis(es) or touch the box in the header line to select/deselect all displayed analyses. Each of these 
functionalities is described in the ‘Analyses’ Screen Functions subsection.

Fi

13841T

A

gure 45. The ‘Analyses’ screen. 

The ‘Analyses’ screen displays a list of all of the analyses that have been 

saved.

Содержание GloMax GM3000

Страница 1: ...Revised 12 16 TM397 GloMax Discover System Instructions for Use of Product GM3000 O P E R A T I N G M A N U A L...

Страница 2: ...oMax Discover Instrument and Tablet PC 12 2 B Switching On the GloMax Discover Instrument 13 2 C Shutting Down the GloMax Discover Instrument 14 2 D Operating the GloMax Discover System 14 3 GloMax Di...

Страница 3: ...flexible use of filters for fluorescence intensity BRET b FRET filtered luminescence and UV visible absorbance measurements The instrument is operated by an integrated Tablet PC which provides quick...

Страница 4: ...Dimensions 18 5in 46 9cm width 19 5in 46 5cm depth 10in 25 4cm height without Tablet PC mounted 16in 35 5cm height with Tablet PC mounted Weight Approximately 60lb 27kg Power Requirements 100 240 V A...

Страница 5: ...s for luminescence including 495nm SP 530nm LP 540nm SP 600nm LP and 450nm 8nm BP Additional custom emission filters may also be used Contact Promega Technical Services Fluorescence Module Specificati...

Страница 6: ...njector System Specifications Number of Injectors optional Two injectors Dispense Volume Range 5 200 l in 1 l increments Plate Compatibility 6 12 24 48 and 96 well plates Injection Speed 20 500 l per...

Страница 7: ...s P R O D U C T S I Z E C AT GloMax Discover System 1 each GM3000 For Research Use Not for use in Diagnostic Procedures Includes 1 each GloMax Discover Instrument 1 each Tablet PC containing GloMax Di...

Страница 8: ...ce corporel pour l op rateur ou d accident avec l instrument ou l entourage 6687TA eps It is important to understand and follow all laws regarding the safe and proper disposal of electrical instrument...

Страница 9: ...y approved by Promega could void the user s authority to operate the equipment Do not use this device in proximity to sources of strong electromagnetic radiation e g microwave oven because they may in...

Страница 10: ...en cours d utilisation 5295MA eps The GloMax Discover is intended for indoor use only Le GloMax Discover est destin une utilisation en int rieur 5295MA eps Always disconnect the power before cleaning...

Страница 11: ...ed for service If any item is damaged contact Promega Technical Services E mail techserv promega com Standard components are shown in Figure 2 below 11851TA Figure 2 GloMax Discover System Accessory C...

Страница 12: ...f the instrument to allow the instrument door to open without hindrance Note We recommend that two people lift the instrument into position 3 Ensure that the instrument is placed in a location that wi...

Страница 13: ...A Figure 4 Instrument front and Tablet PC holder setup 3 Secure the Tablet PC in the Tablet Holder by using the 1 16 inch Hex Wrench to screw the Tablet Mount Attachment Piece into place 4 Using the p...

Страница 14: ...ht corner of the GloMax Discover indicates when the instrument is ON 3 Power up the Tablet PC by pressing and holding the power button on the perimeter of the Tablet PC Note When powering ON turn the...

Страница 15: ...the Windows shutdown procedure appropriate for your tablet PC Windows 8 Swipe in from the right edge of the screen select Settings then select Power Shut Down Windows 10 From the Desktop screen swipe...

Страница 16: ...the text box and entering a name Figure 8 11679TA Figure 8 Save Results Window 6 Select Start to begin the protocol 7 The protocol will begin acquiring data and will display the results in the plate...

Страница 17: ...time Absorbance This Quick Read button allows you to immediately perform an absorbance read selecting the plate type 6 12 24 48 96 or 384 well plate with or without plate lids for 96 and 384 well pla...

Страница 18: ...sion filters turning the Shaker On Off and accessing the instrument information About Door This button toggles the open closed status of the door on the GloMax Discover Instrument Help Tapping the Hel...

Страница 19: ...ead Screens continued 11625TA Select plate format Select integration time Start measurement Define the Plate Map Green selected Gray unselected Figure 11 GloMax Discover Luminescence Quick Read screen...

Страница 20: ...o make locating them easier There is no limit to the number of protocols that may be selected as favorites 11627TA Select Favorites Create new protocol View protocols of interest Figure 13 GloMax Disc...

Страница 21: ...button Selecting Analysis will analyze the results as described in Section 3 E Viewing Existing Protocols 1 To view details of an existing protocol from the Protocols screen select the protocol of in...

Страница 22: ...vised 12 16 11630TA Figure 16 New Protocol name prompt from the GloMax Discover software 3 Build your protocol by dragging and dropping protocol functions from the left panel onto the Protocol Window...

Страница 23: ...the Save or Save As button on the bottom right corner of the screen A user message will appear indicating that the protocol was saved successfully F 11633TA igure 19 GloMax Discover New Protocol Succe...

Страница 24: ...te Map is unlocked and cannot be applied Select Plate Map for each protocol step igure 21 When the plate map is unlocked a different plate map can be created for each step Whenever a protocol is locke...

Страница 25: ...n of the New Protocol screen into the protocol The functions can be expanded and contracted by selecting the black triangle at the top left corner of each function They may be removed by selecting the...

Страница 26: ...he plate by using the Heat function To prewarm the heater prior to the measurement read select Heat from the Tools icon of the menu bar and select Wait in the Heating step If Wait is selected in the p...

Страница 27: ...ors you can choose which injector to use Injector 1 Injector 2 or both the desired injection volume 5 l 200 l and the injection speed 20 l sec to 500 l sec Select the wells that will be injected by to...

Страница 28: ...orbital The shaking duration can range from 0 10 minutes and the cycles per minute can range from 100 500 Select the shaking diameter as 1 2 or 3mm for all shaking speeds and patterns Shaking paramete...

Страница 29: ...or Prompt box is checked the Prompt screen shown in Figure 30 appears to the user during protocol with the option to open the door If Open Door is selected the door will open and the screen will offer...

Страница 30: ...ed with all detection modes protocol functions and plate types A maximum of 100 loops can be performed within a single protocol 1 Add the Loop step to the protocol by dragging and dropping the Loop ic...

Страница 31: ...types and protocol functions except for heat shake and user prompt functions If shaking and or heating is desired in a kinetic protocol they must be applied to the entire plate and therefore be placed...

Страница 32: ...the steps by touching and dragging the step 3 D Results Screen When running a protocol the results will display in real time as the protocol proceeds Results are automatically saved within the GloMax...

Страница 33: ...ct ing results files touch the Export button to export the selected files to the export path set by the administrator Section 3 F Export Folder or touch the Remove button to delete the selected result...

Страница 34: ...9 82e 04 1 31e 04 3 22e 03 298 72 Figure 36 Example GloMax Discover Results heat map colors Within the plate map each individual sample may be viewed by tapping the well of interest If a Ratio metric...

Страница 35: ...ain result types e g protocols containing kinetic reads the Analysis button will be inactive because analysis is not supported for these protocol types b To Export data tap the Export button bottom le...

Страница 36: ...wer Multiple tabs are located in the spreadsheet to view the data in plate map format or linear format by well All settings used in the protocol are also displayed in the workbook If multiple readings...

Страница 37: ...Toll Free in USA 800 356 9526 608 274 4330 Fax 608 277 2516 TM397 Revised 12 16 www promega com 3 D Results Screen continued Figure 42 File export to Microsoft Excel workbook Data with time intervals...

Страница 38: ...ent to the GloMax software analyze data that have been generated on the instrument It is the responsibility of the individual researcher to evaluate the results of any analyses for validity and applic...

Страница 39: ...es screen displays a list of analysis templates that have been saved 4 The Left Navigation column of the Templates screen presents the user with several options regarding the displayed analysis templa...

Страница 40: ...vigation column the user can filter the analyses by time period Today This Month the last 6 Months anytime This Year or All of the results b In the lower section of the Left Navigation column the user...

Страница 41: ...m the Home screen touch the Results button b On the left side of the Protocols Execution Results screen touch the Templates button c Touch the checkbox es on the right side of the analysis template s...

Страница 42: ...creen touch the Results button b On the left side of the Protocols Execution Results screen touch the Templates button c Touch the Import button near the bottom left side of the screen to open the Imp...

Страница 43: ...performing the following steps a From the Home screen touch the Results button b On the left side of the Protocols Execution Results screen touch the Templates button c Touch the checkbox es on the r...

Страница 44: ...button in the bottom left hand corner of the Templates screen in order to create a new analysis template If you wish to modify an existing template simply touch the template entry on the list and the...

Страница 45: ...t the Curve Fit type for this tem plate Options include Linear Standard Curve The user can specify samples with known concentration that define a linear standard curve and samples with unknown concent...

Страница 46: ...ll Unknown wells are only allowed in a Linear Standard Curve type analysis template Known A well where the concentration of the sample is known You can set a name and concentration for this type of we...

Страница 47: ...same name For example if naming the Known wells for a standard curve use an identical name Standard Stand Known In Step j you will assign concentrations to each well to distinguish them from one anot...

Страница 48: ...ctors In this figure concentrations have been applied to the standard curve replicates shown at the bottom of each well and dilution factors have been applied to the unknowns 100 for wells A1 D8 200 f...

Страница 49: ...e same name S1 but different dilution factors Wells A1 and A2 have a dilution factor of 100 E1 and E2 have dilution factor of 200 Therefore after applying Well Grouping wells A1 and A2 are now denoted...

Страница 50: ...d and grouped together and a unique color will be applied to each group l Touch the Units text box to specify the unit of measurement for the concentrations on the entire plate Only one unit of measur...

Страница 51: ...by the administrator and have the date and time of the export appended to the file name If a single analysis was selected the file name will be the same as the analysis name If multiple analyses were...

Страница 52: ...After creating a raw data set from a plate read you can analyze the raw data collected by using the analysis functions in the GloMax software Analyses can be performed using analysis templates that h...

Страница 53: ...ns allow you to toggle between Ratio On Off Read 1 On Off and Read 2 On Off to display the ratiometric data or the individual raw data from each plate read Analysis of NanoBRET data modifies the butto...

Страница 54: ...d with the wells that are active for this analysis touch the Run button near the bottom of the left side of the screen to perform the analysis of samples Figure 56 Fi 13895TA gure 56 Running an Analys...

Страница 55: ...n well Averages and standard deviations assuming there are three or more replicates will be calculated for each unknown replicate set and will be indicated in the export file for the analysis Linear R...

Страница 56: ...data After selecting the Run button to analyze an experimental data set the graphing tab on the righ side of the screen becomes active Touch the graphing tab to view analysis results From this tab Ax...

Страница 57: ...report will have multiple tabs of data which are described below Protocol Details tab The Protocol Details tab indicates information regarding the analysis that was performed including the name of th...

Страница 58: ...d firmware versions instrument name and maintenance and calibration values Figure 59 About GloMax Discover screen located on the Settings menu Figure 59 provides example information only Your instrume...

Страница 59: ...ction Speed 20 500 l second Waste Collection Tray Volume Approximately 50ml Void Volume 500 l For standard Luciferase Assay or Dual Luciferase Assays we recommend an injector speed of 200 l per second...

Страница 60: ...1 The currently installed Aperture is displayed at the top of the window To change the Aperture select Load 96 or Load 384 as desired 2 The door will open automatically 3 Place the Aperture Plate wit...

Страница 61: ...two screws at the bottom sides of the door Figure 65 3 Next pull the front access door toward you to remove the door Figure 65 4 Remove the filter paddle by gently pushing it in and then up The slide...

Страница 62: ...711 5399 USA Toll Free in USA 800 356 9526 608 274 4330 Fax 608 277 2516 61 www promega com TM397 Revised 12 16 Figure 66 Filter configuration procedure part 1 Figure 67 Filter configuration procedure...

Страница 63: ...Filter Wheel When performing an Absorbance read the instrument will automatically use the correct filter based on the filter specified in the protocol If multiple filters are used in a protocol the i...

Страница 64: ...r toward you to remove the door Figure 71 3 Remove the Excitation module by unscrewing the thumb screw The excitation module should slide forward so that you can remove it 4 Tap Next to continue Figur...

Страница 65: ...n either the Door button is selected a Protocol is started or if the instrument power is turned Off On Initialize the head all axes or eject plate by selecting the appropriate Start button in this scr...

Страница 66: ...ort protocols for the instrument F 11675TA igure 77 Administrator Page screen Export Folder Select the folder location to which the data should be exported Once this is configured the data will automa...

Страница 67: ...ay import new versions of firmware and software with instructions directly from the Promega web site www promega com resources tools detection instruments software promega branded instruments glomax d...

Страница 68: ...cords can be viewed on the left side of the screen by Today This Month the past 6 Months This Year or All Detailed audit records are automati cally generated and stored with the GloMax Discover softwa...

Страница 69: ...gure 83 GloMax Discover Injector System with accessories Shown assembled here are the Injector System Console with Vertical Support Rods Inlet Tubing Assembly and Inlet Tube Holder The DB 15 Data Cabl...

Страница 70: ...support rod into the small opening Press down firmly until the rod clicks into place 6 Slide the inlet tube holder onto the vertical support rod 7995TA 7213TA Figure 86 Inserting the vertical support...

Страница 71: ...ult in an electrical short and will void the warranty 11 Replace the front panel on the Pump Station 12 Exit the GloMax Discover Software and then relaunch software Turn on the instru ment This will a...

Страница 72: ...protocol The viscosity of solutions reagents can affect the performance of the injectors If a protocol requires injectors the injectors must first be primed with at least 500 l of the reagent to be i...

Страница 73: ...d into the reagent bottle 4 Clip the stainless steel tube into the slot on the horizontal bar and ensure the tube reaches the bottom of the reagent bottle 5 Tap the Start button adjacent to the Prime...

Страница 74: ...will be returned to the reagent container Flushing the Injectors after Use 1 Remove the sample plate from the instrument 2 Tap the Start button adjacent to the Flush option on the Injectors screen Fi...

Страница 75: ...tronics Do not use solvents or abrasive cleaners Use a cloth dampened with deionized water to periodically wipe clean the exterior of the GloMax Discover Instrument Do not use solvents or abrasive cle...

Страница 76: ...on the Micro plate Sample Tray 12 Flush the injector 3 times with air A small volume of water will remain in the injector after the air purge 5 E Cleaning the Waste Collection Tray The Waste Collecti...

Страница 77: ...cond part of the adapter on and tighten by hand 7 Attach the adapter to the gray fitting by turning it clockwise and tightening by hand 6 Troubleshooting For questions not addressed here please contac...

Страница 78: ...hnical Services to help troubleshoot the issue Firmware write operation timeout The instrument has failed to write values to its firmware Attempt to repeat the operation if possible If this error recu...

Страница 79: ...Technical Services techserv promega com Tablet PC touch screen does not appear to be working 1 Verify the plug is securely connected to the Tablet PC 2 Verify that the instrument is plugged into the U...

Страница 80: ...a USB flash drive shut down and restart the Tablet PC and the instrument 7 Appendix 7 A Configuring the Tablet PC The GloMax Discover Tablet PC touch screen allows the user to make selections from a...

Страница 81: ...an be used to navigate to the various screens Touching and holding an icon on the Tablet for 3 seconds is equivalent to a Right Click on a normal PC 2 Date and Time The date and time set on the Tablet...

Страница 82: ...the screen For Windows 10 a Close the GloMax Software if it is open If not at the Home screen touch the Home button in the upper left corner of the user interface Touch the X in the upper left corner...

Страница 83: ...e and daylight saving time for your location Changing the Time Zone and Daylight Saving Time settings e Use the drop down menu under the Time Zone heading to select the time zone appropriate for your...

Страница 84: ...roles PromegaAdministrator Promega Administrators have the following capabilities All PromegaUser capabilities Import protocols Select Export folders PromegaUser Promega Users have the following capab...

Страница 85: ...ght side of the Taskbar to open the on screen keyboard and enter the text lusrmgr msc Figure 97 Panel A Touch the X on the on screen keyboard to close the keyboard Under the Best match header an item...

Страница 86: ...inistrator window will open which can be used to add existing users to the PromegaAdministrators group Tap the Add button to add users to the PromegaAdministrators group In the Enter the object names...

Страница 87: ...gaUsers A PromegaUsers screen will open which can be used to add existing users to the PromegaUsers group Tap the Add button to add users to the PromegaUsers group In the Enter the object names to sel...

Страница 88: ...he Home button in the upper left corner of the user interface Touch the X in the upper left corner of the screen and then confirm that you want to exit b Touch the Search icon on the left side of the...

Страница 89: ...ers screen will open which can be used to remove users from the PromegaUsers group Select the user to be removed and tap the Remove button Touch OK to remove the selected user from the PromegaUsers gr...

Страница 90: ...played 11611TA Quick access to the Tools Screen Orange Temperature value indicates heater is activated Dashed line indicates the instrument is busy heating opening closing door etc 11612TA Open Close...

Страница 91: ...on contact Promega Technical Services Contact information is available at www promega com E mail techserv promega com To obtain service during the warranty period please take the following steps 1 Con...

Страница 92: ...minated by toxic carcino genic radioactive or other hazardous materials B I confirm that the returned items have been decontaminated and can be handled without exposing personnel to health hazards Cir...

Страница 93: ...inescence and Fluorescence 1each GM3510 GloMax Navigator System 1each GM2000 GloMax Navigator with Dual Injectors and Pumps 1each GM2010 GloMax Discover System Service Options Product Size Cat GloMax...

Страница 94: ...1 each N1870 NanoBRET KRas BRaf Interaction Assay 1 each N1880 NanoBiT PPI MCS Starter System 1 each N2014 NanoBiT PPI Flexi Starter System 1 each N2015 Reporter Assays Product Size Cat Dual Glo Lucif...

Страница 95: ...totoxicity Assay 10ml G9260 CytoTox ONE Homogeneous Membrane Integrity Assay 200 800 assays G7890 MultiTox Fluor Multiplex Cytotoxicity Assay 10ml G9200 MultiTox Glo Multiplex Cytotoxicity Assay 10ml...

Страница 96: ...ter 96 CellTiter Blue CellTiter Fluor CellTiter Glo Dual Glo Dual Luciferase Flexi GloMax Kinase Glo NanoBiT Nano Glo QuantiFluor Renilla Glo and Steady Glo are a registered trademarks of Promega Corp...

Отзывы: