73
3
Ta
king
Pict
ures
You can use the zoom to change the captured area.
1
Press the zoom button in
A
mode.
Right (
x
)
Enlarges the subject.
Left (
w
) Widens the area that is
captured by the camera.
When you continue to press the button
towards the right (
x
), the camera
automatically switches from optical zoom to
Intelligent Zoom.
Once the button is released and pressed
again, the camera switches to Digital Zoom.
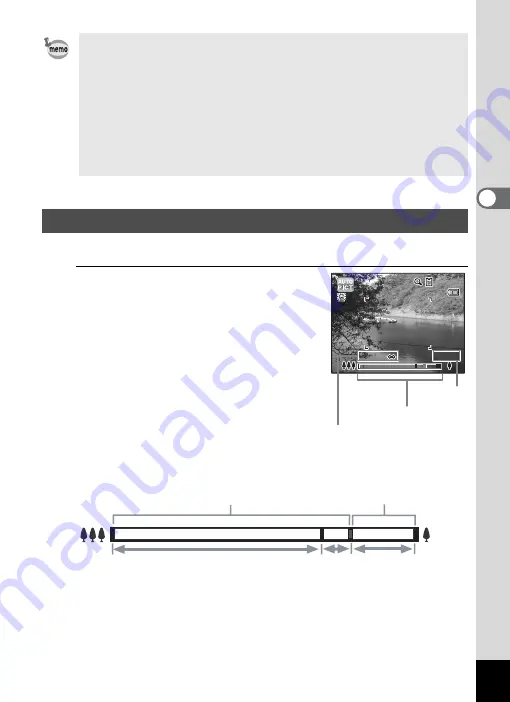
The zoom bar is displayed as follows.
*1 You can zoom in to a maximum of 5× optically.
*2 The Intelligent Zoom range differs depending on the number of
recorded pixels. See the following table.
• The
9
mode is available only when it is assigned to the Green button
in [Green Button] of the [
A
Rec. Mode] menu (p.107). By default, the
9
mode is assigned to the Green button.
• In
9
mode, you cannot change the information on the display by
pressing the
4
/
W
button.
• If you press the
3
button in
9
mode, the [
W
Setting] menu
appears. The [
A
Rec. Mode] and [
C
Movie] menus cannot be
displayed.
• When the camera is turned off in
9
mode, it turns on in
9
mode next
time the power switch is pressed.
Using the Zoom
3 8
3 8
3 8
33.5 x
33.5 x
33.5 x
0.9 m-
0.9 m-
0.9 m-
Zoom bar
Zoom ratio
Focus range
(during zooming only)
Zoom in with high
image quality.
Zoom in with some degree
of image deterioration.
Optical zoom range
*1
Intelligent
Zoom range
*2
Digital Zoom
range
Содержание 15936
Страница 30: ...Memo 28...
Страница 50: ...Memo 48...
Страница 51: ...2 Common Operations Understanding the Button Functions 50 Setting the Camera Functions 55...
Страница 64: ...Memo 62...
Страница 136: ...Memo 134...
Страница 158: ...Memo 156...
Страница 159: ...6 Recording and Playing Back Sound Recording Sound Voice Recording 158 Adding a Voice Memo to Images 161...
Страница 165: ...7 Settings Camera Settings 164...
Страница 182: ...Memo 180...
Страница 183: ...8 Connecting to a Computer Connecting to a Computer 182 Using the Provided Software 186...
Страница 196: ...Memo 194...
Страница 220: ...Memo 218 9 Appendix...


