


52
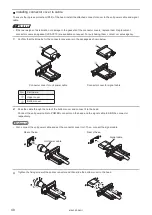
4.
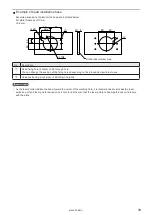
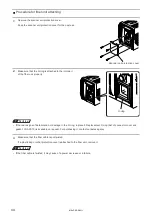
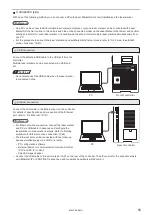
Connect the three wires to the terminals.
The signs of “L (black)”, “N (white)” and “PE (GND) (yellow/green)”
show in the cables. Connect each cable to the appropriate terminal.
Screw size: M4
Tightening torque: 1.2N·m
ワㄐㄕㄊㄆ
• For the AC power supply cable, use the specified optional AC power
cable or a cable with the enough rating capacity to fulfil the power voltage
specification of this product.
• Please select a cable compliant with the standards in the country or region where it is used.
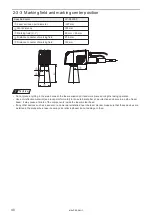
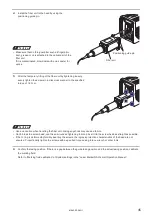
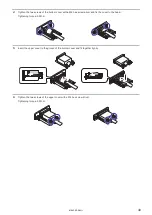
5.
Attach the resin cover to the terminal.
6.
Fix the AC power cable with the clamp.
Screw size: M4 hex screw
Tightening torque: 1.0N·m
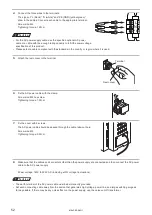
7.
Fix the cover with 2 screws.
The AC power cable should be passed through the cable take-out hole.
Screw size: M3
Tightening torque: 0.5N·m
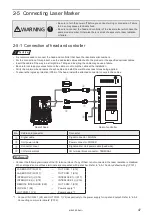
8.
Make sure that the cables and connectors other than the power supply are connected and then connect the AC power
cable to the AC power supply.
Power voltage: 180V to 264V AC (including ±10% voltage fluctuations)
ワㄐㄕㄊㄆ
• The earth terminal of the AC power cable must be permanently grounded.
• Set each connecting cable away from the device that generates high voltage, power line, and large switching surge as
far as possible. If there may be any noise effect on the power supply, use the noise cut-off transformer.
PE
L
N
N
PE
L
Resin cover
Terminal
ME-LPRF-SM-11
Содержание LP-RF Series
Страница 17: ...1 Product Overview ME LPRF SM 11...
Страница 34: ...2 Laser Marker Installation ME LPRF SM 11...
Страница 57: ...3 Operation Method ME LPRF SM 11...
Страница 81: ...4 External Control Using I O ME LPRF SM 11...
Страница 126: ...5 External Control by Communication Commands ME LPRF SM 11...
Страница 135: ...6 Link Control with External Devices ME LPRF SM 11...
Страница 160: ...7 Maintenance ME LPRF SM 11...
Страница 186: ...Troubleshooting ME LPRF SM 11...
Страница 214: ...Index ME LPRF SM 11...
Страница 216: ...216 USB 32 55 W Warning 205 ME LPRF SM 11...
Страница 217: ......


