


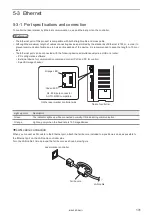


122
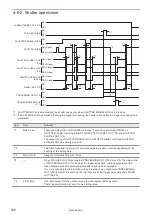
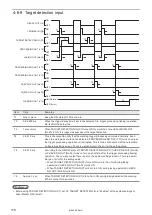
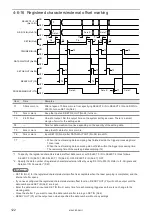
4-6-16 Registered characters/external offset marking
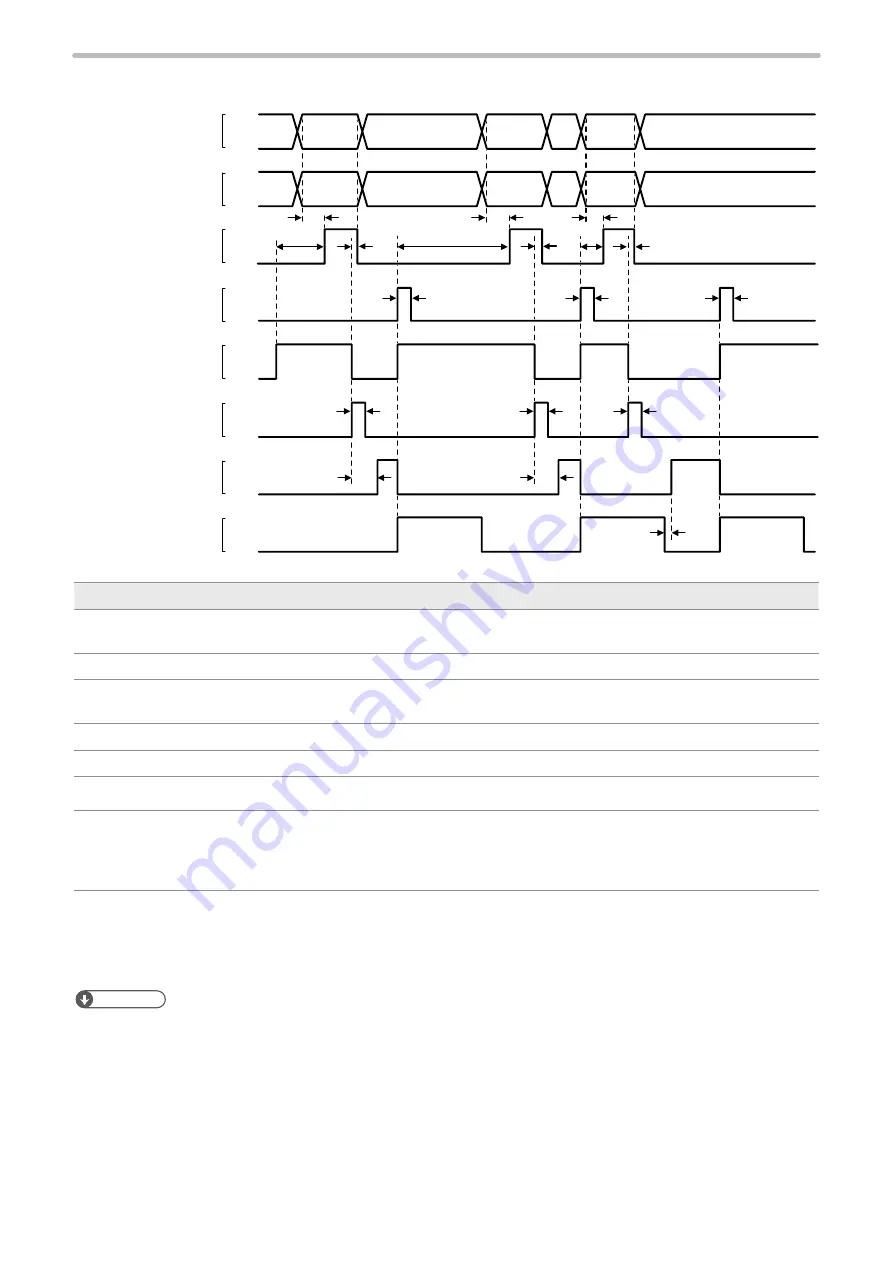
T4
T4
T6
T6
T6
T2
T7
T2
T2
T5
T5
T5
T3
T3
T3
T1
T1
T1
ON
OFF
ON
OFF
ON
OFF
ON
OFF
ON
OFF
ON
OFF
ON
OFF
ON
OFF
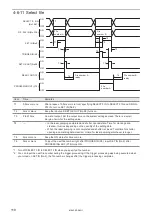
SELECT 0 - 2 IN
(No.19-21)
D0 - D15 IN (No.3-18)
SET IN (No.2)
TRIGGER IN (X5)
READY OUT (Y5)
PROCESSING OUT (Y10)
SET OK OUT (No.28)
DATA WAIT OUT (No.38)
*1
*2
Data A
Data A
Data B
Data B
Data C
Data C
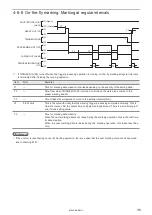
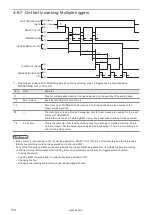
Item
Time
Remarks
T1
0.5ms or more
After a lapse of 0.5ms or more from specifying SELECT 0 IN to SELECT 2 IN and D0 IN to
D15 IN, turn on SET IN (No.2).
T2
0ms or more
Keep the input until SET OK OUT (No.28) turns on.
T3
2 to 510ms
One-shot output. Set the output time on the system settings screen. There is a small
margin of error for the setting value.
T4
―
Time for data creation. It varies depending on the quantity of the setting data.
T5
2ms or more
Keep the ON status for 2ms or more.
T6
0ms or more
Input SET IN (No.2) after DATA WAIT OUT (No.38) turns ON.
T7
―
• When the next marking data compiling has finished within the trigger processing time:
1ms or less
• When the next marking data compiling did not finish within the trigger processing time:
The remaining time of the marking data compiling (T4)
*1 : To specify the registered characters/external offset data number, set SELECT 0 IN to SELECT 2 IN as follows.
SELECT 0 IN (No.19): ON, SELECT 1 IN (No.20): OFF, SELECT 2 IN (No.21): OFF
*2 : Specify the data number of registered characters/external offset by using D0 IN to D15 IN. Refer to “4-3 Signals and
Details of I/O Connector” (P.91).
ンㄆㄇㄆㄓㄆㄏㄆ
• SET IN (No.2) for the registered characters/external offset is acceptable when the laser pumping is completed, and the
internal shutter opens.
• If you have configured the registered characters/external offset function, READY OUT (Y5) will not be output until the
data number and SET IN (No.2) are input.
• Enter the data number input and SET IN (No.2) every time for each marking trigger even there is no change to the
marking data.
• Close the shutter if you want to reset the data number after turning on SET IN (No.2).
• READY OUT (Y5) will be output even when specified the data number without any settings.
ME-LPRF-SM-11
Содержание LP-RF Series
Страница 17: ...1 Product Overview ME LPRF SM 11...
Страница 34: ...2 Laser Marker Installation ME LPRF SM 11...
Страница 57: ...3 Operation Method ME LPRF SM 11...
Страница 81: ...4 External Control Using I O ME LPRF SM 11...
Страница 126: ...5 External Control by Communication Commands ME LPRF SM 11...
Страница 135: ...6 Link Control with External Devices ME LPRF SM 11...
Страница 160: ...7 Maintenance ME LPRF SM 11...
Страница 186: ...Troubleshooting ME LPRF SM 11...
Страница 214: ...Index ME LPRF SM 11...
Страница 216: ...216 USB 32 55 W Warning 205 ME LPRF SM 11...
Страница 217: ......


