Chapter 5 Installation
18
Step 3
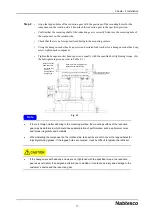
• Align the mating part of the motor flange with that of the reduction gear. Then, while checking the
bolt holes for securing the mating parts, attach the motor flange to the reduction gear.
• Confirm that the centering shaft of the motor flange is correctly fitted into the centering hole of the
reduction gear.
• Check that there is no
foreign matter adhering
to the mounting surface.
• Make sure that the
matching surface of the
motor flange and the
matching surface of the
reduction gear are in
close contact. If either of
them is tilting or there is
a gap, remove the motor
flange and perform step
4 again.
• For the RS-260A, insert
the cap provided with the reduction gear into the side of the motor flange.
If there is foreign matter adhering to the mounting surface, the mounting surface of the reduction
gear may be deformed, which could cause deterioration of performance, such as abnormal noise
and torque irregularity and durability.
Step 4
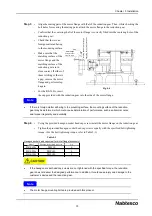
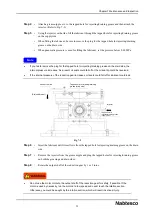
• Using the provided hexagon socket head cap screw, install the motor flange on the reduction gear.
• Tighten the provided hexagon socket head cap screws equally with the specified bolt tightening
torque. (For the bolt tightening torque, refer to Table 5-1.)
Table 5-2
If the hexagon socket head cap screws are not tightened with the specified torque, the reduction
gear does not deliver the designed performance. In addition, it could cause injury and damage to the
customer’s device and the reduction gear.
The motor flange mounting bolts are provided with this product.
Note
Note
型式
六角穴付ボルト
数量
RS-260A
M8×35
4
RS-320A
M12×45
4
RS-900A
M12×45
4
モータフランジ取付用六角穴付ボルト(付属品)
Fig. 5-4
Cap
Motor flange
Hexagon socket
head cap screw
C
e
n
te
ri
n
g
sh
a
ft
o
f
m
o
to
r
fla
n
g
e
C
e
n
te
ri
n
g
h
ol
e
o
f r
e
d
u
ct
io
n
g
e
ar
Model
Hexagon socket head cap screw
Hexagon socket head cap screw for motor flange (accessory)
Qty.


