


U S I N G M I D I T I M E P I E C E A V C O N S O L E
91
(or redistributed by) the MIDI Timepiece AV itself
to other devices, create a connection from the
Transport Out icon to the desired devices as shown
below in Figure 10-10. This connection is not
necessary, however, if you intend to send MMC
transport commands directly from computer
software (or a MMC hardware device) to a MMC
device.
Transport In and Transport Out icon connections
only involve MMC transport commands; they do
not route MMC record functions, such as record-
enable or auto punch-in/out. To route MMC
record functions, make connections between the
MIDI Routing Window’s MIDI ports and
computer icon as needed.
It is not necessary to connect the Transport Out
icon to either ADAT icon; MIDI Timepiece AV
control over ADATs connected to its ADAT Sync
Out icon is “hard-wired” and therefore not
represented graphically in the MIDI Routing
window.
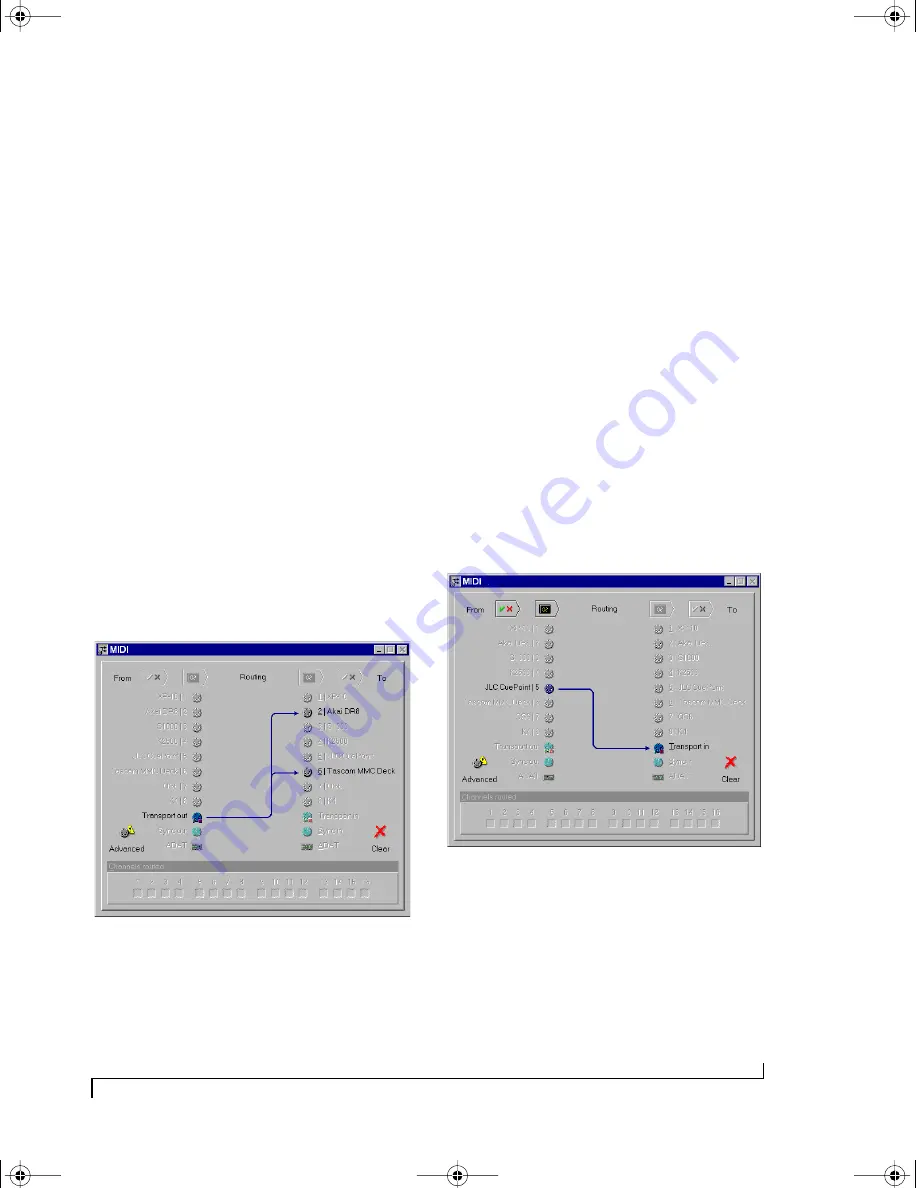
Figure 10-10: When you want to control other MMC devices with the
MIDI Timepiece AV, or if you want the MIDI Timepiece AV to redistrib-
ute MMC transport commands from your sequencer or an Alesis LRC,
connect the Transport Out icon to any devices you wish to control.
Note that these MMC connections involve MMC transpor t
commands only. For MMC record functions (play-enable, punch-in,
etc.), use the regular MIDI routings and, for MMC software, use the
appropriate Windows MIDI driver output ports.
Routing MMC to the MTP AV
The Transport In icon in the MIDI Routing
window represents MIDI Machine Control input to
the MIDI Timepiece AV itself. In other words, the
MIDI Timepiece AV “listens” to MMC transport
commands from any devices (or computer
software) connected to this icon.
For MMC transport control of the AV from the
computer, enable the
transport master
option as
shown Figure 10-18 on page 98. Doing so makes
the MIDI Timepiece AV follow MMC transport
commands sent from software.
Connecting a MMC controller to the MTP AV
If you would like to control the MIDI
Timepiece AV from a MMC controller connected
to one of the MIDI Timepiece AV’s MIDI inputs,
connect the device’s input cable to the Transport In
icon as demonstrated below in Figure 10-11.
Figure 10-11: To control the MIDI Timepiece AV from a MMC control-
ler such as JLCooper’s CuePoint, connect the device to the Transport
In icon as shown here.
☛
The Alesis LRC controller is an exception: it
does not require any routing in the MIDI Routing
window because of its special connection to the
LRC Input on the MIDI Timepiece AV’s front
!USB Interfaces Manual Book Page 91 Tuesday, October 10, 2000 12:43 PM
Содержание micro express-USB
Страница 1: ...C M Y CM MY CY CMY K...
Страница 6: ...IV USB Interfaces Manual Book Page iv Tuesday October 10 2000 12 43 PM...
Страница 7: ...All Users PartI ForAllUsers USB Interfaces Manual Book Page 5 Tuesday October 10 2000 12 43 PM...
Страница 8: ...All Users USB Interfaces Manual Book Page 6 Tuesday October 10 2000 12 43 PM...
Страница 27: ...XT Micro Users PartII ForXT MicroUsers USB Interfaces Manual Book Page 25 Tuesday October 10 2000 12 43 PM...
Страница 28: ...XT Micro Users USB Interfaces Manual Book Page 26 Tuesday October 10 2000 12 43 PM...
Страница 83: ...MPT AV Users PartIII ForMTPAVUsers USB Interfaces Manual Book Page 81 Tuesday October 10 2000 12 43 PM...
Страница 84: ...MPT AV Users USB Interfaces Manual Book Page 82 Tuesday October 10 2000 12 43 PM...
Страница 132: ...S Y N C H R O N I Z A T I O N W I T H T H E A V 130 USB Interfaces Manual Book Page 130 Tuesday October 10 2000 12 43 PM...
Страница 141: ...Appendices PartIV Appendices USB Interfaces Manual Book Page 139 Tuesday October 10 2000 12 43 PM...
Страница 142: ...Appendices USB Interfaces Manual Book Page 140 Tuesday October 10 2000 12 43 PM...


