


- 1 -
1 Contents ······································································································································ 1
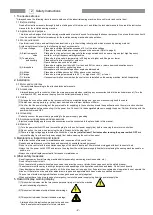
2 Safety Instructions ························································································································· 2
3 Points of Caution ··························································································································· 3
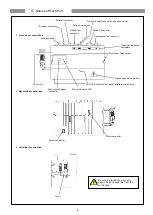
4 Names of Each Part ······················································································································· 4
5 Installation ··································································································································· 5
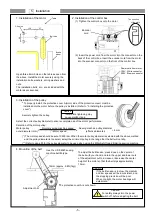
1. Installation of the motor ·························································································································· 5
2. Installation of the control box ··················································································································· 5
3. Installation of the pulley ·························································································································· 5
4. Mounting of the belt ······························································································································· 5
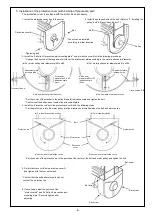
5. Installation of the protective cover ············································································································ 6
6. Installation of the position detector ··········································································································· 7
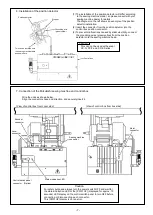
7. Connection of the Mitsubishi sewing machine and control box ······································································· 7
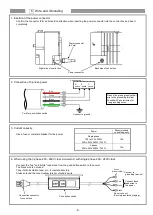
6 Wire and Grounding ······················································································································· 8
1. Insertion of the power connector ·············································································································· 8
2. Connection of 3-phase power ·················································································································· 8
3. Current capacity ··································································································································· 8
4. When using the 3-phase 200 - 240V class Limiservo X with single phase 200 - 240V class ································· 8
7 Confirmation································································································································· 9
1. Before turning switches on.......... ············································································································· 9
2. Turn on the power.......... ························································································································· 9
8 Adjustments ································································································································ 10
1. Adjustment of stopping position ·············································································································· 10
2. Adjustment of pedal toe down pressure, and heeling pressure ······································································ 10
3. Adjustment of operation speed ··············································································································· 11
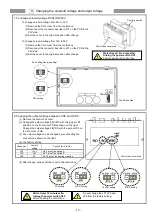
9 Changing the solenoid voltage and output voltage ··············································································· 12
1. To change solenoid voltage DC24V/DC30V ······························································································ 12
2. Changing the output voltage between 0VDC and 5VDC ·············································································· 12
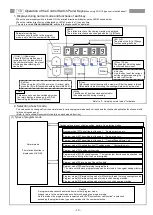
10 Operation of the Control switch Panel Keys ······················································································ 13
1. Displays during normal mode and functions of each key ·············································································· 13
2. Selection of each mode ························································································································· 13
(1) Types of program mode ··············································································································· 13
(2) Selection of each program mode from the normal mode. ···································································· 14
(3) Direct number call function ··········································································································· 15
3. Using the normal mode ························································································································· 16
4. Changing to the tacking, preset, pattern NO. selection mode ········································································ 17
(1) Tacking setting mode ·················································································································· 17
(2) No. of tacking stitches setting mode ······························································································· 17
(3) Preset stitching setting mode ········································································································ 18
(4) Pattern No. selection mode ·········································································································· 18
5. Using the program mode [1] simple setting ······························································································· 19
6. Using the program mode [2] simple setting ······························································································· 21
7. Using the program mode [3] simple setting ······························································································· 23
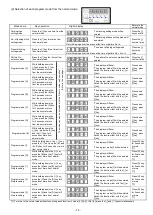
11 Function List ······························································································································ 25
12 How to Use the Option Connector ·································································································· 29
1. Connector Layout ································································································································ 29
2. To use as a standing work type sewing machine ························································································ 30
13 Error Display······························································································································ 31
14 Specifications ···························································································································· 32
<Reference> Table of digital display ································································································ 32
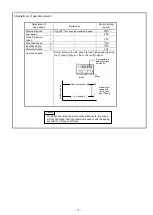
Dimensions (MOTOR and CONTROL BOX) ···········································································
1 Contents


