


- 13 -
1. Displays during normal mode and functions of each key
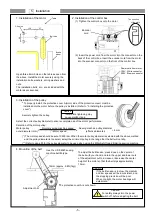
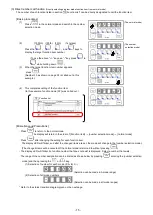
When the power supply switch is turned ON, the rotation direction will display on the LED.M shown below.
When the rotation direction is not displayed on LED.M, press the [
↓
] key any time.
This state is called
the normal mode
, and the following keys can be operated.
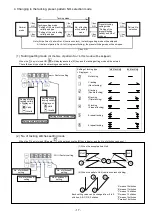
2. Selection of each mode
The modes can be changed from the normal mode to various program modes and various basic functions and application functions set with
this control switch panel.
(Refer to the Technical Documents for details on each mode's function.)
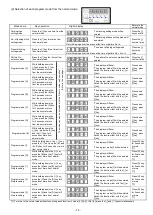
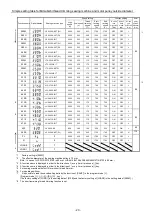
(1) Types of program mode
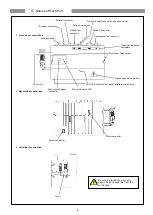
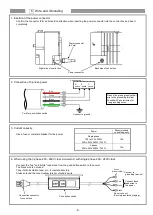
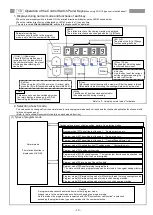
10 Operation of the Control Switch Panel Keys
(When using XC-G10 type control switch panel)
Normal mode
(The rotation direction is
displayed on LED.M)
Program mode [P] The setting to often use 1 *Sewing machine, etc.
Caution
A program mode cannot be entered from an other program mode.
Always return to the normal mode once before changing the program mode.
Note that when the program mode is selected with the "Direct number call function", a selection
exceeding the program mode type can be made with the number selection.
Program mode [A] The setting to often use 2 *Servo motor, etc.
Program mode [B] The setting to often use 3 *Counter/Speed display, etc.
Program mode [C] Applied function [C] setting mode * Customizing, etc.
Program mode [D] Tacking setting mode
Program mode [E] H/W checking mode
* The input/output function can be checked, and
the error statue during a fault can be investigated.
Program mode [I] Save mode of the setting data
Program mode [R] Reset/returning to original data.
* The state set with each program mode can be returned to the original settings (factory
settings).
Program mode [1] Simple setting mode for Mitsubishi thread trimming sewing machine.
Program mode [2] Simple setting mode for chain stitch sewing machine.
Program mode [3] Simple setting mode for other lock stitch sewing machine.
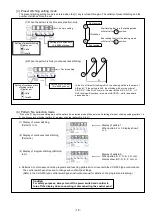
Tacking setting, preset stitching setting, pattern No. selection modes
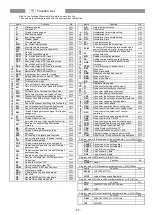
[↑] (Up), [↓] (Down) keys
The validity of the start and end
tacking switch, the type of stitch,
the number of stitches, the preset
stitching and backtacking, etc.,
can be set.
LED.M
The rotation direction of the sewing machine is displayed.
The rotation direction can be changed with the [
↓
]+[M] keys.
LED.A~D
The state of the [A] to [D] keys
function setting is shown.
[C] key, [D] key
The speed at which the pedal
is fully toed down is set.
[B] key
This is used to start sewing with a slow start. After the power is turned
ON and after thread trimming, the sewing will start with a slow start.
[A] key
1 position and 2 position can be selected for
the needle position during stopping.
Note
This above keys can be operated only when
the rotary display is shown on the LED.M.
(Excluding the Enter key or Shift key)
Parameter setting key
Use these keys to switch to the program
mode, and to start the number call function.
Enter key
Use this key to set the various
setting values when using the
number call function.
Shift key
When using the [A] to [D] keys in the [-] (minus) state,
press the [A] to [D] keys while holding down this Shift
key.
Parameter
Setup
Shift
Refer to "3. Using the normal mode" for details.


