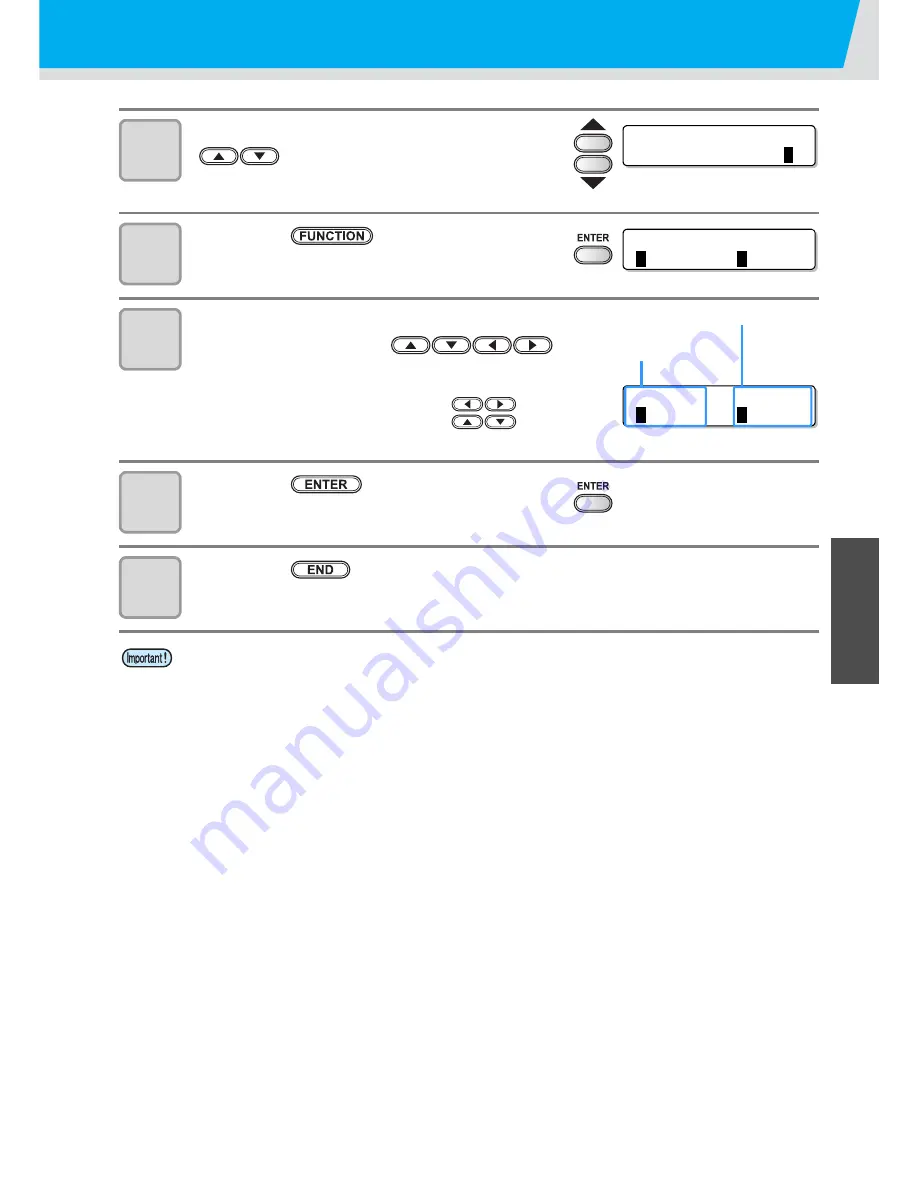
Setting Auto cleaning
3-23
3
Conve
n
ie
nt
us
e
6
Select “ON” by pressing the
keys.
• Proceed to the step 9 when “OFF” is selected.
7
Press the
key.
8
Set an interval of cleaning and cleaning
type by pressing the
keys.
Item selecting
: by the
keys
Interval and Type setting
: by the
keys
9
Press the
key.
10
Press the
key several times to end.
• This function does not operate when ink near-end occurs. Solve the ink near-end, referring to
P.1-12.
• Depending on the conditions of the heads, etc., the defective printing could not be recovered
even performing this function. In this case, contact our service office or distributor.
[ 1 ] A U T O CR E A N I NG
S E T U P
:
O
N
I N T E R V A L
: T Y P E
1
0 0 0 mm
:
N
ORMA L
I N T E R V A L
: T Y P E
1
0 0 0 mm
:
N
ORMA L
Interval :
10 to 10000mm
Type : NORMAL
SOFT
HARD
Содержание JV33-130
Страница 1: ...MIMAKI ENGINEERING CO LTD URL http www mimaki co jp D201694 16 ...
Страница 7: ...vi ...
Страница 99: ...3 35 Machine settings 3 Convenient use Examples of Output ...
Страница 101: ...3 37 Machine settings 3 Convenient use 7 Press the key 8 Press the key several times to end ...
Страница 114: ...3 50 ...
Страница 147: ...Setting Routine operations 4 33 4 Routine Maintenance 8 Press the key several times to end ...
Страница 162: ...Replacing the cutter blade 4 48 4 Close the front cover 5 Press the key The machine returns to LOCAL mode ...
Страница 181: ...Warning labels 6 7 6 Appendix No Reorder Label 1 M901549 2 M903239 3 M903330 4 M903405 5 M904810 ...
Страница 185: ...6 11 Function Flowchart 6 Appendix To P 6 12 To P 6 18 To P 6 24 To P 6 25 To P 6 26 ...
Страница 189: ...6 15 Function Flowchart 6 Appendix OFF LEVEL 1 3 1 Wh i t e L a y P r t SE L OF F ...
Страница 201: ...D201694 16 31012012 ...
Страница 202: ...NH FW 5 3 MIMAKI ENGINEERING CO LTD 2012 ...


