2-11
Setting medias
2
Basic Operations
11
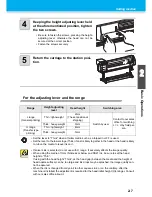
Hold the media with the media press
gently.
• Set the media so that no media sticks out from the
right end pinch roller to the right side.
• When using a thick media, remove the media
press from the media before printing.
12
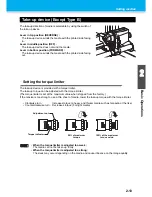
Prepare the take-up device.
• When the Type B is used, the take-up device is
not equipped. Go to the Step 13.
( 1 )
Set an empty core of the roll media on the take-
up device.
( 2 )
Close the front cover.
13
Press the
key to select “ROLL” .
• Detects the media width.
• When [MEDIA RESIDUAL] of the maintenance function is “ON” (
P.4-35), the screen for
entering media remaining amount is displayed after detecting the media width.
• Do not set media at the position which the media press touches the side plate on the right.
As media may tilt and be lifted, it could break the head.
• If a media is misaligned to the right more than fixed position, a
warning is displayed. Set the media again.
Media press
* * * * * E RROR 5 0 * * * * *
ME D I A S E T POS I T I ON R
Media
Media Press
Side plate
on the right
Media press position:27 to 38 mm from the side plate on the right.
(For the variation of the inside diameter of media roll, it ranges as above.)
• Do not locate the suction hole on the platen between
the media and the media press. (It may stain the
media.)
Suction
hole
Front cover
Core
Take-up
device
ME D I A S E L E C T
RO L L <
> L E A F
Содержание JV33-130
Страница 1: ...MIMAKI ENGINEERING CO LTD URL http www mimaki co jp D201694 16 ...
Страница 7: ...vi ...
Страница 99: ...3 35 Machine settings 3 Convenient use Examples of Output ...
Страница 101: ...3 37 Machine settings 3 Convenient use 7 Press the key 8 Press the key several times to end ...
Страница 114: ...3 50 ...
Страница 147: ...Setting Routine operations 4 33 4 Routine Maintenance 8 Press the key several times to end ...
Страница 162: ...Replacing the cutter blade 4 48 4 Close the front cover 5 Press the key The machine returns to LOCAL mode ...
Страница 181: ...Warning labels 6 7 6 Appendix No Reorder Label 1 M901549 2 M903239 3 M903330 4 M903405 5 M904810 ...
Страница 185: ...6 11 Function Flowchart 6 Appendix To P 6 12 To P 6 18 To P 6 24 To P 6 25 To P 6 26 ...
Страница 189: ...6 15 Function Flowchart 6 Appendix OFF LEVEL 1 3 1 Wh i t e L a y P r t SE L OF F ...
Страница 201: ...D201694 16 31012012 ...
Страница 202: ...NH FW 5 3 MIMAKI ENGINEERING CO LTD 2012 ...


