3-44
Extension of Ink Expiry Month
Ink expiry month can be extended for six months from the expired month. When used without extension, ink
becomes unusable after two months of the expiry month.
Extension of Ink Expiry Month
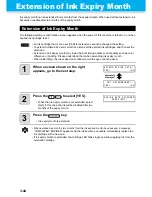
The following setting or confirmation screen appears when the power of this machine is turned on, or when
expired ink cartridge is set.
1
When a screen shown on the right
appears, go to the next step.
2
Press the
to select [YES].
• When the ink expiry month is not extended, select
[NO]. In this case, the ink will be disabled after two
months of the expiry month.
3
Press the
key.
• Ink expiry month is extended.
• An ink cartridge that is once set [YES] for extension cannot be changed the setting.
• To extend multiple inks’ expiry month at a time, set the expired ink cartridges, and then set the
extension.
• Extension of ink expiry month may lower the print image quality or print quality such as color
difference or banding. Please understand them when extending ink expiry month.
• When initial filling, the ink expired more than two months ago cannot be used.
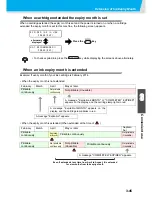
• When extended six months (six months from the ink expired month) have passed, a message
“COMPLETELY
EXPIRED” appears and the ink becomes unusable. Immediately replace the
ink cartridge with a new one.
• If ink expiry month is extended, the cartridge LED blinks in green while supplying ink from the
extended cartridge.
E X T E ND E X P I R E D A T E ?
Y E S <
> NO
NO T R E COMME ND E D ! !
Y E S <
> NO
alternately
displayed
E X P I R E D A T E E X T E ND E D
P R E S S [ E N T ]
Содержание JV33-130
Страница 1: ...MIMAKI ENGINEERING CO LTD URL http www mimaki co jp D201694 16 ...
Страница 7: ...vi ...
Страница 99: ...3 35 Machine settings 3 Convenient use Examples of Output ...
Страница 101: ...3 37 Machine settings 3 Convenient use 7 Press the key 8 Press the key several times to end ...
Страница 114: ...3 50 ...
Страница 147: ...Setting Routine operations 4 33 4 Routine Maintenance 8 Press the key several times to end ...
Страница 162: ...Replacing the cutter blade 4 48 4 Close the front cover 5 Press the key The machine returns to LOCAL mode ...
Страница 181: ...Warning labels 6 7 6 Appendix No Reorder Label 1 M901549 2 M903239 3 M903330 4 M903405 5 M904810 ...
Страница 185: ...6 11 Function Flowchart 6 Appendix To P 6 12 To P 6 18 To P 6 24 To P 6 25 To P 6 26 ...
Страница 189: ...6 15 Function Flowchart 6 Appendix OFF LEVEL 1 3 1 Wh i t e L a y P r t SE L OF F ...
Страница 201: ...D201694 16 31012012 ...
Страница 202: ...NH FW 5 3 MIMAKI ENGINEERING CO LTD 2012 ...


