


2-6
Setting medias
Useable medias
This machine can be used with roll media and leaf sheet media.
For useable medias, refer to P.1-15 "Usable sizes of media".
Adjusting the head height
Adjust the head height according to the thickness of the media used.
Adjusting the head height
1
Move the carriage to the platen.
• When the device is turned on :
Execute [ST.MAINTENANCE] - [CARRIAGE OUT]
(
P.4-5 Step 1,2 )
• When the device is turned off :
Open the front cover, then move the carriage with
hand.
2
Loosen two screws located at the front.
• Loosen the screws, rotating by one turn with a
screwdriver.
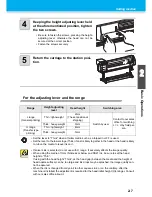
3
Adjust the height-adjusting lever
according to the media.
• Adjust the position of the lever, referring to "For
the adjusting lever and the range".
• Set the height-adjusting lever to the highest stage
or the lowest stage. Setting it to the intermediate
height, a printing fault can result.
• Adjust the head height prior to setting of the media. If the head height is adjusted after the
media is set, this may cause media jamming, deterioration of the drawing quality or head dam-
age.
• The range of the initial head height is adjustable by 2 levels according to the purpose of use.
• The range of the printing height of JV33 is from the general printing (L range: 2 mm/3 mm) to
the transfer printing (H range: 4 mm/5 mm) (Set to L range 2 mm at shipping)
• If the drawing quality is set to "Bi-D" (
P.3-14) , perform "DROP POSITION" of the mainte-
nance function after the head height is adjusted. (
P.4-23)
Carriage
Screws
Height adjust-
ing lever
Содержание JV33-130
Страница 1: ...MIMAKI ENGINEERING CO LTD URL http www mimaki co jp D201694 16 ...
Страница 7: ...vi ...
Страница 99: ...3 35 Machine settings 3 Convenient use Examples of Output ...
Страница 101: ...3 37 Machine settings 3 Convenient use 7 Press the key 8 Press the key several times to end ...
Страница 114: ...3 50 ...
Страница 147: ...Setting Routine operations 4 33 4 Routine Maintenance 8 Press the key several times to end ...
Страница 162: ...Replacing the cutter blade 4 48 4 Close the front cover 5 Press the key The machine returns to LOCAL mode ...
Страница 181: ...Warning labels 6 7 6 Appendix No Reorder Label 1 M901549 2 M903239 3 M903330 4 M903405 5 M904810 ...
Страница 185: ...6 11 Function Flowchart 6 Appendix To P 6 12 To P 6 18 To P 6 24 To P 6 25 To P 6 26 ...
Страница 189: ...6 15 Function Flowchart 6 Appendix OFF LEVEL 1 3 1 Wh i t e L a y P r t SE L OF F ...
Страница 201: ...D201694 16 31012012 ...
Страница 202: ...NH FW 5 3 MIMAKI ENGINEERING CO LTD 2012 ...


