5-6
Warning / Error Messages
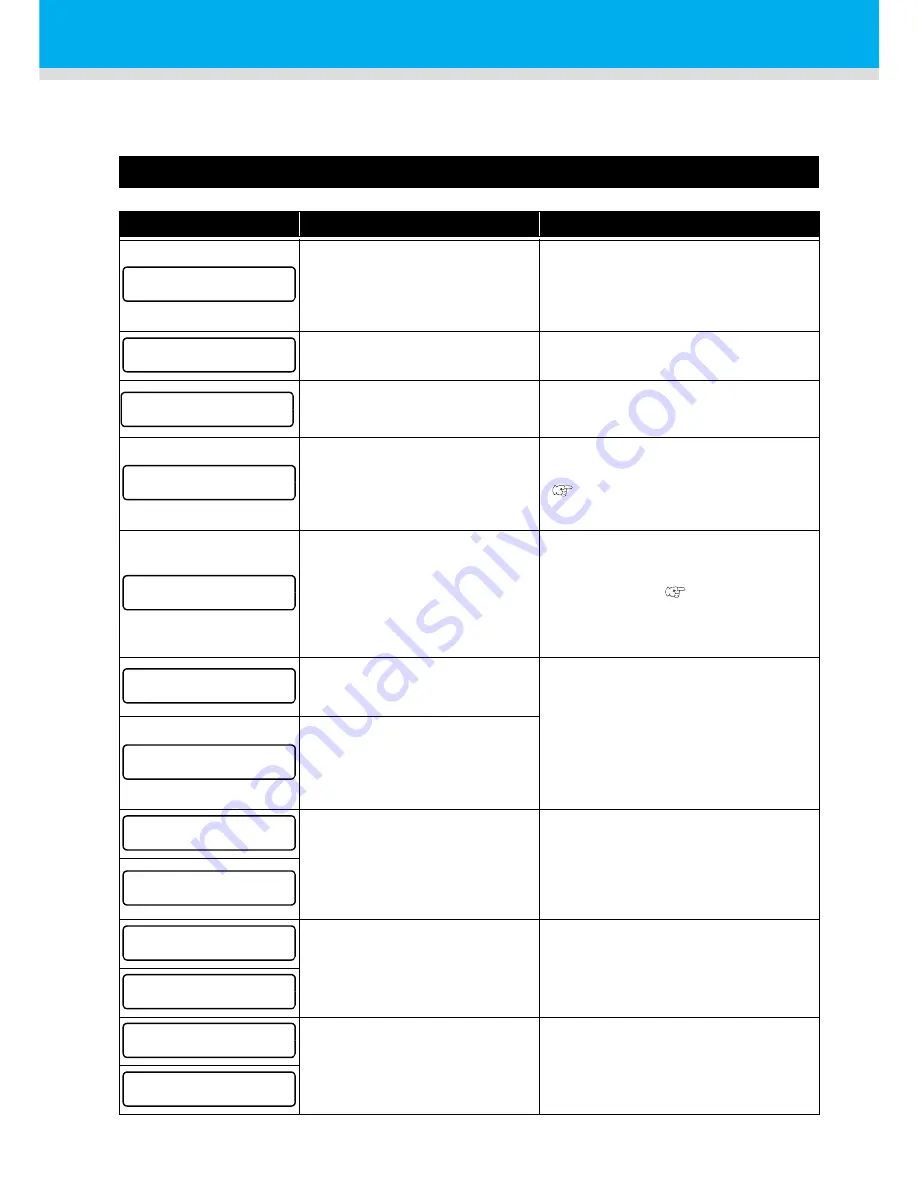
If some trouble occurs, the buzzer sounds and the display shows a corresponding error message.
Take an appropriate remedy for the displayed error.
Warning messages
Message
Cause
Solution
The front cover or the maintenance
cover is opened.
Check the front cover and maintenance
covers.
If the same error message appears again
even after closing all the covers, contact
your local distributor to call for service.
A media has not been set.
Set media.
The battery life end of the internal
clock is detected.
Contact your local distributor to call for
service.
Time to replace the wiper in the
capping station with a new one has
come.
(The wiping count has reached the
specified value.)
Replace the wiper with a new one.
(
P.4-7)
The nozzle recovery cannot be
expected because the machine has
been left standing for a prolonged
period of time.
Perform test printing then check nozzle
clogging.
In the case of nozzle clogging observed,
perform cleaning. (
P.2-24)
In the case of significant nozzle clogging
observed, perform the operations of P.4-
10"Washing of Head nozzle".
A heater is disconnected.
(This example shows that pre-
heater is disconnected.)
Contact your local distributor to call for
service.
The thermistor of a heater is defec-
tive.
(This example shows that the
thermistor of pre-heater is defec-
tive.)
Ink for one supply path has been
nearly used up.
Replace the cartridge for the supply path
corresponding to the indicated color.
You can print without replacing the car-
tridge (until INK END is displayed).
However, the machine returns to local
mode every completion of printing one file.
Ink for one supply path has been
completely used up.
Replace the cartridge for the supply path
corresponding to the indicated color.
Ink cannot be supplied due to the
cartridge per one supply path.
Check the cartridge for the supply path
corresponding to the indicated color.
C l o s e a c o v e r .
* * NO ME D I A * *
! E X C H A NGE B A T T E R Y
< L OC A L . 1 >
[ # 0 1 ]
R e p l a c e a W I P E R < MN T >
< L OC A L . 1 >
[ # 0 1 ]
! D o T E S T D R AW
P R E
P R T
POS T
B R E A K
* * ° C
* * ° C
P R E
P R T
POS T
T H E RM
* * ° C
* * ° C
< L OC A L . 1 >
[ # 0 1 ]
N E A R E ND
MMC C - - - -
* R EMO T E . 1 *
[ # 0 1 ]
N E A R E ND
MMC C - - - -
< L OC A L . 1 >
[ # 0 1 ]
I N K E ND
- - - - Y Y K K
* R EMO T E . 1 *
[ # 0 1 ]
I N K E ND
- - - - Y Y K K
< L OC A L . 1 >
! C A R
[ # 0 1 ]
* R EMO T E . 1 *
! C A R
[ # 0 1 ]
Содержание JV33-130
Страница 1: ...MIMAKI ENGINEERING CO LTD URL http www mimaki co jp D201694 16 ...
Страница 7: ...vi ...
Страница 99: ...3 35 Machine settings 3 Convenient use Examples of Output ...
Страница 101: ...3 37 Machine settings 3 Convenient use 7 Press the key 8 Press the key several times to end ...
Страница 114: ...3 50 ...
Страница 147: ...Setting Routine operations 4 33 4 Routine Maintenance 8 Press the key several times to end ...
Страница 162: ...Replacing the cutter blade 4 48 4 Close the front cover 5 Press the key The machine returns to LOCAL mode ...
Страница 181: ...Warning labels 6 7 6 Appendix No Reorder Label 1 M901549 2 M903239 3 M903330 4 M903405 5 M904810 ...
Страница 185: ...6 11 Function Flowchart 6 Appendix To P 6 12 To P 6 18 To P 6 24 To P 6 25 To P 6 26 ...
Страница 189: ...6 15 Function Flowchart 6 Appendix OFF LEVEL 1 3 1 Wh i t e L a y P r t SE L OF F ...
Страница 201: ...D201694 16 31012012 ...
Страница 202: ...NH FW 5 3 MIMAKI ENGINEERING CO LTD 2012 ...


