Installer Manual
Microvideo srl
www.microvideo.eu
36
CHAPTER 3 – Installing
Recommendations for replacing battery:
The sensor is equipped with a system that detects when the battery is running low. In case
of detection, the sensor sends a transmission to the central, if well planned,
will report the problem to the user.
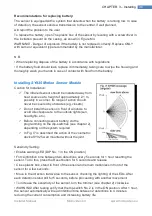
To replace the battery, open The plastic box of the sensor by levering with a screwdriver in
the invitation present on the casing, as shown in Figure M4.
WARNING! - Danger of explosion if the battery is not replaced correctly. Replace ONLY
with same or equivalent type recommended by the manufacturer.
N.B.
• When replacing dispose of the battery in accordance with regulations
• If the battery fluid should leak, replace it immediately, taking care to wipe the housing and
thoroughly wash your hands in case of contact with fluid from the battery.
Installing SY925 Motion Sensor Module
Caution for Installation:
The infrared sensor should be installed away from
heat sources at a height of approximately 2.1 m,
possibly in a corner. Its range of action should
never be covered by obstacles (eg, closets)
Do not install the sensor in front of windows to
avoid direct exposure to the outside lights (sun,
headlights, etc.).
Before connecting sensor battery, do the
programming on the dip-switches (see chapter 2),
depending on the system required
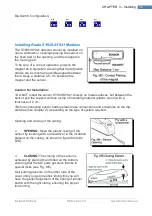
In Fig. I7 is described the action of the volumetric
device SY925 wall mounted without the joint.
Sensitivity Setting:
• Enable warning LED (DIP No. 1 in the ON position)
• Force inhibition time between two detections every 5 seconds for 1 hour resetting the
sensor. To do this, press the Reset button for 5 seconds and release
• Close plastic box, stand in front of the sensor and remain motionless in front of the
sensor for a few seconds.
• Move in the direction transverse to the sensor, checking the lighting of the LEDs. After
each detection stand still for 5 seconds, before proceeding with another movement.
• To increase the sensitivity of the sensor, turn the trimmer (see chapter 2) clockwise
• WARNING! After testing verify that the dip-switch No. 2 is in the ON position. After 1 hour,
the sensor automatically will lead inhibition time between 2 detections to 4 minutes,
reducing the current consumption and increasing battery life.


