


117
1
Printer Driver Screens and Functions
This section describes the functions of the printer driver.
The printer driver screen is displayed by opening the file to print and clicking [Print] -
[Preferences] in the [File] menu.
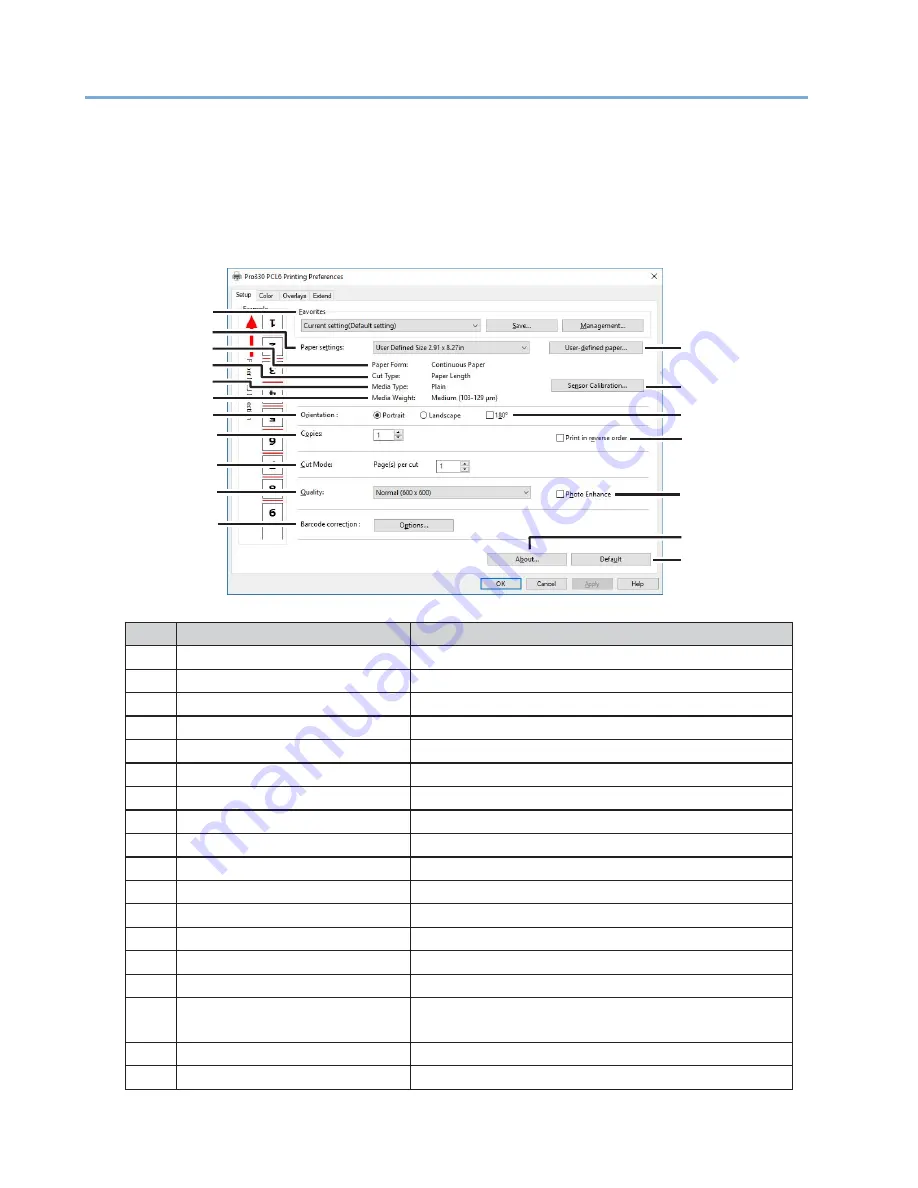
[Setup] Tab
No.
Item
Description
1
Favorites
Enables the printer driver settings to be saved to a file.
2
Paper settings
Sets the paper to print on.
3
User-defined paper
Adds, changes, and deletes paper.
4
Paper Form
Displays the paper format set for the user-defined paper.
5
Cut Type
Displays the cut type set for the user-defined paper.
6
Media Type
Displays the paper type set for the user-defined paper.
7
Media Weight
Displays the paper weight set for the user-defined paper.
8
Sensor Calibration
Adjusts the sensors used for detecting paper and marks.
9
Orientation
Sets the orientation for printing on the paper.
10
180 turn
Prints with the orientation rotated 180 degrees.
11
Copies
Enter the number of copies to print at once
12
Print in reverse order
Prints from the last page of the document.
13
Cut Mode
Cuts every specified number of pages.
14
Quality
Sets the resolution for printing.
15
Photo Enhance
Prints the image data for photos, etc. in detail.
16
Barcode correction
Configures settings for improving the accuracy of
reading barcodes.
17
About
Displays the version information of the printer driver.
18
Default
Restores the default settings of this tab.
2
3
4
6
5
7
8
9
10
11
12
13
14
15
16
17
18
Содержание 360C
Страница 1: ...360C Operator s Manual 880076 0101 Rev 2 ...
Страница 9: ...9 Read This First Safety Precautions General Precautions Other Cautions Trademarks Screens Licenses 1 ...
Страница 17: ...17 Unpacking How to Unpack the Machine Checking the Accessories Installing Consumables 2 ...
Страница 24: ...24 ...
Страница 36: ...35 7 Tighten the screws x 2 8 Connect the connector ...
Страница 37: ...36 9 Attach the Cover Cable PSNT 10 Attach the Cap Cover PSNT x 2 ...
Страница 50: ...49 ...
Страница 91: ...90 ...
Страница 147: ...146 ...
Страница 156: ...155 8 Remove the cover toner 9 Close the top cover 10 Open the toner cartridge cover ...
Страница 158: ...157 15 Turn on the machine For information on turning on the machine refer to Turning On the Machine ...
Страница 167: ...166 8 Close the top cover ...
Страница 173: ...172 13 Return the image drum unit to its original position in the machine 14 Close the top cover ...
Страница 178: ...177 15 Close the feeder cover until it clicks ...
Страница 179: ...178 ...
Страница 192: ...191 6 Return the image drum unit to its original position in the machine 7 Close the top cover ...
Страница 196: ...195 9 Return the image drum unit to its original position in the machine 10 Close the top cover ...
Страница 198: ...197 4 Close the feeder cover until it clicks ...
Страница 204: ...203 TONER NOT INSTALLED A toner cartridge is not installed in the machine Set the toner cartridge in the machine ...
Страница 233: ...232 ...
Страница 234: ...233 Management Software Type of Software Installing Software Web Page Configuration Tool Status Monitor 10 ...
Страница 244: ...243 The settings of the machine can be changed from the Admin Setup tab ...
Страница 272: ...271 8 Enter the administrator password of the destination device and click OK The result is displayed ...
Страница 277: ...276 10 Enter the administrator password and then click OK 11 Confirm the setting results and click Back ...
Страница 280: ...279 11 Confirm the setting results and click Back ...
Страница 289: ...288 ...
Страница 296: ......
Страница 297: ......


