8
3.3 Sensor Cartridge
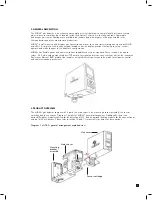
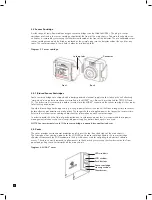
A wide range of toxic, flammable or oxygen sensor cartridges can be fitted to MIDAS
®
. The plug in sensor
cartridges are fitted in the sensor cartridge chamber at the front of the main chassis. To access the chamber the
unit cover is removed by unscrewing the thumbscrew located at the front of the detector. The pre calibrated smart
sensor cartridges can easily be fitted or replaced as they simply plug into the detector without the need for any
tools. The sensor cartridge is firmly held in place by two locking tabs.
Diagram 5. Sensor cartridge
Front
Back
Connector
Locking tabs
3.3.1 Biased Sensor Cartridges
Some sensor cartridges are shipped with a battery powered electrical supply in order to keep the cell effectively
‘warmed up’ and ready to monitor once installed in the MIDAS
®
unit. Bias cells are supplied for TEOS, NO and
O
3
. The bias circuit is removed just before insertion into the MIDAS
®
system and the sensor cartridge is thus ready
for effective gas detection.
Should a bias voltage not be applied (e.g. during a power failure) then the cell will take a longer time to recover
before effective gas detection can take place. The longer the loss of applied power, the longer the recovery time.
Refer to the relevant sensor cartridge data sheet for information on each sensor cartridge.
In order to avoid the risk of loss of gas detection due to unforeseen power loss, we recommend that a power
management solution such as uninterruptible power supplies, battery back ups etc. are used.
NOTE: Sensor warranty is void if the sensor cartridge is opened by unauthorized user.
3.4 Cover
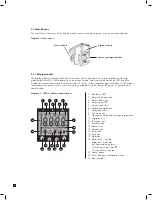
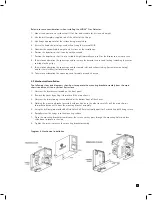
The cover provides environmental protection and fits over the top, front and sides of the main chassis.
The front panel has viewing windows for the LCD, LEDs and sensor cartridge fitted in the sensor cartridge
chamber. Underneath the LCD window are the 4 push buttons used for navigating the detector’s software
menus. The cover is easily removed to allow access to the chassis by unscrewing the thumbscrew on the front
panel and pulling the cover forwards off the main chassis.
Diagram 6. MIDAS
®
cover
LED windows
LCD window
Push buttons
Sensor cartridge
viewing window
Thumbscrew
Содержание midas
Страница 1: ...1 TOXIC FLAMMABLE AND OXYGEN GAS DETECTOR OP E RAT ING INSTRUCTIONS ...
Страница 44: ...44 6 Remove the 4 pump module screws 7 Remove the two fixing clips and disconnect the tubes at the manifold ...
Страница 55: ...55 Diagram 40 IP Address setting in Windows XP Diagram 41 Sample MIDAS web page ...
Страница 57: ...57 15 2 Modbus TCP Installation 15 3 Power over Ethernet POE Installation ...


