Eaton RE Series - отличное решение для вашего дома или бизнеса. У нас есть инструкция по монтажу. Скачайте руководство бесплатно на {вебсайт}, чтобы узнать как установить и использовать этот продукт. Надежный и удобный - убедитесь сами!
2 Installation and Operation
2-8
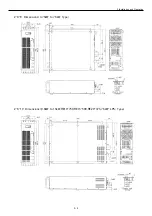
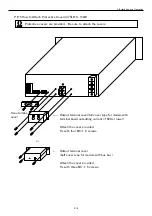
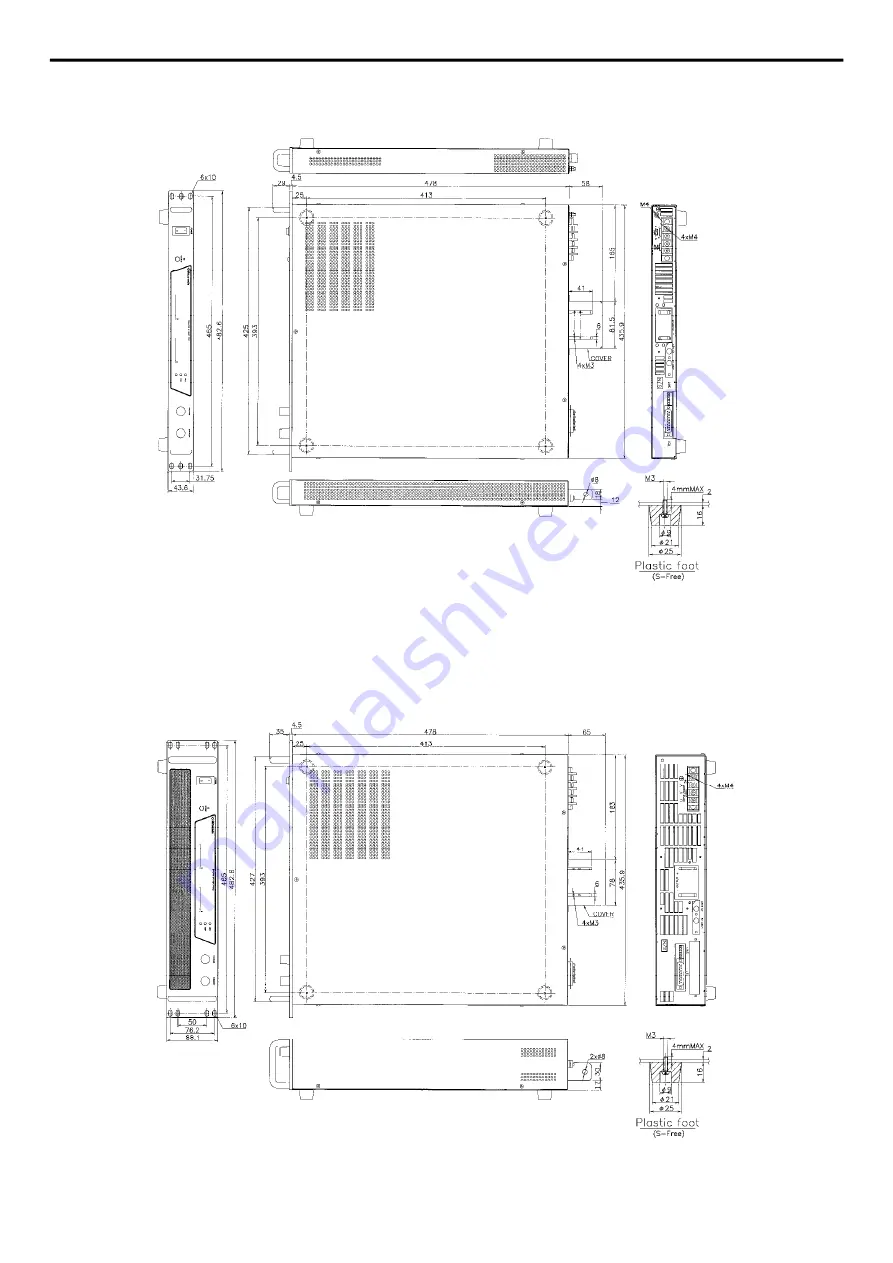
2-4-7 Dimensions(750W to 1.2kW Type)
2-4-8 Dimensions(1.8kW to 3kW Type)
Страница 1: ...MODEL Rev 1 1 RE series Instruction Manual B N 105 9 316 105 9 316 ...
Страница 2: ...g of the symbols and observe each item Depending on the product some symbols may not used 禁止 Indicates content that could cause death or serious injury Indicates content that could cause injury or damage to property Indicates danger warning caution Refer to the instruction manual when using the part with this symbol Indicates where high voltage is handled Touching it may cause electric shock and r...
Страница 3: ... terminal or GND terminal connect it to the ground If the input terminal of the product is an inlet type connect to the power outlet with the ground using the supplied power cable or a power cable suitable for the area to be used If it is not connected to the ground there is a risk of electric shock and fire which is extremely dangerous About power supply cable If there is a power supply cable att...
Страница 4: ...r right hand In case of electric shock when manipulating the product in order to reduce the risk of current flowing through important organs of the body Keep your left hand off from the product and operate with your right hand Do not touch the wiring or load connected to the output terminal or output terminal during operation or immediately after output stop Very high voltage is applied to the ter...
Страница 5: ... port and exhaust port are blocked the specified performance of the product cannot be demonstrated and parts are deteriorate which may cause smoke and fire When work such as welding is conducted near the product disconnect all the wires from the product Do not wipe with chemicals thinner etc or wet cloth There is a danger of electric shock electric leakage burnout from chemicals or water entering ...
Страница 6: ...1 2kW Type 2 5 2 4 3 Front panel 1 8kw to 3kW Type 2 6 2 4 4 Rear panel 1 8kW to 3kW Type 2 6 2 4 5 Front panel 3 75kW to 15kW Type 2 7 2 4 6 Rear panel 3 75kW to 15kW Type 2 7 2 4 7 Dimensions 750W to 1 2kw Type 2 8 2 4 8 Dimensions 1 8kW to 3kW Type 2 8 2 4 9 Dimensions 3 75kW to 7 5kW Type 2 9 2 4 10 Dimensions 9 8kW to 15kW RE10 750 RE15 500 RE20 375 7 5kW LPfc Type 2 9 2 4 11 Dimensions RE10 ...
Страница 7: ...rotection Setting 3 3 3 4 Remote Sensing Operation 3 4 3 5 Switching between Local Mode and Remote Mode 3 5 3 5 1 Setting Current Voltage and OVP No 1 3 5 3 5 2 Setting Current Voltage and OVP No 2 3 6 3 6 Blackout Protection 3 7 3 7 Over Temperature Protection 3 8 4 Advanced Operation 4 1 4 1 Series Parallel Operation 4 1 4 1 1 Series Operation 4 1 4 1 2 Parallel Operation 4 1 4 2 Divided Operati...
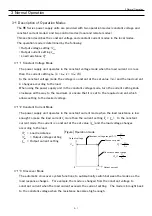
Страница 8: ...nstant current modes Compact size and light weight achieved by the unique high frequency switching technology Output enable disable with an external signal Remote control of output voltage and current Status signals CV CC TROUBLE Output monitor Read output voltage and output current 1 3 Operation Modes The RE Series units operate in two basic modes constant voltage and constant current mode In the...
Страница 9: ...here is no foreign object such as liquid or metal piece from the air vent because such could cause failure of unit electrical shock or fire This power supply is designed for the size of 19 inch rack When you install to the rack hold the chassis with the guide Do not hold the power supply with only fixing holes on front panel Front panel handle is strictly for the purpose of changing the direction ...
Страница 10: ...and 30 cm or more clearance from the front panel for other models and exhaust 30 cm or more clearance from the rear panel Where there is dust on air intake holes remove it immediately as it can prevent the enough cooling of the power supply 2 3 3 Bias The maximum voltage for use with the output floating biased with reference to the ground is 250 VDC Watch for the bias voltage generated at the outp...
Страница 11: ...ecome 200V Input current is about 115 of Input current 220V 3φ become 200V Input current is about 110 of Input current L 220V 115V of above INPUT VOLTAGE CURRENT table become 110V and 230V become 220V Input current is about 105 of Input current L 240V 115V of above INPUT VOLTAGE CURRENT table become 120V and 230V become 240V Input current is about 95 of Input current 220V 3φ become 240V Input curr...
Страница 12: ... M4 In case of single phase input screw fix L1 on L Line L2 on N Neutral and on GND of AC input terminal board Attached input cable is usable only at single phase input Case of 3 75kW to 15kW Attach solderless terminal on AC input cable and screw fix it on L1 L2 L3 and of AC input terminal board on main body rear panel M6 For safety be sure to attach the covers provided 750W to 1 2kW type 1 8kW to...
Страница 13: ...put voltage setting volume dial for Potentiometer at LLp option Output current setting volume dial for Potentiometer at LLp option POWER ON OFF switch OUTPUT ON OFF switch OUTPUT ON indicator LED Fault indicator External switch OFF indicator Remote programming indicator Volt meter Current meter Remote enable indicator for GP IB Connector for remote control D sub 25 pin Function setting switch Conn...
Страница 14: ...ng volume Output voltage setting volume dial for Potentiometer at LLp option Output current setting volume dial for Potentiometer at LLp option Vent holes POWER ON OFF switch OUTPUT ON OFF switch OUTPUT ON indicator LED Fault indicator External switch OFF indicator Remote programming indicator Volt meter Current meter Remote enable indicator for GP IB FLT LD EXT CV CC REN Matsusada SET OVP OUTPUT ...
Страница 15: ...for RE200 50 POWER ON OFF switch OUTPUT ON OFF switch OUTPUT ON indicator LED Fault indicator External switch OFF indicator Remote programming indicator Volt meter Current meter Remote enable indicator for GP IB FLT LD EXT CV CC REN Matsusada SET OVP OUTPUT POWER REGULATED DC POWER SUPPLY VOLTAGE CURRENT V A Function setting switch Connector for remote control D sub 25 pin Connector terminals for ...
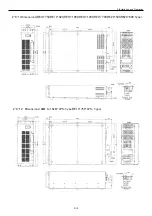
Страница 16: ...2 Installation and Operation 2 8 2 4 7 Dimensions 750W to 1 2kW Type 2 4 8 Dimensions 1 8kW to 3kW Type ...
Страница 17: ...2 Installation and Operation 2 9 2 4 9 Dimensions 3 75kW to 7 5kW Type 2 4 10 Dimensions 9 8kW to 15kW RE10 750 RE15 500 RE20 375 7 5kW LPfc Type ...
Страница 18: ...2 Installation and Operation 2 10 2 4 11Dimensions RE10 750 RE10 820 RE10 1000 RE10 1200 RE15 700 RE20 500 RE20 600 Type 2 4 12 Dimensions 8kW to 15kW LPfc Type RE10 750 LPfc Type ...
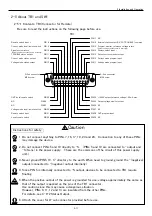
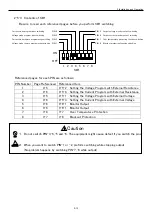
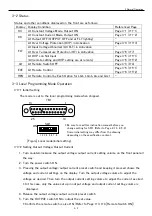
Страница 19: ... since this may cause a dangerous situation However PINs 6 11 12 and 13 are insulated from the other PINs For details see 4 6 2 Status Output 6 Attach the cover for D sub connector provided before use Caution MUST NO NO MUST CAUTION TB1 PIN 7 NC PIN 6 External status output CV CC TROUBLE common PIN 5 Program monitor reference voltage return PIN 4 Remote switch input PIN 3 Output current monitor ou...
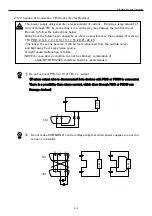
Страница 20: ...wiring become it will be more influenced from the outside noise and kept away from Large noise source It might cause malfunction or failure NOTE In case above condition can not be obtained combination of LGob GP IB RS232C Interface board is recommended Do not connect PIN 5 or 10 of TB1 to output If minas output wire is disconnected from devices with PIN5 or PIN10 is connected There is a possibilit...
Страница 21: ...tor Output 7 3 8 3 7 Over Temperature Protection 8 3 7 3 6 Blackout Protection 1 Do not switch PIN 3 4 5 and 6 The equipment might cause defect if you switch the pins 2 When you want to switch PIN 1 or 2 preform switching while stopping output No problem happens by switching PIN 7 8 while output CAUTION NO Caution SW1 ON 1 2 3 4 5 6 7 8 OFF PIN 5 Output voltage monitor output switching PIN 6 Outpu...
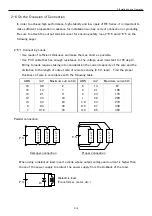
Страница 22: ...loads requires taking into consideration the current capacity of the wire and the limitation to the length of output wire of remote sensing 0 5 V lead Find the proper thickness of wire in accordance with the following table AWG mm2 Maximum current A AWG mm2 Maximum current A 18 16 14 12 10 8 7 0 8 1 3 2 1 3 3 5 3 8 4 10 6 2 7 11 18 23 39 53 6 4 2 1 1 0 2 0 3 0 13 21 33 42 53 67 85 67 106 170 209 2...
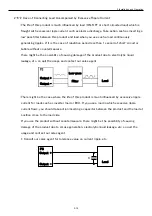
Страница 23: ...e of the product due to electrolytic liquid leakage etc so quit the usage and contact our sales agent There might be the case where the life of this product is much influenced by excessive ripple current for loads such as inverter load or ECU If you use a load in which excessive ripple current flows you should take action inserting a capacitor between the product and the load at position close to ...
Страница 24: ...e see below 3 technical criteria for the selection of proper diode that can successfully protect power supply and load from reverse current 1 Tolerated dose to reverse voltage must be approx twice or higher than the power supply s rated output voltage 2 Forward current capacity must be approx 3 to 10 times higher than the power supply s rated output current 3 Diode needs to be as efficient as poss...
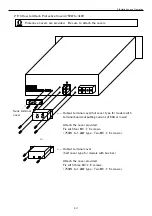
Страница 25: ...inal cover full cover type for models with terminal board outputting current of 60A or lower Attach the cover provided Fix with four M3 6 screws 750W to 1 2kW type Two M3 6 screws Output terminal cover half cover type for models with bus bar Attach the cover provided Fix with three M3 6 screws 750W to 1 2kW type Two M3 6 screws Sens terminal cover Or MUST ...
Страница 26: ...sure to attach the covers Output terminal cover full cover type for models with terminal board outputting current of 60A or lower Attach the cover provided Fix with four M3 6 screws Output terminal cover half cover type for models with bus bar Attach the cover provided Fix with three M3 6 screws Sens termina cover Or MUST ...
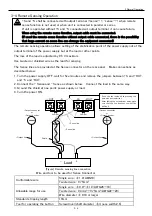
Страница 27: ...ob clockwise all the way to the maximum or ensure that it is set to the required current which allows setting to the desired voltage 3 1 2 Constant Current Mode The power supply unit operates in the constant current mode when the load resistance is low enough to make the load current IL more than the current setting IL Iset In the constant current mode the current is constant at the set value Iset...
Страница 28: ...ng mode when shipped 3 3 2 Setting Output Voltage Output Current 1 Turn counterclockwise the output voltage output current setting volume on the front panel all the way 2 Turn the power switch ON 3 Pressing the output voltage output current preset switch and keeping it pressed shows the voltage and current settings on the display Turn the output voltage volume to adjust the voltage as desired Then...
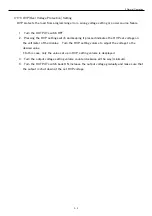
Страница 29: ...ng it pressed indicates the OVP set voltage on the voltmeter of the display Turn the OVP setting volume to adjust the voltage to the desired value In this case only the value set up in OVP setting volume is desplayed 3 Turn the output voltage setting volume counterclockwise all the way minimum 4 Turn the OUTPUT switch back ON increase the output voltage gradually and make sure that the output is s...
Страница 30: ...the Sense connector on the rear panel Make connections as described below 1 Turn the power supply OFF wait for five minutes and remove the jumpers between S and OUT and S and OUT 2 Connect the Sense and Sense as shown below Connect the load in the same way 3 Ground the shield at one point power supply or load 4 Turn the power ON Wire and tool to be used for Sense Connector Figure Remote sensing li...
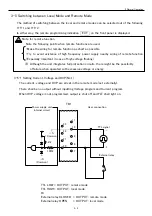
Страница 31: ...ase of high voltage floating Although the unit integrates full protection circuits there might be the possibility of failure when operated with excessive voltage or energy 3 5 1 Setting Current Voltage and OVP No 1 The current voltage and OVP are all set in the remote mode set externally There shall be no output without inputting Voltage program and Current program When OVP voltage is not programm...
Страница 32: ...ing local mode Or External relay CLOSED Voltage Current or OVP setting remote mode External relay OPEN Voltage Current or OVP setting local mode Voltage set in the remote mode Current set in the remote mode TB1 TTL signal 10 22 21 External relay 5kΩ 100Ω 9 8 S Common S Common Power supply unit Internal circuit User connection TB1 TTL signal 10 External relay 5kΩ 100Ω 9 S Common S Common Power supp...
Страница 33: ...tput if the power is recovered while in operation To reset turn the OUTPUT ON OFF switch to OFF and then back ON When the blackout protection function is not to be used turn SW1 8 ON In this case output for the set value is generated when the power is recovered TB1 TTL signal 13 12 11 25 External relay 5kΩ 100Ω 10 24 23 S Common S Common Power supply unit Internal circuit User connection SW1 ON 1 ...
Страница 34: ...put OUTPUT ON OFF switch shall be ON In this case the unit output the set output value after recovery For manual recovery set the 7 pin of SW1 to ON see below In this case unit shall not recover from over temperature protection even when the internal temperature gets down to normal temperature Once turn Power switch off and back on to resume the output Then turn off Output ON OFF switch and back i...
Страница 35: ...t carry out series connection exceeding 250 V 4 1 2 Parallel Operation Connect units of identical rated output voltage and current as per diagram right The same voltage should be set for all Output current is the total of the individual current Set the OVP level of all power supply units to maximum to avoid damage 4 2 Divided Operation Connect as shown on the right When used in this way the remote...
Страница 36: ...ge 110 of the rated output for 10 V 3 Reduce the OVP program voltage gradually until the FLT fault indication is illuminated and the power is shut down 4 Turn the OUTPUT switch OFF and turn the voltage knob to 0 5 Turn the OUTPUT switch back ON increase the output voltage gradually and make sure that the output is shut down at the set OVP voltage TB1 0 10Vdc 5 18 7 19 6 S Common Power supply unit ...
Страница 37: ...or OFF by the remote switch OUTPUT switch on front panel should be ON When remote switch is OFF and LD is displayed on the front panel output does not come out When remote switch is ON and LD is disappeared from the front panel output is able to be out The relationship between OUTPUT switch and remote switch is shown below OUTPUT Switch Remote Switch Status ON ON Status of OUTPUT ON ON OFF Status ...
Страница 38: ...OFF OUTPUT ON To make ON OFF of and to OFF ON to reverse the logic To make OFF ON apply 5 V between PINs 8 and 4 To make OFF ON OPEN the jumper between the PINs 10 and 21 When 5 V is applied between PINs 8 and 4 it is turned ON Stopping application of 5 V turns it OFF TB1 8 20 19 18 17 5Vdc 10mA 510Ω 7 6 5 4 User connection Power supply unit Internal circuit ...
Страница 39: ... Rating Voltage is controllable with external voltage 0 to 10V 3 at SW1 to be ON 4 5 2 Setting the Voltage Program with External Resistance 0 to Rating Voltage is controllable with external resistor 0 to 10kΩ 1 at SW1 to be ON CAUTION TB1 0 10VDC 5 1 S Common User connection Power supply unit Internal circuit ON SW1 1 8 0 10kΩ TB1 6 5 1 S Common 0 1mA Power supply unit Internal circuit User connec...
Страница 40: ...o be ON 4 6 Monitor Status Output 4 6 1 Monitor Output 0 to Rating Voltage Current are able to be monitored with 0 to 10V 5 and 6 at SW1 to be OFF TB1 0 10VDC 5 2 S Common User connection Power supply unit Internal circuit ON SW1 1 8 TB1 0 10kΩ 5 2 S Common 0 1mA Power supply unit Internal circuit User connection ON SW1 1 8 5 1 Output current monitor 0 10VDC 15 3 0 10VDC 1kΩ 14 18 0 10VDC 1kΩ S Co...
Страница 41: ...ature protection AC fault AC voltage drop 11 Make short circuit between Output Pin and Common at status output When using with PINs 6 11 12 and 13 floating be sure to maintain the voltage on PINs 5 and 10 at 100 VDC or lower Especially be sure to follow the instructions above when using negative output CAUTION TB1 13 12 11 20Ω 20Ω 10 9 8 7 6 25 24 23 22 21 20 19 20Ω User connection 5mA or less R 4...
Страница 42: ...ol Are CV and CC controls at front being the minimum At CV remote control Cross Over mode becomes active with CC control setting value at front Same as CC OVP remote control Refer to Pages 3 1 3 5 through 3 7 Is OVP setting correct Refer to Page 4 2 Is OUTPUT switch being ON Refer to Pages 2 5 through 2 7 Is Remote Setting correct Refer to Pages 3 5 through 3 7 Is the impedance of V con for 10V co...
Страница 43: ......