169
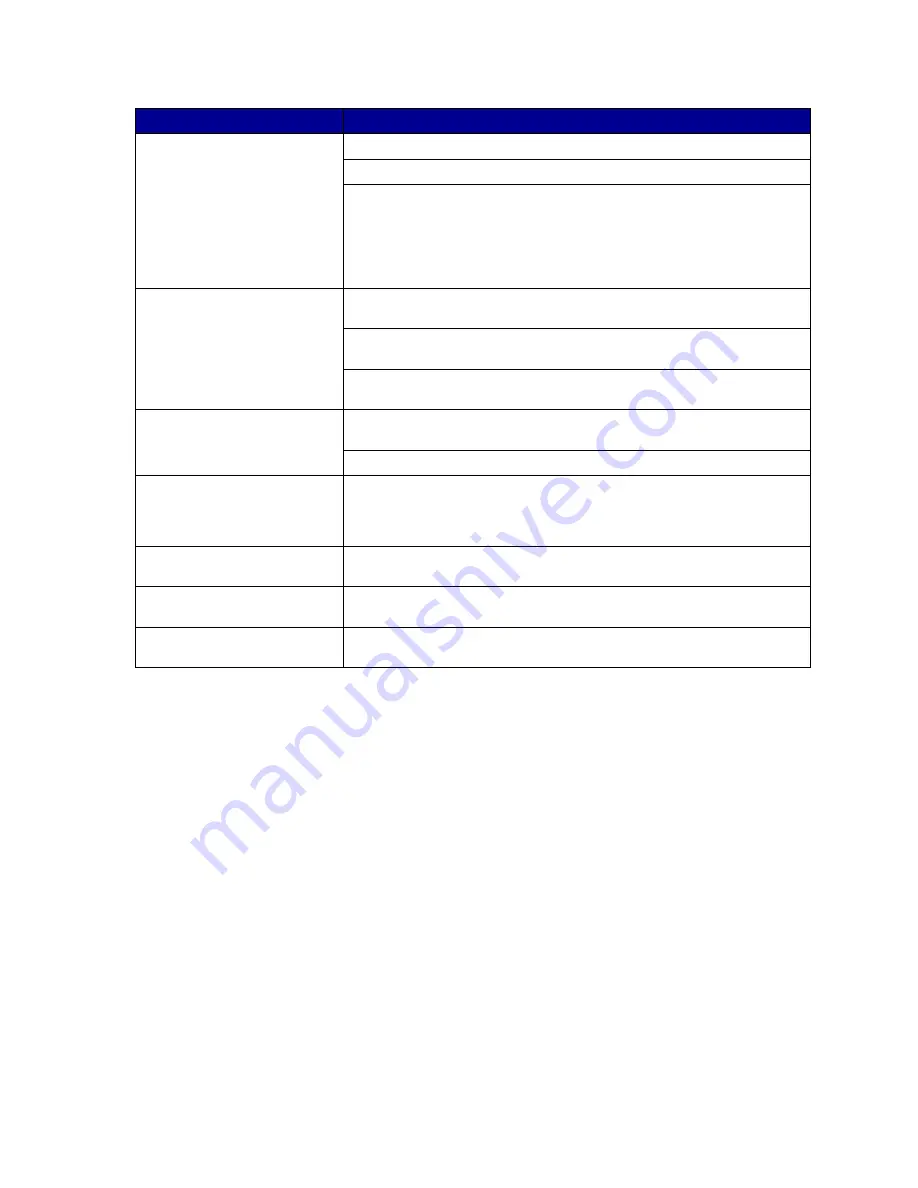
Cannot receive faxes.
Make sure neither Fax Port nor Fax Buffer is set to Disabled in the Fax Menu.
Make sure the fax machine you have connected is a class 1 fax modem.
If power to the modem has been interrupted, complete the following steps in
the order listed:
1 Turn the printer power off.
2 Turn the modem power on.
3 Turn the printer power on.
Large jobs will not collate.
Reduce the complexity of your print job. Eliminate the number and size of
fonts, the number and complexity of images, and the number of pages.
Add more printer memory. See
Adding memory
, or refer to the Setup Guide
for more information.
Install an optional hard disk. See
Hard disk
, or refer to the Setup Guide for
more information.
Transparencies curl excessively.
Make sure you’re using recommended Lexmark transparencies. See
Transparencies
for more information.
Make sure exit tray is fully open.
Paper jam message does not
clear.
To clear the paper jam messages, you must press
Go
. If the paper jam
message continues, remove all paper from the paper path. Check both inside
the printer as well as the paper source you were using. Close all doors and
press
Go
. See
Clearing paper jams
for more information.
Page that jammed does not
reprint after you clear the jam.
Set Jam Recovery to Auto or to On in the Setup Menu. See
Auto Continue
for more information.
Cannot insert a toner cartridge
into the printer.
Make sure the cartridge is aligned properly and is being installed in the
correct location. See
Replacing a toner cartridge
for more information.
Toner accumulates inside the
printer.
Replace the toner cartridge that matches the color of the toner that has
accumulated inside the printer. See
Replacing a toner cartridge
.
Problem
Action
Содержание 12N0003 - C 910 Color Laser Printer
Страница 1: ...www lexmark com User s Reference October 2001 Lexmark C910 ...
Страница 2: ......
Страница 10: ...viii ...
Страница 53: ...51 4 Close the multipurpose feeder door ...
Страница 99: ...97 5 Loosen the thumbscrews on each side of the transfer belt cover 6 Lift and remove the transfer belt cover ...
Страница 100: ...98 7 Loosen the thumbscrews on each side of the transfer belt 8 Pull the transfer belt out ...
Страница 102: ...100 3 Slide the transfer belt in until it is fully seated 4 Tighten the transfer belt thumbscrews ...
Страница 127: ...125 5 Lift the optional drawer ...
Страница 128: ...126 36 Removing the duplex unit 1 Turn the printer off 2 Open the duplex unit door ...
Страница 129: ...127 3 Loosen the thumbscrews securing the duplex unit 4 Slide the duplex unit out ...
Страница 130: ...128 5 Close the duplex unit door ...
Страница 158: ...156 3 Loosen the two screws shown 4 Pull out the duplex unit far enough to see the duplex unit inlet ...
Страница 169: ...167 3 Close the top cover 4 Press Go ...


