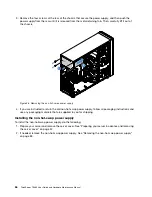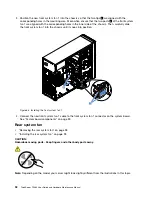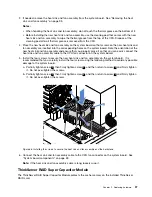
3. Install the new non-hot-swap power supply into the chassis so that the four screw holes in the new
non-hot-swap power supply are aligned with the corresponding holes in the rear of the chassis. Then,
install the four screws to secure the new non-hot-swap power supply in place.
1
1
2
2
0
M
GM
T
3
4
ID
1
2
Figure 57. Installing the non-hot-swap power supply
4. Connect cables to the new non-hot-swap power supply. Then, properly route the cables and secure the
cables with the cable clips and ties in the chassis.
Intrusion switch
This topic applies only to server models that have the intrusion switch installed.
•
“Removing the intrusion switch” on page 87
•
“Installing the intrusion switch” on page 88
Removing the intrusion switch
To remove the intrusion switch, do the following:
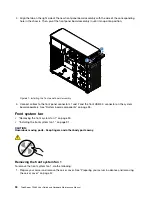
1. Prepare your server and remove the server cover. See “Preparing your server in advance and removing
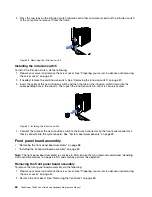
2. Locate the intrusion switch. Then, disconnect the intrusion switch cable from the branch connector on
the front panel connector 2.
.
87
Содержание ThinkServer TS460
Страница 1: ...ThinkServer TS460 User Guide and Hardware Maintenance Manual Machine Types 70TQ 70TR 70TS and 70TT ...
Страница 14: ...xii ThinkServer TS460 User Guide and Hardware Maintenance Manual ...
Страница 18: ...4 ThinkServer TS460 User Guide and Hardware Maintenance Manual ...
Страница 52: ...38 ThinkServer TS460 User Guide and Hardware Maintenance Manual ...
Страница 68: ...54 ThinkServer TS460 User Guide and Hardware Maintenance Manual ...
Страница 138: ...124 ThinkServer TS460 User Guide and Hardware Maintenance Manual ...
Страница 144: ...130 ThinkServer TS460 User Guide and Hardware Maintenance Manual ...
Страница 148: ...134 ThinkServer TS460 User Guide and Hardware Maintenance Manual ...
Страница 159: ...Taiwan BSMI RoHS declaration Appendix C Restriction of Hazardous Substances RoHS Directive 145 ...
Страница 160: ...146 ThinkServer TS460 User Guide and Hardware Maintenance Manual ...
Страница 171: ......
Страница 172: ......


