Setup Mode
Controllers
7-19
PitchDwn
). Any physical controller that uses the Control Destination list can be assigned to
PitchUp
or
PitchDwn
. To keep things simple though, you will normally want to use
BendUp
as
a Pitch Wheel destination and use
AuxBend 1
and
AuxBend 2
for other controllers, such as the
Sliders and Ribbon.
Keep in mind that not all MIDI devices respond to Bend Range messages. With many older
MIDI instruments, you must set bend ranges on the devices themselves.
Changing programs sends a Bend Range message with the current program’s values. So does
pressing
Panic
, which is a quick way to reset your PC3 or MIDI slaves if you’ve used a controller
to modulate the bend range.
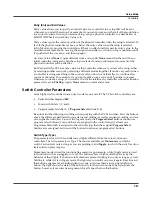
Aux Bend 1 Up and Aux Bend 1 Down
Like Bend Range, Aux Bend 1 defines the range for Pitch Bend messages, but does so for those
physical controllers assigned to
MIDI 21
. There are two parameters related to AuxBend 1: an
upward value (AuxBend1Up) and a downward value (AuxBend1Dwn). This means that you
can set different values for upward and downward pitch-shifting. For example, you could get
the Pitch Wheel to give you both vibrato and whammy-bar effects for the guitar program in a
setup. In the zone that contains the guitar program, set AuxBend1Up to
2ST
and AuxBend1Dwn
to
12ST
, then assign the PWUp and PWDn parameters on the WHEEL page to a value of
MIDI21
. Now moving the Pitch Wheel up gives you a whole tone of upward bend, while
moving it down gives you a full octave of downward bend.
In most factory setups,
AuxBend 1
is the assignment for the Ribbon.
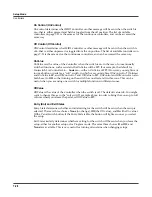
Aux Bend 2 Range
The PC3 allows you to specify a third pitch bend range; this is called AuxBend 2, and it defines
the range for MIDI Controller 15 messages. For AuxBend 2, you can set only one range for both
upward and downward pitch bending.
Controllers
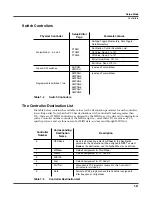
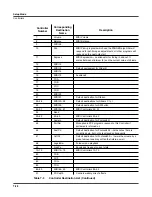
Controller editing is one of the strongest aspects of the PC3’s usefulness as the main controller
for a sophisticated MIDI studio. In this section, we’ll talk about two different types of
“controllers” as they apply to the PC3. One is the
physical
controllers: the wheels, buttons,
pedals, etc. that you move with your fingers or feet. The other is
MIDI
Controllers, which are
MIDI commands sent by the PC3. For our purposes, “MIDI Controllers” includes the complete
set of Controllers defined by the MIDI Specification, as well as pitchbend, aftertouch, and a few
other useful MIDI commands. To fend off confusion, we’ll refer to the PC3’s physical controllers
with a lower-case c, and MIDI Controllers with an upper-case C.
Any
MIDI
Controller can be used as the assignment for any
physical
controller (and for multiple
physical controllers, as well). Or in other words, any physical controller like the Mod Wheel can
be programmed to send any MIDI control signal. In addition, each controller in each setup zone
can be tweaked just like keyboard velocity (or any other Setup-mode parameter). Although
controller editing on the PC3 can be somewhat complex, it can also be very rewarding.
To get an idea of the expressive capabilities of Setup mode, explore the factory setups that come
with the PC3.
Содержание PC3
Страница 24: ...1 6 Introduction Options ...
Страница 50: ...4 4 The Operating Modes Using the Modes ...
Страница 174: ...7 54 Setup Mode The Utility Soft Buttons ...
Страница 178: ...8 4 Quick Access Mode Making Your Own QA Banks ...
Страница 204: ...9 26 Effects Mono Algorithms ...
Страница 266: ...A 2 MIDI Implementation Chart ...
Страница 308: ...Index x ...

