50
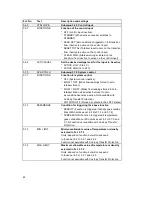
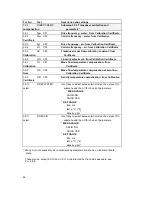
The operator can now choose either A) Automatic (recommended) or B) manual adjustment.
A) Automatic adjustment :
B) Manual adjustment :
In all the following examples, a short notation is used for the setting of the signal converter.
Pushing a key several times is indicated by the number of times without the intermediate
display messages. Only the final display output is listed. If programming is possible in the
different menus 1.0 or 3.0 the only change is in the function number (e.g. for zero adjustment
1.1.1. instead of 3.1.1.), the inputs for the programming of the functions are the same.
Under certain conditions, it may not be possible to adjust the zero point, for instance when :
–
The medium is in motion, because the shut-off valves etc. are not functioning properly.
–
There are still gaseous inclusions in the primary head because it was flushed insufficiently.
–
Resonant vibration of the piping interferes with the primary head because of poor
installation.
In such cases the zero point adjustment will not be accepted. If the zero adjustment was
started by the binary input, the converter will show the message :
ZERO.ERROR
This will appear in the display for a short time after the adjustment. The converter also reports
the ZERO.ERROR in the status list.
If the zero calibration was started from the menus then Parameter Error 4.3 will be displayed
when the operator tries to accept the new values.
key
Display
line 1
line 2
↵
CALIB. ( NO)
↑
CALIB. (YES)
↵
X.X PERCENT*
↵
ACCEPT (YES)
4x
↵
Return to measuring mode
* Display of transducer live zero as a % of
maximum flow rate, for a period of 20 seconds.
Key
Display
line 1
line 2
↑
SET.VALUE
↵
(0).000
kg/min
Input zero value in the
sequence : dimension, sign,
numeric value.
↵
4x
↵
Return to measuring mode.


