49
6.
Description of Functions
6.1
Zero point adjustment
When operating the system for the first time, it is necessary to set the zero point of the
instrument.
Once the zero point has been adjusted, the installation should not undergo any further
modifications in order to maintain the quality of the measurement. This means that after
system changes (such as the piping), it is advisable to re-adjust the zero-point.
To achieve a successful zero calibration the primary head should be completely full of process
fluid at normal operating pressures and temperatures. Ideally there should be no air inclusions
in the fluid, particularly for horizontal installations, so it is recommended that the primary head
be flushed with the process fluid at a high flow rate (>50%), for 2 minutes, prior to starting the
adjustment. After flushing, flow in the primary head must be brought back to zero by tightly
closing appropriate valves.
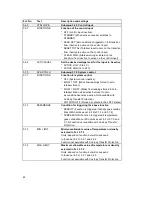
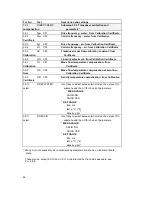
The zero off-set can either be measured automatically or entered manually using the display
keys. If an automatic adjustment is to be made then the operator should trigger this, with the
front cover still in place (compact systems only), using the bar magnet provided to operate the
magnetic sensors on the display. This is to ensure that the zero adjustment is carried out with
the mechanical installation exactly the same as for normal operation.
Begin from the measuring mode.
NOTE:
The brackets around parts of the above text indicates the cursor position, these characters will
be flashing on the display. Flashing values can now be changed with the
↑
key. Pressing the
→
key moves the cursor to the next “field” which then starts to flash.
Key
Display
line 1
line 2
→
9-key stroke entry code
(if enabled)
Fct. (1).0 OPERATOR
↑
Fct. (2).0 TEST
↑
Fct. (3).0 INSTALL
→
Fct. 3.(1) BASE DATA
→
Fct. 3.1.(1) ZERO SET
→
(MEAS.VALUE)


