background image

Maestro Software

40

Key Concepts

Parameter Locations (in Maestro Screens)

To determine where a parameter may be viewed in the Maestro
software, refer to 

Appendix 1: Parameter Locations

 at the end of this

document. The following screen illustrations define the parameters.

Status Screens

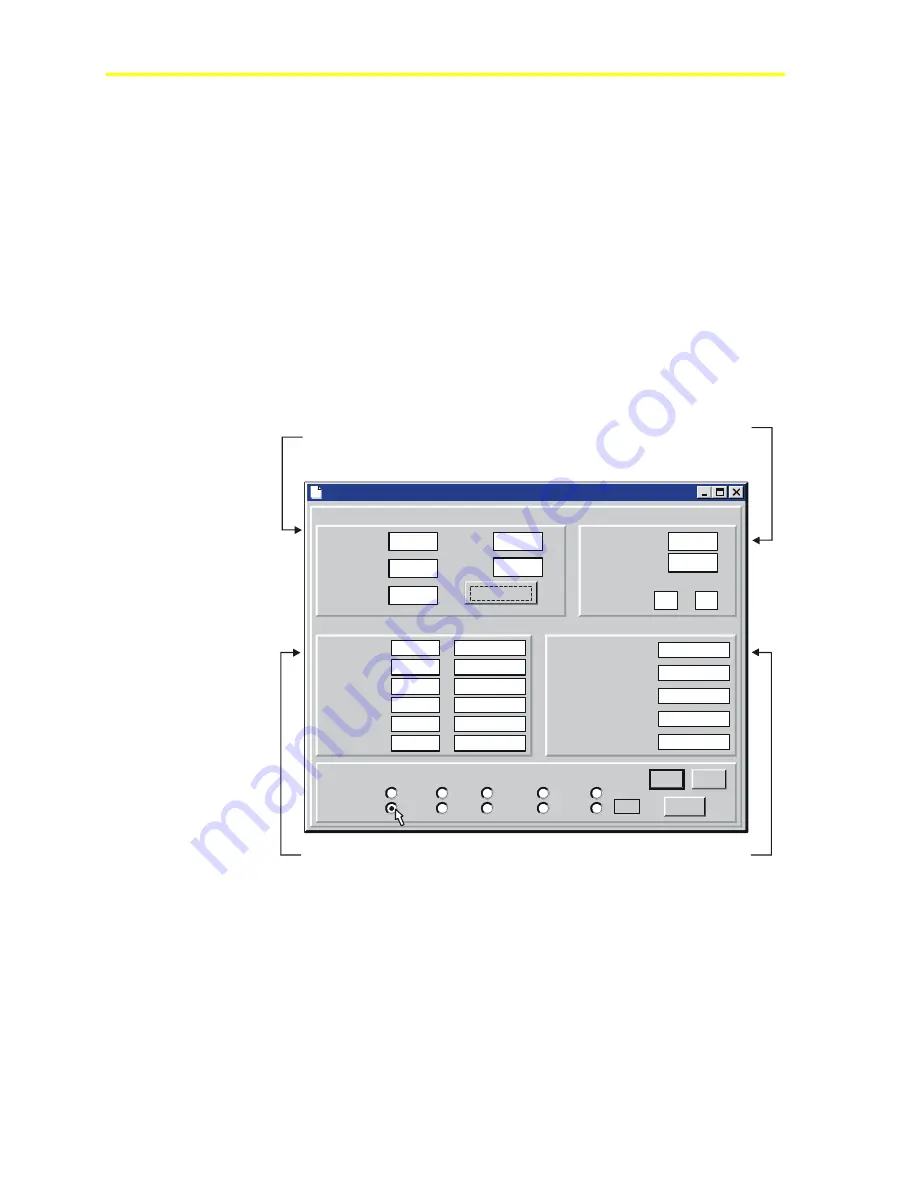
The following screens illustrate the information that is found on the
HVAC, Refrigeration, System, and Input and Output status screens.

Refrigeration Status Screen

Unit #3 Condensing Units

Inputs:

Suction:

Temp:

Discharge:

Oil 1:

Oil 2:

Logs

Outputs                 Actual                Override

Comp 1:

Comp 2:

Fan 1:

Fan 2:

LLSol:

Evap Fan:

Defrost

Circuit in Defrost:

Defrost Status:

Termination Status:

Last Terminated By:

Time Remaining:

Alarms:

Comp Alarms:

Circuit Alarms:

Oil Restarts

Comp. 1:

2:

Setpoints:
Status:

Circuit

Compr.

Alarms

Condenser Defrost

Next

Undo

Prev

#1

The 

 section shows the current sensor

reading for each of the refrigeration inputs.

Inputs

The 

 section displays the relay 

status (On or Off) for each of the 
refrigeration outputs. 

Outputs

The 

 section displays

whether there are compressor 
or circuit alarms that have not
been acknowledged.

Alarms

The 

 section displays the 

current defrost cycle status.

Defrost

Figure 33: Status Screen for Refrigeration Parameters

Содержание PENN ACT2

Страница 1: ...System Requirements 6 About this Bulletin 6 Installing the Software 7 Introduction 7 Key Concepts 8 Procedure Overview 9 Detailed Procedures 10 Installing Maestro Software in Windows 3 1 10 Installing Maestro Software in Windows 95 11 Establishing a New Site 17 Introduction 17 Key Concepts 18 Hardware Setup 18 Definitions 18 Connection Types 19 Information Storage 19 Procedure Overview 20 Detailed...

Страница 2: ...e 35 Selecting an ACT2 Controller at the Chosen Site 37 Using the Maestro Software to View System Information 39 Introduction 39 Key Concepts 40 Parameter Locations in Maestro Screens 40 Status Screens 40 Procedure Overview 44 Detailed Procedures 45 Viewing Refrigeration HVAC or Generic I O Setpoint and Status Information 45 Viewing the System Status List 47 Viewing System Setup Information 48 Vie...

Страница 3: ...rom a Backup 72 Using the Maestro Software to Log Parameters 73 Introduction 73 Key Concepts 74 Log Interval 74 Logged Values 74 Procedure Overview 75 Detailed Procedures 76 Setting a Refrigeration Circuit Log Interval 76 Setting an HVAC Log Interval 78 Setting an Input or Output Log Interval 80 Using the Maestro Software to Monitor Alarms 83 Introduction 83 Key Concepts 84 Alarm Logs 84 Procedure...

Страница 4: ...y Concepts 96 Default Password 96 Disabling the Password 96 Procedure Overview 97 Detailed Procedures 98 Changing the Password 98 Using Shortcuts in the Maestro Software 99 Introduction 99 Key Concepts 100 Maestro Software Main Screen 100 Maestro Software Shortcut Buttons 101 Troubleshooting 103 Appendix 1 Parameter Locations 105 Alphabetical Parameter Listing by Functional Groups 105 Parameter Li...

Страница 5: ...onnection to an ACT2 controller Direct connection is frequently used as a quick way to enter the initial setpoints and parameter settings when commissioning an ACT2 controller A new ACT2 controller may be set up at the shop before it is delivered to the job site reducing the need to program the controller with the integral four key system Remote connection is frequently used to monitor the status ...

Страница 6: ...subsections Introduction The introduction gives a brief overview of the topics covered in that chapter and an explanation of how those topics are useful Key Concepts This subsection defines key terms for the topics in that chapter including parameter definitions and location Procedure Overview This subsection summarizes the steps needed to complete the actions covered in that chapter It is useful ...

Страница 7: ... section covers the procedure for installing the Maestro software To set up monitor or modify an ACT2 controller using a computer the Maestro software must be installed on the computer Once installed on a computer the Maestro software enables you to interface with multiple ACT2 controllers at different locations ...

Страница 8: ...e beginning installation check that you have all disks for the Maestro software installation The computer must meet the minimum requirements set out in the Overview section Installation takes 5 to 10 minutes depending on the computer used ...

Страница 9: ...w starting at Step 5 Install the Maestro Software in a Windows 95 Environment 1 Insert Disk 1 of the Maestro software into the disk drive 2 Click the Start button 3 From the start menu click Run 4 Type a setup where a is the disk drive containing Maestro Installation Disk 1 5 Click the OK button 6 Review and answer the prompts clicking on the Next button to continue 7 When prompted remove Disk 1 f...

Страница 10: ...Maestro software into the disk drive 2 From the Program Manager menu click File 3 Click Run Figure 1 Program Manager 4 Type a setup in the Command Line box where a is the disk drive containing Maestro installation disk 1 Figure 2 Run Dialog Box 5 Follow the installation instructions below starting at Step 5 ...

Страница 11: ...he Maestro software into the disk drive 2 Click the Start Button Figure 3 Start Button 3 From the start menu click Run Figure 4 Start Menu 4 Type a setup where a is the disk drive containing the Maestro installation Disk 1 5 Click the OK button Figure 5 Run Dialog Box Result The software begins the setup process Figure 6 Setup Screen ...

Страница 12: ...Maestro Software 12 6 Review then click the Next button to continue Figure 7 Welcome Screen 7 Review then click the Next button to continue Figure 8 Readme Screen ...

Страница 13: ... Maestro software will reside press the Browse button and follow the screen instructions 9 Review then click the Next button to continue Figure 9 Destination Location Dialog 10 Select the folder where the Maestro program icon should appear 11 Click the Next button to continue Figure 10 Program Folder Dialog ...

Страница 14: ...tall Figure 12 Installation Status Screen 14 At the following prompt remove Disk 1 from the drive and insert Disk 2 into the drive Cancel OK Path A Please insert the next disk Disk 2 If the files on this disk can be found in another location for example in another drive enter its full path or click the Browse button to select its path Figure 13 Next Disk Dialog 15 Click the OK button to continue ...

Страница 15: ... 16 When prompted remove the current disk and insert the next disk until installation is complete Result When installation is complete the Maestro Program Group similar to the window shown below with a shortcut icon to run the Maestro software is placed on your computer screen Figure 14 Maestro Program Group ...

Страница 16: ...Maestro Software 16 ...

Страница 17: ... site parameters can then be pre programmed and saved and when the controller is available the parameters can be downloaded to the controller An existing functional site can be set up through a direct or modem connection When the Personal Computer PC and the controller are connected the Maestro software detects the hardware at that site and displays the appropriate screens A site needs to be estab...

Страница 18: ...he communication ID for the first controller at each site must be 1 The second must be 2 the third must be 3 and so on See Programming ACT2 Controller System Parameters Technical Bulletin LIT 804400 Site A location or job that has a single ACT2 controller or network of controllers The site name should be unique and easily associated with a particular location It can be up to 23 characters long Sit...

Страница 19: ...is taken from the eight character site abbreviation entered during site setup Site information is updated when the Disconnect command is chosen from the Site menu Any changes made to a sites parameters are updated and stored even when working offline IMPORTANT To save information from a session the Disconnect command in the Site menu must be selected before the session is terminated The following ...

Страница 20: ...above 2 Click the Site menu and select the type of connection that you currently have with this site Dial Direct RS 485 or TCP IP or Off Line 3 If the connection type selected is either Dial or Direct RS 485 or TCP IP the Maestro software will process the connection and determine the number and type of units connected at that site When the connection is completed go to Step 4 If the connection typ...

Страница 21: ... the Maestro Software Interface 21 Detailed Procedures Establishing a New Site 1 Double click the Maestro icon to run the Maestro software Figure 15 Maestro Start Icon 2 Click the File menu and select Setup Comm Figure 16 Maestro File Menu ...

Страница 22: ...e ACT2 controller See Setting Up External Communications Technical Bulletin LIT 804250 for details on how to connect a computer to a controller Figure 17 Communications Setup Dialog 4 If a modem connection is used set the baud rate to 9600 5 Click the OK button 6 Click the Site menu and select Pick Site Figure 18 Site Menu ...

Страница 23: ...Programming the ACT2 Controller Using the Maestro Software Interface 23 7 Click the Add button Figure 19 Remote Site Dialog Box ...

Страница 24: ...e number Notes The site name may be up to 23 characters and the phone number may be up to 23 digits The site abbreviation is used to name the backup folder on the computer so it must be eight characters or less and follow DOS naming conventions Figure 20 Remote Site Setup Screen 9 Click the Accept button 10 Click the OK button ...

Страница 25: ... the Maestro Software Interface 25 Establishing the ACT2 Controllers at a New Site 1 Establish the new site see above 2 Click the Site menu and select Pick Site Figure 21 Site Menu 3 Select the site where the new ACT2 controller is located ...

Страница 26: ...stro Software 26 4 Click the button at the bottom of the window that describes the type of connection currently used with this site Dial Direct RS 485 or TCP IP or Off Line Figure 22 Remote Site Dialog Box ...

Страница 27: ...new site using the following steps a Click the Site menu and select Pick Unit Help Applications Window File Johnson Controls Maestro Remote Communications 1 Perform Maestro 1 42 Site Automated Dialout Results Disconnect Pick Unit Pick Site Pick Site Automated Dialout Setup Automated Dialout Setup Dial Dial Direst RS 485 or TCP IP Direst RS 485 or TCP IP Off Line Off Line Receive Setpoints From Con...

Страница 28: ...ntroller at each site 2 for the second controller 3 for the third and so on d Select the type and version of controller from the list Notes Units named TituS appear in the New Unit Information list box and TituS commands appear in the Maestro menus TituS is the same as ACT2 If an ACT2 version does not appear in the list box choose the closest TituS version ...

Страница 29: ...Cancel Performer 2 04 Performer 2 09 Performer 3 05 ACT2 CS 2 05 ACT2 CS 2 09 Figure 25 New Unit Dialog Box f Repeat Steps 3a through 3e for each ACT2 controller at the site 6 Proceed to Using the Maestro Software to View System Information to view system setup and status or to Using the Maestro Software to Modify Parameters to set up the setpoints and other parameters ...

Страница 30: ...Maestro Software 30 ...

Страница 31: ...Off Line allows you to view how the site is set up and does not require communication with the site controllers With an offline connection you may access and modify site information on the computer hard drive only but the site controller s current status cannot be monitored and the controller s parameters are not changed until Maestro communicates with the site Dial or Direct connections allow you...

Страница 32: ...nected to the ACT2 controller Off Line Connection The computer and the ACT2 controller do not communicate The Maestro software can only retrieve display and modify the existing ACT2 controller information on the computer s hard disk Later when a Dial or Direct connection is made Off Line modifications can be downloaded to the ACT2 and it s status can be updated to the computer hard drive Passwords...

Страница 33: ...gOn screen 3 Click the OK button Connect to a Site 1 Run the Maestro Software 2 Optional Log on to the Maestro software as described above 3 Click the Site menu and select Pick Site 4 Select the site that you wish to view 5 Click the type of connection that exists to this site Dial Direct RS 485 or TCP IP or Off Line Result The Maestro software determines the units connected at that site Off Line ...

Страница 34: ...button on the LogOn screen 1 Double click the Maestro icon to run the Maestro software Figure 26 Maestro Start Icon 2 Type the password in the Maestro LogOn screen Notes To reach the Maestro LogOn screen while the program is running click the File menu and select Logon Figure 27 Maestro LogOn Screen The default log on password when Maestro is installed is ABC See Changing a Password with the Maest...

Страница 35: ... Site 1 Run the Maestro software 2 Optional Log on to the Maestro software as described above 3 Click the Site menu and select Pick Site Figure 28 Site Menu 4 Select the site you wish to view 5 Click the type of connection that exists to this site Dial Direct RS 485 or TCP IP or Off Line ...

Страница 36: ...ftware 36 Figure 29 Remote Site Dialog Box Result The Maestro software determines the units connected at the site Off Line uses unit information from previous connections that is stored on the computer hard drive ...

Страница 37: ...g the ACT2 Controller Using the Maestro Software Interface 37 Selecting an ACT2 Controller at the Chosen Site 1 Connect to a site Figure 30 Site Menu 2 Click the Site menu and select Pick Unit Figure 31 Site Menu ...

Страница 38: ...Maestro Software 38 3 Click the unit you wish to view Figure 32 Select Unit Dialog 4 Click the OK button ...

Страница 39: ...e computer screen than on the controller display Using the Maestro software to view information also facilitates troubleshooting a site from a remote location Viewing controller parameters before visiting a job site allows the technician to anticipate the type of service call needed Controller information logs can also be viewed from a remote PC and can provide a history of how the system operates...

Страница 40: ...il 2 Logs Outputs Actual Override Comp 1 Comp 2 Fan 1 Fan 2 LLSol Evap Fan Defrost Circuit in Defrost Defrost Status Termination Status Last Terminated By Time Remaining Alarms Comp Alarms Circuit Alarms Oil Restarts Comp 1 2 Setpoints Status Circuit Compr Alarms Condenser Defrost Next Undo Prev 1 The section shows the current sensor reading for each of the refrigeration inputs Inputs The section ...

Страница 41: ...Programming the ACT2 Controller Using the Maestro Software Interface 41 HVAC Status Screen Figure 34 Status Screen for HVAC Parameters ...

Страница 42: ...Maestro Software 42 Generic Input Status Screen Figure 35 Status Screen for Generic Input Parameters Generic Output Status Screen Figure 36 Status Screen for Generic Output Parameters ...

Страница 43: ...ACT2 Controller Using the Maestro Software Interface 43 Analog Output Status Screen Figure 37 Status Screen for Analog Output Parameters Usage Status Screen Figure 38 Status Screen for Energy and Water Usage Parameters ...

Страница 44: ...sh to view See Connecting to an Existing Site for instructions 2 Select the Applications menu and click System Setup 3 To close this screen click the upper left corner of the screen and select Close View System Setup Information 1 Connect to the site and select the ACT2 controller that you wish to view See Connecting to an Existing Site for instructions 2 Select the Applications menu and click Sys...

Страница 45: ...ations menu and click Condensing Unit Screens for refrigeration information HVAC Screens for HVAC information or I O Screens for information on generic input or output setup and status Figure 39 Applications Menu Notes Clicking the COND UNIT button on the left of the screen is a quick way to reach the refrigeration screens Clicking the HVAC button on the left of the screen is a quick way to reach ...

Страница 46: ... min sec Board 2 Pt 3 Delay 0 Digital Cut on when Open Analog Cut on when 40 Min 0 Timed Normal On Off Liq Line Override Overrides Min 0 Timed Normal On Off Evap Fan Override Setpoints Status Circuit Compr Alarms Condenser Defrost Next Undo Prev 1 Figure 40 Refrigeration Circuit Selection 4 Select the parameters setpoints or status you wish to view using the option buttons at the bottom of the scr...

Страница 47: ...ect the ACT2 controller that you wish to view See Connecting to an Existing Site for instructions 2 Select the Applications menu and click System Status Figure 41 Applications Menu Result The following screen is displayed Figure 42 System Status Screen 3 To close this screen click the upper left corner of the screen and select Close ...

Страница 48: ...that you wish to view See Connecting to an Existing Site for instructions 2 Select the Applications menu and click System Setup Figure 43 Applications Menu Result The following screen is displayed Figure 44 System Setup Screen 3 To close this screen click the upper left corner of the screen and select Close ...

Страница 49: ...2 controller that you wish to view See Connecting to an Existing Site for instructions 2 Select the Applications menu and click Condensing Unit Screens for refrigeration logs HVAC Screens for HVAC logs or I O Screens for input logs Figure 45 Applications Menu 3 Select Status at the bottom of the screen Figure 46 Condensing Unit Status ...

Страница 50: ...he HVAC screen click the Graphs button 5 In the Available Logs column click the logs you wish to view Figure 47 Log Dialog Box 6 Click the Add button to move the logs into the Selected Logs column 7 Click the Get Now button to view the selected logs ...

Страница 51: ...a cable By changing parameter values offline saving the changes to the computer hard drive and later connecting to the controller and downloading the changes Parameters setup is grouped into four main categories with subcategories as follows Condensing Unit Refrigeration System Setup five screens Circuit parameters Compressor parameters Alarm parameters Condenser parameters Defrost parameters HVAC...

Страница 52: ...that sensor Liquid Line This defines the location of the liquid line solenoid valve output In this example the liquid line solenoid output is located on Output Board 3 I O board Evaporator Fan This defines the location of the evaporator fan output In this example the evaporator fan output is located on Output Board 3 Point 2 I O board Overrides This section is used to override the liquid line sole...

Страница 53: ...th those actions Alarm in Vacuum When checked this parameter will log an alarm if the compressor suction pressure indicates that the system is in a vacuum Compressor 2 as Unloader When checked the second compressor will be designated as an unloader Control By This parameter defines whether the compressors will be controlled by a temperature or a pressure sensor reading Pump Down This defines the t...

Страница 54: ... in the time delay Discharge Pressure This defines the discharge pressure alarm setpoints and time delays Discharge pressure values outside of this range will trigger an alarm if they persist for longer than the time defined in the time delays Case Temp This defines the case temperature alarm setpoints and time delays Case temperatures outside of this range will trigger an alarm if they persist fo...

Страница 55: ...nds This parameter allows Fan 1 to be overriden On or Off The override duration may also be defined here Fan 2 This section defines the setpoints action and I O board location of the output for Condenser Fan 2 This section also defines the action of the Condenser Fan 2 output when the controller is in the override mode Energize This parameter defines whether the relay will be energized at the On o...

Страница 56: ...imes must be given in the 24 hour clock format e g 6 00 p m must be entered as 18 00 Duration This defines the maximum length of the defrost cycle Runoff This defines the dripping time after defrost Manual Defrost These three buttons are used to manually begin a defrost cycle begin a runoff cycle dripping time or terminate a current defrost cycle Termination Outputs This gives the I O board locati...

Страница 57: ...nes which stage of cooling reclaim heat and auxiliary heat activate the second fan speed Zone Name This assigns a name to the zone shown Zone names can be up to eight characters long Prev Clicking on this button will display the previous HVAC zone setup screen The zone number is displayed to the left of this button and the zone name is displayed in the box above Next Clicking on this button will d...

Страница 58: ...tween successive stages of heat is the total differential divided by the number of stages is the minimum time in minutes between successive heating stages Dehum Setpoints defines the target humidity at which the ends dehumidification defines the differential in RH between setpoint and the point at which the output starts dehumidification is the amount of time Setpoint Deadband Delay output that th...

Страница 59: ... will take place Warmup will begin at the number of minutes before the end of night setback given in the Delay box See example below Cooling Setpoints This area defines when cooling is activated during night setback Setpoint Differential Delay defines the temperature at which cooling begins is the total differential between stages is the minimum time in minutes between successive stages Reclaim Se...

Страница 60: ...the outside temperature drops down to 15 F or colder warmup will be activated and night setback will end at 5 00 a m 60 minutes before the end of the normal night setback time If the outside temperature is between 15 and 30 F warmup will begin sometime between 5 00 and 5 30 a m The closer the outside temperature is to 15 F the earlier warmup will begin Night setback is used to save energy because ...

Страница 61: ...nnected at a particular input board and point define the type of sensor and set the frequency of readings logged from that sensor An offset is also available to compensate for long wiring runs or other factors that may shift the sensor reading Sensor names can be up to 15 characters long Alarms This section is used to define alarm points and time delays based on the sensor reading at this location...

Страница 62: ... will be energized at the On or Off setpoint In this example the Off setpoint 114 will energize the relay This also defines the relay failure status In this example the relay will fail de energized Control Input This provides an association between a previously defined input and this output Schedule Number This allows the output to be associated with a schedule Setpoints This defines the value fro...

Страница 63: ...00 00 Off Weds 00 00 Off Thur 00 00 Off Fri 00 00 Off Sat 00 00 Off Daily 00 00 Off 00 00 Off S S 00 00 Off Hol1 00 00 Off Hol2 00 00 Off 1 00 00 2 00 00 3 00 00 4 Send 1 2 3 4 5 6 7 8 9 10 11 12 Day Time Event Schedule This screen allows you to define up to 12 schedules and the actions associated with each schedule Holidays This allows you to define four dates on which the holiday schedule will b...

Страница 64: ...alog output is trying to maintain Deadband This is the value above or below the target during which the output does not change Gain This is the magnitude of change in the output caused by a change in the input High Percent This defines the high end of the analog output in either volts or mA A jumper on the ACT2 controller can be used to select either 0 10 volt or 4 20 mA output Low Percent This de...

Страница 65: ...Daily Total Alarm units for one 0 Daily NONE Pulsed Input Sensor for Usage Measurements This box is used to identify which sensor is monitoring energy or water usage From Input Setup Screen These values do not need to be changed their value is defined on the Input setup screen Alarm When Exceeded This area defines when usage should trigger an alarm Two values can be set for example an alarm when a...

Страница 66: ...are logged Outside Temperature This defines the I O board location of the outside air temperature sensor input Modem Initialization String This line is used to send specialized commands to the modem such as specifying after which ring the modem will answer Phone Numbers to Dial This defines a primary and secondary phone number for the modem to dial according to when an alarm condition is detected ...

Страница 67: ... Undo button on each screen before disconnecting or close the Maestro software without disconnecting Back Up Parameter Settings 1 Log on to the Maestro software See Connecting to an Existing Site 2 Connect to the site and select the ACT2 controller that you wish to view See Connecting to an Existing Site 3 Select the Site menu and click Receive Setpoints from Controller Restore Parameters from a B...

Страница 68: ... an Existing Site 3 View the parameters you wish to set See Using the Maestro Software to View System Information Help Window File Johnson Controls Maestro Remote Communications Maestro 1 42 Site HVAC I O Screens COND UNIT Applications I O Screens System Setup Load Alarms Load Alarms System Status System Status Clear TituS Memory Clear TituS Memory ALARMS ALARMS HVAC Screens Condensing Unit Screen...

Страница 69: ...ons Maestro 1 42 Site Automated Dialout Results Pick Unit HVAC I O Screens COND UNIT ALARMS ALARMS Pick Site Pick Site Automated Dialout Setup Automated Dialout Setup Dial Dial Direst RS 485 or TCP IP Direst RS 485 or TCP IP Off Line Off Line Receive Setpoints From Controller Receive Setpoints From Controller Send Setpoints to Controller Send Setpoints to Controller Disconnect Figure 63 Site Menu ...

Страница 70: ...ride Overrides Min 0 Timed Normal On Off Evap Fan Override Setpoints Status Circuit Compr Alarms Condenser Defrost Next Undo Prev 1 Figure 64 Condensing Unit Circuit Setpoint Screen b If you choose to exit without disconnecting the following menu is displayed Click the Discard Changes button to exit without saving changes made in this session Warning Save Changes to Disk Discard Changes Do Not Exi...

Страница 71: ...cting to an Existing Site 3 Select the Site menu and click Receive Setpoints From Controller Help Applications Window File Johnson Controls Maestro Remote Communications First Demo Site Maestro 1 42 Site Automated Dialout Results Automated Dialout Setup Dial Direct RS 485 or TCP IP Off Line Pick Site Disconnect Disconnect Pick Unit Pick Unit Receive Setpoints From Controller Send Setpoints to Cont...

Страница 72: ...e 3 Select the Site menu and click Send Setpoints to Controller Help Applications Window File Johnson Controls Maestro Remote Communications First Demo Site Maestro 1 42 Site Automated Dialout Results Automated Dialout Setup Dial Direct RS 485 or TCP IP Off Line Pick Site Disconnect Disconnect Pick Unit Pick Unit Receive Setpoints From Controller Receive Setpoints From Controller Send Setpoints to...

Страница 73: ...gged Parameter logs are used to create an historical graph of the parameter values over a period of time The ACT2 controller can log each input and output 500 times When 500 log entries have been stored the oldest entry is dropped when the next new log entry is recorded These logs are viewable either on the ACT2 controller panel or with the Maestro software See Using the Maestro Software to View S...

Страница 74: ... interval is set at 5 minutes the amount of time logged is 500 logs X 5 min log 2 500 minutes or 41 hours and 36 minutes Logged Values All entries include the day month hour and minute the log entry was recorded Refrigeration logs record the case and discharge temperature the suction discharge and oil pressure and the status of the liquid line defrost compressor condenser and evaporator fan HVAC l...

Страница 75: ...interval Set an HVAC Log Interval 1 Log on to the Maestro software See Connecting to an Existing Site 2 Connect to the site and select the ACT2 controller that you wish to view See Connecting to an Existing Site 3 Select the Applications menu and click System Setup 4 Set the HVAC unit log interval to a value greater than zero minutes 5 Select the Site menu and click Disconnect to save the new log ...

Страница 76: ...o view See Connecting to an Existing Site 3 Select the Applications menu and click Condensing Unit Screens Help Window File Johnson Controls Maestro Remote Communications Maestro 1 42 Site HVAC I O Screens COND UNIT Applications I O Screens System Setup Load Alarms Load Alarms System Status System Status Clear TituS Memory Clear TituS Memory ALARMS ALARMS HVAC Screens Condensing Unit Screens Figur...

Страница 77: ...atus Circuit Compr Alarms Condenser Defrost Next Undo Prev 1 Figure 69 Condensing Unit Circuit Setpoint Screen 5 Set the condensing unit log interval to a value greater than zero minutes Setting the log interval to 0 turns off condensing unit logs Unit 3 Condensing Units Circuit Name Soda Cooler Case Temp Board 2 Point 1 Error 0 Liquid Line 2 2 Evap Fan 2 3 Condensing Unit Log Interval Evap Fan De...

Страница 78: ...roller Send Setpoints to Controller Send Setpoints to Controller Disconnect Figure 71 Site Menu Setting an HVAC Log Interval 1 Log on to the Maestro software See Connecting to an Existing Site 2 Connect to the site and select the ACT2 controller that you wish to view See Connecting to an Existing Site 3 Select the Applications menu and click System Setup Help Window File Johnson Controls Maestro R...

Страница 79: ... delay minutes 00 00 00 None Outside temperature Board Save Send if Online Send if Online Figure 73 System Setup Screen 5 Select the Site menu and click Disconnect to save the new log interval Help Applications Window File Johnson Controls Maestro Remote Communications Maestro 1 42 Site Automated Dialout Results Pick Unit HVAC I O Screens COND UNIT ALARMS ALARMS Pick Site Pick Site Automated Dialo...

Страница 80: ... See Connecting to an Existing Site 3 Select the Applications menu and click I O Screens Help Window File Johnson Controls Maestro Remote Communications Maestro 1 42 Site HVAC I O Screens COND UNIT Applications HVAC Screens I O Screens System Setup Condensing Unit Screens Load Alarms Load Alarms System Status System Status Clear TituS Memory Clear TituS Memory ALARMS ALARMS Figure 75 Applications ...

Страница 81: ...ensors Pulse Type Setup 1 Board Name Water Heater Te High Temp Type Log interval Min 5 Offset 0 Point 1 High 110 Delay min 5 Low 98 Delay min 5 Units Per Pulse whole decimal 0 0 Minutes Per Unit 0 Units None Board 0 Point 1 None Board 0 Point 2 None Board 0 Point 3 This Only Relation Setp Stat Inputs Outputs Schedules A Out Usage Next Prev 1 Undo Autoreset Figure 76 Generic Input Setpoint Screen ...

Страница 82: ... Setp Stat Inputs Outputs Schedules A Out Usage Next Prev 1 Undo Autoreset Figure 77 Generic Input Setpoint Screen 6 Select the Site menu and click Disconnect to save the new log interval Help Applications Window File Johnson Controls Maestro Remote Communications Maestro 1 42 Site Automated Dialout Results Pick Unit HVAC I O Screens COND UNIT ALARMS ALARMS Pick Site Pick Site Automated Dialout Se...

Страница 83: ...rms and view and print alarm logs When the Maestro is in the Wait for Alarms mode the ACT2 controller can dial in and send an alarm immediately to the Maestro This can alert someone to trouble at a job site before the site even realizes that a problem exists All of the alarms received by the Maestro software are saved daily in an alarm log file that is named by the date the alarms were received ...

Страница 84: ...og or they may be automatically retrieved by setting the computer and Maestro to wait for alarms Manually retrieving alarm logs creates a file in the site directory containing the latest downloaded alarms When the Maestro is in the Wait for Alarms mode it creates one file per day which records all alarms from every site that has dialed an alarm This file is stored in the Maestro folder and is name...

Страница 85: ...ion exists with a site 1 Check that the modem is connected and turned on 2 Double click the Maestro icon to run the software 3 Click the File menu and select Wait for Alarms View Previously Stored Alarm Logs 1 Double click the Maestro icon to run the Maestro software 2 Click the File menu and select Open Alarm Log 3 Select the log file you wish to view 4 Click the OK button Print the Currently Dis...

Страница 86: ...Start Icon 3 Click the File menu and select Wait for Alarms Note Wait for Alarms command is not available on the File menu unless a modem connection exists Help Applications Site Window File Johnson Controls Maestro Logon Open Alarm Log Change Passwords Printer Setup Exit Alt F4 Maestro 1 42 Wait for Alarms Logoff Logoff Setup Comm Setup Comm Hangup Hangup Print Print Print Preview Print Preview F...

Страница 87: ...e 87 Result The following screen is displayed Alarm Monitor Alarm Messages Modem MODEM OK Initializing and Waiting for Alarms Figure 81 Alarm Display IMPORTANT The computer Maestro software and modem must remain On for the ACT2 controller to send alarms to the computer ...

Страница 88: ... Remote Maestro 1 42 Logon Change Passwords Printer Setup Exit Alt F4 Logoff Logoff Setup Comm Setup Comm Hangup Hangup Open Alarm Log Print Preview Print Preview Print Print Wait for Alarms Wait for Alarms Figure 83 File Menu 3 Select the log file you wish to view 4 Click the OK button Select Alarm Log File name Folders c encmaest alarms log Alarm Logs LOG c List files of type Drives c encmaest a...

Страница 89: ... you wish to print see above 2 Click the File menu and select Print Help Applications Site Window File Johnson Controls Maestro Remote Maestro 1 42 Logon Change Passwords Logoff Logoff Printer Setup Exit Alt F4 Setup Comm Hangup Open Alarm Log Print Preview Print Preview Print Wait for Alarms Figure 85 File Menu ...

Страница 90: ...Maestro Software 90 ...

Страница 91: ...covers the procedure for setting up the Maestro software to automatically dial out to an ACT2 controller site The Maestro software can call a site on a given schedule and download a log file containing a selection of parameter logs and alarms During automated dialout Maestro can also back up the site s parameter settings and reset acknowledge alarms ...

Страница 92: ...ialout will begin When multiple sites are selected they are dialed in the order that they appear in the box Begin dialing sites at Dial Selected Sites The box contains a list of all of the sites that are set up in that software If a site is highlighted it is selected for dialout If the site is highlighted and has a dashed line around the highlight the current options for that site appear in the ri...

Страница 93: ...ite and Retrieve Information 1 Connect and power up the modem 2 Log on to the Maestro software 3 Click the Site menu and select Automated Dialout Setup 4 Enter the desired dialout schedule and select the parameters you wish to retrieve 5 Click the OK button to save changes IMPORTANT The computer and Maestro software must remain running and the modem must be available for the automatic dialout to t...

Страница 94: ...u wish to retrieve Automated Dialout Information OK Cancel 3 ACT2 2 02C Zone 1 Zone Temp Zone 1 Zone Humidity Zone 1 Outside Temp Zone 2 Zone Temp Zone 2 Zone Humidity Zone 2 Outside Temp Zone 3 Zone Temp Zone 3 Zone Humidity Zone 3 Outside Temp Sensor Water Heater Te Selected logs for First Demo Site HH MM 24 hour Begin dialing sites at 01 01 Dial Out Options for First Demo Site Monday Dial this ...

Страница 95: ...ng the Maestro software password The Maestro software can be set up to require a logon password Password protection is used to deter unauthorized changes to site controller parameters When Maestro is password protected and you are not logged on to the software you may still view the setup and status screens however any parameter changes you make are not sent to the controller and not saved ...

Страница 96: ...re is installed is ABC Use this password the first time you log into newly installed Maestro software Disabling the Password Setting the Maestro password to 000 will disable the password Disabling the password allows any user to change parameters at any site that the Maestro is connected to ...

Страница 97: ...d To Do This Follow These Steps Change Passwords 1 Double click the Maestro icon to run the Maestro software 2 Click the File menu and select Change Passwords 3 Enter the current password in the Old Password box 4 Enter the new password in the New Password and Confirm boxes 5 Click the OK button to change the password ...

Страница 98: ...og Printer Setup Exit Alt F4 Maestro 1 42 Wait for Alarms Logoff Logoff Setup Comm Setup Comm Hangup Hangup Print Print Print Preview Print Preview Change Passwords Figure 88 File Menu 3 Enter the current password in the Old Password box 4 Enter the new password in the New Password and Confirm boxes Maestro Change Passwords Cancel OK Confirm New Password Old Password Figure 89 Change Password Dial...

Страница 99: ...re Interface 99 Using Shortcuts in the Maestro Software Introduction This section is a reference for the shortcut buttons in the Maestro software These buttons may be used instead of using menu selections to perform the most common Maestro software functions ...

Страница 100: ...elp Window File Johnson Controls Maestro Remote Communications Ma e stro 1 42 Site HVAC 1 ACT2 3 10C I O Screens COND UNIT Applications ALARMS ALARMS ACT2 1 1 2 3 Encore Products 1000 Cobb Place Blvd Bldg 200 Suite 200 Kennesaw GA 30144 Figure 90 Maestro Main Screen ...

Страница 101: ...ny type of connection Terminating a connection with this button also saves any changes that were made during that session Alarm Button The alarm button sets the Maestro software to wait for alarms from sites that may dial in to this connection Scroll Box The scroll box is used to select which site will be connected to When connected to a site this box displays the unit that is currently connected ...

Страница 102: ...Maestro Software 102 ...

Страница 103: ...twork is attached to the correct modem An incorrect number of controllers are detected at a site Check that each controller has a unique communication ID number Viewing System Information The site does not appear in the list on the Pick Site screen Check that the site has been properly established Using the Maestro Software to Monitor Alarms Dialout did not take place at the scheduled time Were th...

Страница 104: ...Maestro Software 104 ...

Страница 105: ... Compressor Setpoints Screen Compressor 1 Output Status Condensing Unit Screens Status Screen Compressor 2 Output Status Condensing Unit Screens Status Screen Compressor 1 Override Condensing Unit Screens Compressor Setpoints Screen Compressor 2 Override Condensing Unit Screens Compressor Setpoints Screen Compressor 1 Setpoints Condensing Unit Screens Compressor Setpoints Screen Compressor 2 Setpo...

Страница 106: ...oint Screen Evaporator Fan Output Status Condensing Unit Screens Status Screen Fan 1 Output Location Condensing Unit Screens Condenser Setpoints Screen Fan 2 Output Location Condensing Unit Screens Condenser Setpoints Screen Fan 1 Output Status Condensing Unit Screens Status Screen Fan 2 Output Status Condensing Unit Screens Status Screen Fan 1 Override Condensing Unit Screens Condenser Setpoints ...

Страница 107: ... HVAC Screen Setpoints Auxiliary Heat Differential HVAC Screen Setpoints Auxiliary Heat Differential Night Setback HVAC Screen Night Setback Auxiliary Heat Outputs Location of HVAC Screen Setup Auxiliary Heat Setpoint HVAC Screen Setpoints Auxiliary Heat Setpoint Night Setback HVAC Screen Night Setback Auxiliary Heat Stages Number of HVAC Screen Setup Auxiliary Heat Time Delay HVAC Screen Setpoint...

Страница 108: ...oints Reclaim Heat Time Delay Night Setback HVAC Screen Night Setback Sensor Name And Status HVAC Screen Status Warmup Strategy Setup HVAC Screen Night Setback Zone Mode HVAC Screen Status Zone name HVAC Screen Setup General I O Parameters Analog Output Deadband I O Screen Analog Output Setpoint Analog Output Gain I O Screen Analog Output Setpoint Analog Output High Percent I O Screen Analog Outpu...

Страница 109: ...en Input Setpoint Output Alternate On and Off Setpoints I O Screen Output Setpoint Output Alternate On and Off Time Delays I O Screen Output Setpoint Output Location I O Screen Output Setpoint Output Name I O Screen Output Setpoint Output Normal On and Off Setpoints I O Screen Output Setpoint Output Normal On and Off Time Delays I O Screen Output Setpoint Output Operation I O Screen Output Setpoin...

Страница 110: ... Saving Time Setup System Setup Screen Dial Out Time Delay System Setup Screen HVAC Log Interval System Setup Screen Modem Initialization String System Setup Screen Outside Temperature Sensor Location System Setup Screen Phone Numbers for Dial Out System Setup Screen Site Name System Setup Screen Time System Setup Screen ...

Страница 111: ...ture Refrigeration Logs graphs Refrigeration Circuit Setpoint information See Figure 48 Refrigeration Circuit Setup Parameters Refrigeration Circuit Name Liquid line Solenoid Output Location Condensing Unit Log Interval Case Temperature Sensor Location Evaporator Fan Output Location Liquid Line Solenoid Output Override Evaporator Fan Delay Input Location Evaporator Fan Output Override Evaporator F...

Страница 112: ...essure Low Alarm Time Delay Lube Oil Pressure Auto Restart Options Lube Oil Pressure Dial Out Options Condenser Setup Information See Figure 51 Refrigeration System Condenser Parameters Condenser Fan Control Temperature or Pressure Discharge Temperature or Pressure Sensor Location Fan 1 Output Location Fan 2 Output Location Fan 1 Setpoints Fan 2 Setpoints Fan 1 Override Fan 2 Override Defrost Setu...

Страница 113: ... Cooling Differential Cooling Time Delay Cooling Lockout Setpoint Reclaim Heat Setpoint Reclaim Heat Differential Reclaim Heat Time Delay Dehumidification Setpoint Dehumidification Differential Dehumidification Time Delay Dehumidification Lockout Setpoint Auxiliary Heat Setpoint Auxiliary Heat Differential Auxiliary Heat Time Delay Auxiliary Heat Lockout Setpoint Alarm Setpoints Alarm Time Delays ...

Страница 114: ...t Total Usage Daily Peak Daily Total Last Reset Date for Usage Monthly Peak Monthly Totals Generic Input Setpoint Information See Figure 56 Input Parameters Input Name Input Type Input Location Log Interval for Generic Input Offset for Input Input High Alarm Input Low Alarm Input Alarm Time Delays Pulse Setup for Input Related Input Locations Relation Between Inputs Generic Output Setpoint Informa...

Страница 115: ...Information See Figure 60 Energy and Water Usage Parameters Peak Usage Alarm Setup Total Usage Alarm Setup Usage Sensor Location Usage Sensor Minutes per Unit Usage Sensor Units Usage Sensor Units per Pulse Schedule Information See Figure 58 Schedule Parameters Schedule Setup Holiday Schedule Setup ...

Страница 116: ... Setup Screen Site Name HVAC Log Interval Outside Temperature Sensor Location Modem Initialization String Phone Numbers for Dial Out Dial Out Time Delay Date Time Dates of Daylight Saving Time Controls Group www johnsoncontrols com 507 E Michigan Street FAN 804 P O Box 423 Refrigeration Systems Technical Manual Milwaukee WI 53201 Printed in U S A ...

Отзывы: