Page 7
ENGLISH
Jandy
®
Pro Series, Hi-E2
®
and Hi-E2R Gas-Fired Heater
|
Installation & Operation Manual
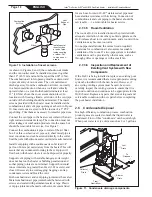
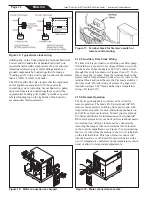
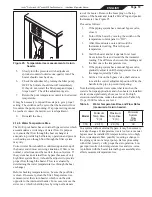
Figure 4. Vent collar assembly for indoor installation.
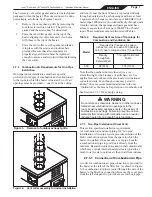
Figure 3. Removal of outdoor exhaust grille.
The necessary vent collar, gasket and screws are shipped
packaged within the heater. The conversion can be done
quite simply as follows. See Figures 3 and 4:
1.
Remove the vent exhaust grille by removing the
four (4) screws which retain it. The grille, its
gasket, and the screws may be discarded.
2.
Place the vent collar gasket on the top of the
heater aligning its center hole and screw holes
with those in the top of the heater.
3.
Place the vent collar over the gasket and fasten
it in place with the screws and lockwashers
provided. Be sure that all components are
properly aligned. Screws must be tightened
enough to assure a sealed joint without deforming
the vent collar.
2.7.2 Combustion Air Requirements for One-Pipe
Installation
One-pipe indoor installations must have specific
provisions for supply of combustion and ventilation air
to the room in which the heater is located. Two (2) air
openings must be provided — one (1) near the ceiling
and one (1) near the floor. When air is provided directly
through an outside wall, each opening must have at least
1 square inch (6.5 square cm) of area per 4000 BTU/h of
heater input. When air is provided indirectly through ducts
from the outside, the openings and passages must have
at least 1 square inch of area per 2000 BTU/h of heater
input. These requirements are interpreted in Table 2.
Table 2.
Required Net Free Area of Openings for
Combustion and Ventilation Air.
Model
Required net free area in square
inches (sq. cm) for each of 2 openings -
one (1) near ceiling and one (1) near floor
Directly
Through an
Exterior Wall
Through Horizontal
Ducts
350
88 (570)
175 (1130)
Note that the numbers indicate the
net free area
—
after allowing for the blockage of grille bars, etc. See
applicable local codes and the previously-cited national
codes for details. Even though codes may permit it,
Zodiac
®
does not recommend installations with only
“infiltration” as the means for provision of combustion air.
See Section 2.7.3.3 for vent pipe sizing.
WARNING
Do not store any chemicals, cleaners, or other corrosive
material near combustion air openings or in the
room. Avoid locating appliance vents in the vicinity of
combustion air openings. Failure to prevent corrosive
materials from mixing with combustion air can result in
reduced heater life and unsafe heater operation.
2.7.3 Two-Pipe Installation (Direct Vent)
This section specifies installation requirements
for combustion air and vent piping for “two pipe”
installations. A two-pipe system provides isolation of the
Hi-E
2
combustion system from the space in which the
heater is installed. It has not only a vent pipe, but also
a combustion air pipe to provide air directly from the
outdoors. Research studies have shown that contaminants
which may corrode internal heater parts are typically at
much lower levels in outdoor air than in air from indoors.
2.7.3.1 Connection of Combustion Air Pipe
A collar for combustion air pipe connection is provided in
the heater at the inlet of the filter box. As shown in Figure
5, the combustion air pipe is routed through the side of the
heater to the filter box connection. Remove the cover plate
from the left side panel to provide access for the air pipe.
Содержание HI-E2
Страница 2: ......
Страница 37: ...Page 37 ENGLISH Jandy Pro Series Hi E2 and Hi E2R Gas Fired Heater Installation Operation Manual NOTES...
Страница 38: ...Page 38 ENGLISH Jandy Pro Series Hi E2 and Hi E2R Gas Fired Heater Installation Operation Manual NOTES...
Страница 39: ...Page 39 ENGLISH Jandy Pro Series Hi E2 and Hi E2R Gas Fired Heater Installation Operation Manual NOTES...


