4 - 38
3dB
f
1
f
0
f
2
freqency [Hz]
4.3.7.2.2 Peak Mark
Setting relative to peak mark is available.
<
Threshold of peak detection
>
Threshold to judge peak/valley can be set up.
<
Display type
>
Select any object to be marked among the choices of ‘Maximum value/Minimum
value/both’.
<
Max. display number
>
Maximum number of marking can be set up. ( from 1 to 10)
If detected peaks and valleys are less than it, only the detected items are marked.
<
Search in the scale range
>
Whether peaks and valleys should be detected in the scale range currently displayed or
in all the data can be set up.
<
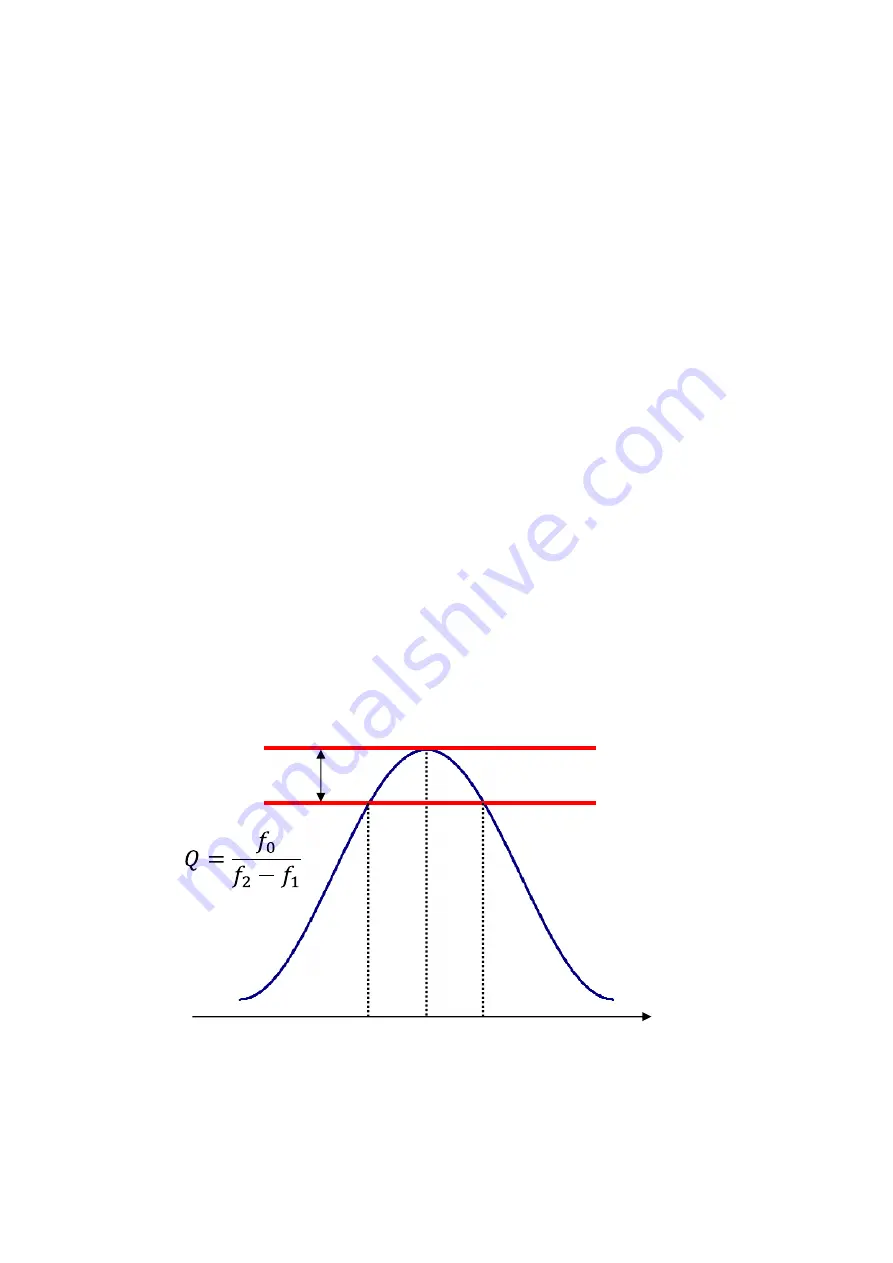
Display Q value
>
Whether Q value should be displayed with the peak value in the remark window or not
can be set up.
Note) This function is valid only in transmissibility graph.
Q value is calculated by using the formula below.
4.3.7.2.3 Legend Width
Whether automatic adjustment of legend length should be available or not can be set.
Содержание K2-CE
Страница 1: ...Vibration Control System K2 CE K2Sprint CE Common Part TYPE II Instruction Manual IMV CORPORATION...
Страница 4: ......
Страница 34: ...2 6 Step 2 The initial screen of installation appears Press the button of Next...
Страница 38: ...2 10 Step 2 The initial screen of installation appears Press the button of Next...
Страница 44: ...2 16 Step 8 The screen of finishing the device driver installation appears Press the button of Finish...
Страница 49: ...2 21 Step 2 The initial screen of installation appears Press the button of Next...
Страница 55: ...2 27 Step 3 The screen displaying the message of Uninstall or change a program appears...
Страница 56: ...2 28 2 Windows 10 Procedures Step 1 Right click the Start Menu And select Control Panel on the displayed menu...
Страница 58: ...2 30 Step 3 The screen displaying the message of Uninstall or change a program appears...
Страница 81: ......
Страница 82: ......
Страница 92: ...4 3 4 2 2 Exit from Application 1 K2 Launcher Press the button Close on the screen...
Страница 107: ...4 18 Step 3 A graph of the page displayed currently appears in the display...
Страница 110: ...4 21 Step 3 Additional graph appears on the currently displayed page...
Страница 115: ...4 26 Step 2 Change values of the graph range for horizontal axis displayed and press the OK button...
Страница 121: ...4 32 Step3 Press the Mark button to mark the cursor data displayed in the list...
Страница 141: ...4 52 Step 2 Press Yes when a dialog of message for assuring appears...
Страница 148: ...4 59 Step 3 Press the Define button of Contact I O information Step 4 Operate the setting of Contact I O and press OK...
Страница 149: ...4 60 Step 5 Press the OK button...
Страница 170: ...4 81 Step 9 Press OK after completing of the necessary settings...
Страница 172: ...4 83 Report of testing result generated by Report Generator...
Страница 184: ...5 6 5 4 1 Initial setting factory setting Factory setting is as shown below To restore it click Initialization...
Страница 189: ...6 5 6 2 2 Display of Standard Graph Procedure Step 1 Press the Open button Step 2 Select the graph data file...
Страница 196: ...6 12 Step 3 Select desired data file Some files can be selected at a time...
Страница 198: ...6 14 Step 5 Graph window is added and the selected graph appears Change of displayed graph Press the graph change button...
Страница 201: ...6 17 Step 3 Select desired data file Some files can be selected at a time...
Страница 212: ...7 6 7 2 2 Standards Mode Procedures Step 1 Press the button of Standards...
Страница 217: ...7 11 7 2 3 Test files mode Procedures Step 1 Press the button of Test files...
Страница 257: ...Waterfall graph depth fixing 4 19 Waterfall graph scroll display 4 19 4 22 4 27 Web Monitor 4 66...


