4 - 66
4.9 IT Function
4.9.1 Web Monitor
The function of Web Monitor is for monitoring the test execution status of the K2 through the PC
connected to a LAN.
Any special software are not necessary to be installed ; the display data of the K2*
)
is directly
saved in a file as HTML format, and the test status can be checked by using a popular browser,
such as Microsoft® Internet Explorer, from any PCs on the LAN.
Web Monitor is only for monitoring the test status. Additional client option is necessary to
operate the remote control that is used to execute other operations, such as Test Stop or Test Start,
from a distant place.
LAN environment is required to use this function.
*) To be exact, the display data of the PC on which the client program of the K2 is running is
saved in a file as HTML format periodically in the disk of a specified PC. Note that any of the
current display data is saved as HTML format when other applications than the K2 are executed on
the PC simultaneously with the client program of the K2
<
Procedure (to set Web Monitor)
>
<
Step 1
>
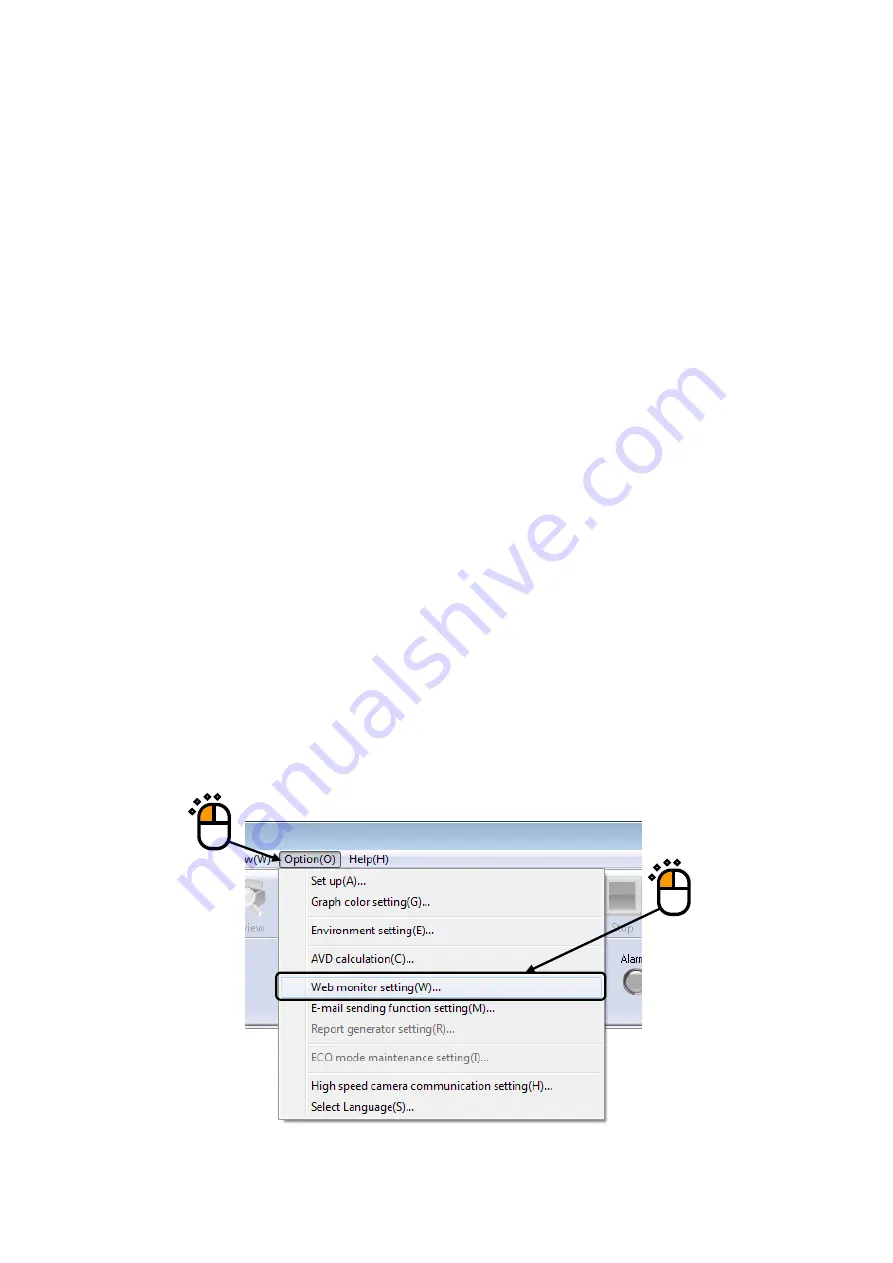
Select “Option” on the Menu Bar, and click the item of “Web Monitor setting”.
①
②
Содержание K2-CE
Страница 1: ...Vibration Control System K2 CE K2Sprint CE Common Part TYPE II Instruction Manual IMV CORPORATION...
Страница 4: ......
Страница 34: ...2 6 Step 2 The initial screen of installation appears Press the button of Next...
Страница 38: ...2 10 Step 2 The initial screen of installation appears Press the button of Next...
Страница 44: ...2 16 Step 8 The screen of finishing the device driver installation appears Press the button of Finish...
Страница 49: ...2 21 Step 2 The initial screen of installation appears Press the button of Next...
Страница 55: ...2 27 Step 3 The screen displaying the message of Uninstall or change a program appears...
Страница 56: ...2 28 2 Windows 10 Procedures Step 1 Right click the Start Menu And select Control Panel on the displayed menu...
Страница 58: ...2 30 Step 3 The screen displaying the message of Uninstall or change a program appears...
Страница 81: ......
Страница 82: ......
Страница 92: ...4 3 4 2 2 Exit from Application 1 K2 Launcher Press the button Close on the screen...
Страница 107: ...4 18 Step 3 A graph of the page displayed currently appears in the display...
Страница 110: ...4 21 Step 3 Additional graph appears on the currently displayed page...
Страница 115: ...4 26 Step 2 Change values of the graph range for horizontal axis displayed and press the OK button...
Страница 121: ...4 32 Step3 Press the Mark button to mark the cursor data displayed in the list...
Страница 141: ...4 52 Step 2 Press Yes when a dialog of message for assuring appears...
Страница 148: ...4 59 Step 3 Press the Define button of Contact I O information Step 4 Operate the setting of Contact I O and press OK...
Страница 149: ...4 60 Step 5 Press the OK button...
Страница 170: ...4 81 Step 9 Press OK after completing of the necessary settings...
Страница 172: ...4 83 Report of testing result generated by Report Generator...
Страница 184: ...5 6 5 4 1 Initial setting factory setting Factory setting is as shown below To restore it click Initialization...
Страница 189: ...6 5 6 2 2 Display of Standard Graph Procedure Step 1 Press the Open button Step 2 Select the graph data file...
Страница 196: ...6 12 Step 3 Select desired data file Some files can be selected at a time...
Страница 198: ...6 14 Step 5 Graph window is added and the selected graph appears Change of displayed graph Press the graph change button...
Страница 201: ...6 17 Step 3 Select desired data file Some files can be selected at a time...
Страница 212: ...7 6 7 2 2 Standards Mode Procedures Step 1 Press the button of Standards...
Страница 217: ...7 11 7 2 3 Test files mode Procedures Step 1 Press the button of Test files...
Страница 257: ...Waterfall graph depth fixing 4 19 Waterfall graph scroll display 4 19 4 22 4 27 Web Monitor 4 66...


