v
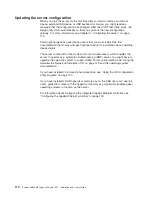
LSI Configuration Utility program
Use the LSI Configuration Utility program to configure the integrated SAS/SATA
controller with RAID capabilities and the devices that are attached to it. For
information about using this program, see “Using the LSI Configuration Utility
program” on page 130.
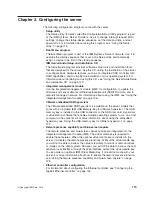
The following table lists the different server configurations and the applications
that are available for configuring and managing RAID arrays.
Table 13. Server configurations and applications for configuring and managing RAID arrays
Server configuration
RAID array configuration
(before operating system is
installed)
RAID array management
(after operating system is
installed)
ServeRAID-BR10i SAS/SATA
Controller (LSI 1068)
installed
LSI Utility (invoked from the
Setup utility), ServerGuide
MegaRAID Storage Manager
(for monitoring storage only)
ServeRAID-MR10i SAS/SATA
Controller (LSI 1078)
installed
MegaRAID Storage Manager
(MSM), MegaRAID BIOS
Configuration Utility (press C
to start), ServerGuide
MegaRAID Storage Manager
(MSM)
v
IBM Advanced Settings Utility (ASU) program
Use this program as an alternative to the Setup utility for modifying UEFI settings
and IMM settings. Use the ASU program online or out-of-band to modify UEFI
settings from the command line without the need to restart the server to access
the Setup utility. For more information about using this program, see “IBM
Advanced Settings Utility program” on page 132.
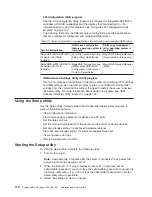
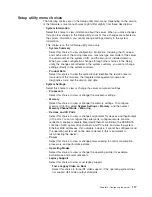
Using the Setup utility
Use the Setup utility, formerly called the Configuration/Setup Utility program, to
perform the following tasks:
v
View configuration information
v
View and change assignments for devices and I/O ports
v
Set the date and time
v
Set the startup characteristics of the server and the order of startup devices
v
Set and change settings for advanced hardware features
v
View, set, and change settings for power-management features
v
View and clear error logs
v
Resolve configuration conflicts
Starting the Setup utility
To start the Setup utility, complete the following steps:
1. Turn on the server.
Note:
Approximately 3 minutes after the server is connected to ac power, the
power-control button becomes active.
2. When the prompt
<F1> Setup
is displayed, press F1. If you have set an
administrator password, you must type the administrator password to access the
full Setup utility menu. If you do not type the administrator password, a limited
Setup utility menu is available.
3. Select the settings to view or change.
116
System x3650 M2 Types 4199 and 7947: Installation and User’s Guide
Содержание 7947E3U
Страница 1: ......
Страница 2: ......
Страница 3: ...System x3650 M2 Types 4199 and 7947 Installation and User s Guide...
Страница 8: ...vi System x3650 M2 Types 4199 and 7947 Installation and User s Guide...
Страница 16: ...xiv System x3650 M2 Types 4199 and 7947 Installation and User s Guide...
Страница 40: ...24 System x3650 M2 Types 4199 and 7947 Installation and User s Guide...
Страница 150: ...134 System x3650 M2 Types 4199 and 7947 Installation and User s Guide...
Страница 162: ...Taiwan Class A compliance statement 146 System x3650 M2 Types 4199 and 7947 Installation and User s Guide...
Страница 168: ...152 System x3650 M2 Types 4199 and 7947 Installation and User s Guide...
Страница 169: ......
Страница 170: ...Part Number 81Y6111 Printed in USA 1P P N 81Y6111...

