background image

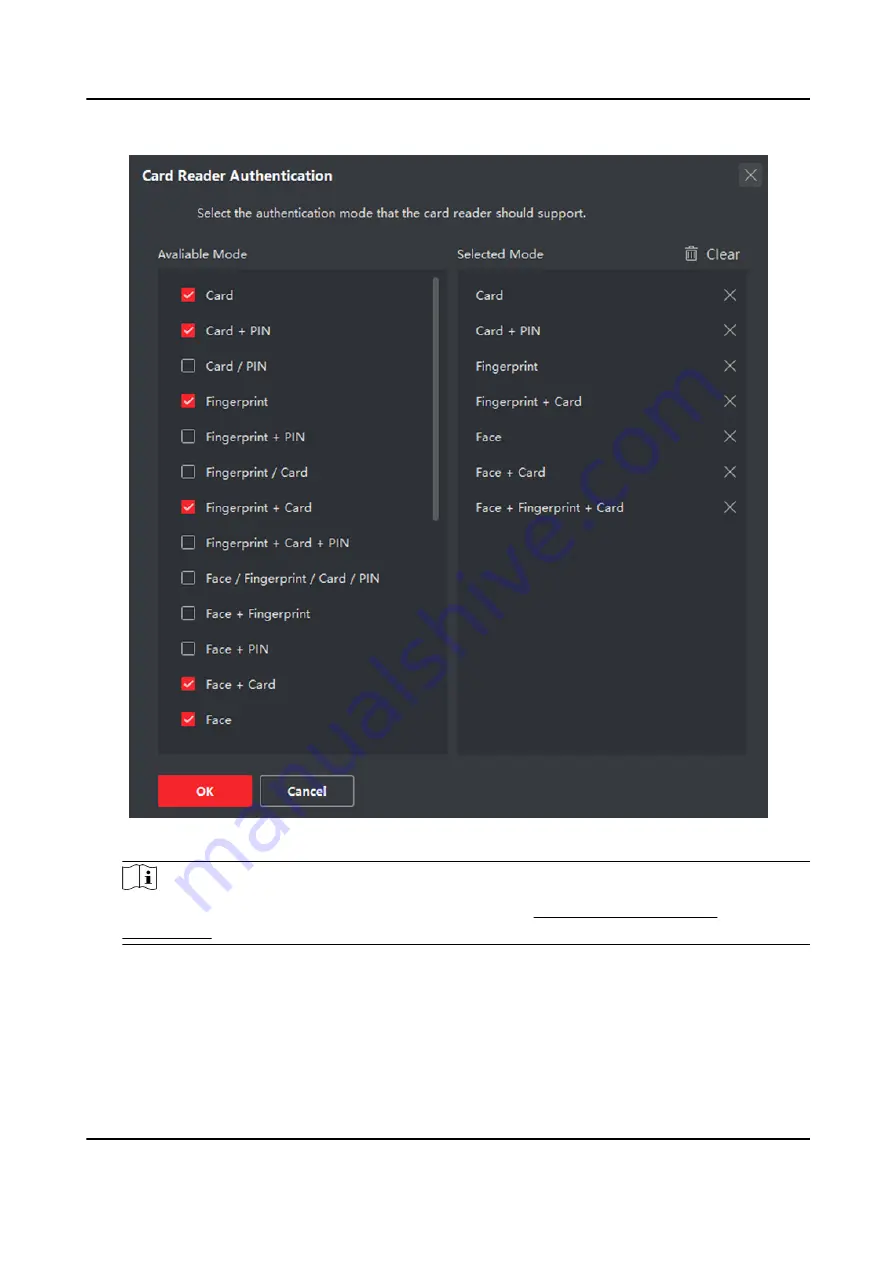
Figure 9-11 Select Card Reader Authentication Mode

Note

PIN refers to the PIN code set to open the door. Refer to Configure Access Control

Information .

2) Check the modes in the Available Mode list and they will be added to the selected modes list.

3) Click OK.

After selecting the modes, the selected modes will display as icons with different color.

4. Click the icon to select a card reader authentication mode, and drag the cursor to draw a color

bar on the schedule, which means in that period of time, the card reader authentication is valid.

5. Repeat the above step to set other time periods.

DS-K1TA70 Series Face Recognition Terminal User Manual

145

Содержание DS-K1TA70MI-T

Страница 1: ...DS K1TA70 Series Face Recognition Terminal User Manual...

Страница 2: ...AT YOUR OWN RISK IN NO EVENT WILL HIKVISION BE LIABLE TO YOU FOR ANY SPECIAL CONSEQUENTIAL INCIDENTAL OR INDIRECT DAMAGES INCLUDING AMONG OTHERS DAMAGES FOR LOSS OF BUSINESS PROFITS BUSINESS INTERRUP...

Страница 3: ...design principles For example for device with facial recognition features biometrics data is stored in your device with encryption method for fingerprint device only fingerprint template will be saved...

Страница 4: ...will or could result in death or serious injury Caution Indicates a potentially hazardous situation which if not avoided could result in equipment damage data loss performance degradation or unexpect...

Страница 5: ...be determined by turning the equipment off and on the user is encouraged to try to correct the interference by one or more of the following measures Reorient or relocate the receiving antenna Increase...

Страница 6: ...ndicate cadmium Cd lead Pb or mercury Hg For proper recycling return the battery to your supplier or to a designated collection point For more information see www recyclethis info This device complies...

Страница 7: ...er heat or fire hazard Please make sure that the power has been disconnected before you wire install or dismantle the device When the product is installed on wall or ceiling the device shall be firmly...

Страница 8: ...ace coating of the device cover Please use a soft and dry cloth when clean inside and outside surfaces of the device cover do not use alkaline detergents Please keep all wrappers after unpack them for...

Страница 9: ...upplies listed in the user instructions Model Manufacturer Standard C2000IC12 0 24P DE MOSO Power Supply Technology Co Ltd CEE C2000IC12 0 24P GB MOSO Power Supply Technology Co Ltd BS KPL 040F VI Cha...

Страница 10: ...e Fire Module 17 4 4 1 Wiring Diagram of Door Open When Powering Off 17 4 4 2 Wiring Diagram of Door Locked When Powering Off 20 Chapter 5 Activation 22 5 1 Activate via Device 22 5 2 Activate via SAD...

Страница 11: ...e 46 7 3 6 Search and Edit User 46 7 4 Data Management 47 7 4 1 Delete Data 47 7 4 2 Import Data 47 7 4 3 Export Data 48 7 5 Identity Authentication 48 7 5 1 Authenticate via Single Credential 48 7 5...

Страница 12: ...8 1 Login 68 8 2 Live View 68 8 3 Person Management 70 8 4 Search Event 71 8 5 Configuration 71 8 5 1 Set Local Parameters 71 8 5 2 View Device Information 72 8 5 3 Set Time 72 8 5 4 Set DST 73 8 5 5...

Страница 13: ...evice Management 104 9 2 1 Add Device 105 9 2 2 Reset Device Password 113 9 3 Group Management 114 9 3 1 Add Group 114 9 3 2 Import Resources to Group 115 9 3 3 Edit Resource Parameters 115 9 3 4 Remo...

Страница 14: ...g Parameters 129 9 5 Configure Schedule and Template 130 9 5 1 Add Holiday 130 9 5 2 Add Template 131 9 6 Set Access Group to Assign Access Authorization to Persons 133 9 7 Configure Advanced Function...

Страница 15: ...ble 174 9 11 3 Add Shift 177 9 11 4 Manage Shift Schedule 180 9 11 5 Manually Correct Check in out Record 183 9 11 6 Add Leave and Business Trip 184 9 11 7 Calculate Attendance Data 185 9 11 8 Attenda...

Страница 16: ...rameters 201 9 14 13 Set Face Recognition Terminal Parameters 201 9 14 14 Configure Face Picture Parameters 202 9 14 15 Configure Supplement Light Parameters 203 9 14 16 Set Device No 204 9 14 17 Conf...

Страница 17: ...rced mask wearing alert If the recognizing face does not wear a mask the device will prompt a voice reminder At the same time the authentication or attendance will be failed Displays temperature measu...

Страница 18: ...ocol to avoid the door opening when the terminal is destroyed Imports and export data to the device from the client software Supports simple theme Supports configuration via Web Supports ISUP 5 0 DS K...

Страница 19: ...Chapter 2 Appearance Refer to the following contents for detailed information of the face recognition terminal DS K1TA70 Series Face Recognition Terminal User Manual 3...

Страница 20: ...Figure 2 1 Face Recognition Terminal Diagram DS K1TA70 Series Face Recognition Terminal User Manual 4...

Страница 21: ...Touch Screen 4 Camera 5 IR Light 6 White Light 7 Thermographic Module 8 IR Light 9 Camera 10 TAMPER 11 Thermographic Module Interface 12 Debugging Port 13 Power Interface 14 Wiring Terminals 15 PSAM...

Страница 22: ...lding a temporary temperature measurement environment is suggested Influence Factors of Temperature Measurement Wind The wind will take the heat away which may affect the measurement result Sweat The...

Страница 23: ...ugh the cable hole of the mounting plate and connect to corresponding external devices cables 5 Align the device with the mounting plate and hang the device on the mounting plate Make sure the two she...

Страница 24: ...e 6 Use 2 supplied screws SC M4 14 5TP10 SUS to secure the device and the mounting plate Note When the screw s head is beneath the device surface the device is secured DS K1TA70 Series Face Recognitio...

Страница 25: ...g to the supplied mounting template 7 After installation for the proper use of the device outdoor use stick the protection film parts of models supplied on the screen 3 3 Surface Mounting Steps 1 Acco...

Страница 26: ...r surface according to the mounting template 3 Insert the screw sockets of the setscrews in the drilled holes Figure 3 5 Insert Screw Socket 4 Align the 6 holes to the mounting plate with the drilled...

Страница 27: ...he device with the mounting plate and hang the device on the mounting plate Figure 3 6 Install Device 7 Use 2 supplied screws SC M4 14 5TP10 SUS to secure the device and the mounting plate Note When t...

Страница 28: ...ng to your actual needs For easy installation drill holes on mounting surface according to the supplied mounting template 8 After installation for the proper use of the device outdoor use stick the pr...

Страница 29: ...ontroller and the access controller can judge whether to open the door or not Note If cable size is 18 AWG you should use a 12 V power supply And the distance between the power supply and the device s...

Страница 30: ...Figure 4 1 Terminal Diagram The descriptions of the terminals are as follows DS K1TA70 Series Face Recognition Terminal User Manual 14...

Страница 31: ...Wiring B5 Yellow Brown COM B6 Yellow Red NO Group C C1 RS 485 Yellow 485 RS 485 Wiring C2 Blue 485 C3 Black GND Ground C4 Wiegand Green W0 Wiegand Wiring 0 C5 White W1 Wiegand Wiring 1 C6 Brown WG_OK...

Страница 32: ...ion to Input to connect to a Wiegand card reader If connects to an access controller you should set the Wiegand direction to Output to transmit authentication information to the access controller For...

Страница 33: ...minal with the secure door control unit The wiring diagram is as follows Figure 4 3 Secure Door Control Unit Wiring Note The secure door control unit should connect to an external power supply separat...

Страница 34: ...pe 1 Note The fire system controls the power supply of the access control system Figure 4 4 Wire Device Figure 4 5 Wire Secure Door Control Unit DS K1TA70 Series Face Recognition Terminal User Manual...

Страница 35: ...when powering off is connected with the lock and the power supply in series When an fire alarm is triggered the door remains open In normal times NO and COM are closed Figure 4 6 Wiring Device DS K1T...

Страница 36: ...owering Off Scenario Installed in Entrance Exit with Fire Linkage Note The Uninterpretable Power Supply UPS is required The fire system NC and COM normally closed when powering off is connected with t...

Страница 37: ...Figure 4 8 Device Wiring Figure 4 9 Wiring Diagram DS K1TA70 Series Face Recognition Terminal User Manual 21...

Страница 38: ...ported The default values of the device are as follows The default IP address 192 0 0 64 The default port No 8000 The default user name admin 5 1 Activate via Device If the device is not activated you...

Страница 39: ...tically checked We highly recommend you change the password of your own choosing using a minimum of 8 characters including at least three kinds of following categories upper case letters lower case le...

Страница 40: ...tor For details see Add Administrator 5 2 Activate via SADP SADP is a tool to detect activate and modify the IP address of the device over the LAN Before You Start Get the SADP software from the suppl...

Страница 41: ...ify to activate your IP address modification 5 3 Activate Device via Client Software For some devices you are required to create the password to activate them before they can be added to the software...

Страница 42: ...the device 5 4 Activate via Web Browser You can activate the device via the web browser Steps 1 Enter the device default IP address 192 0 0 64 in the address bar of the web browser and press Enter Not...

Страница 43: ...k Operation 6 1 Select Language You can select a language for the device system After the device activation you can select a language for the device system DS K1TA70 Series Face Recognition Terminal U...

Страница 44: ...6 1 Select System Language By default the system language is English Note After you change the system language the device will reboot automatically DS K1TA70 Series Face Recognition Terminal User Man...

Страница 45: ...vice you should select an application mode for better device application Steps 1 On the Welcome page select Indoor or Others from the drop down list Figure 6 2 Welcome Page 2 Tap OK to save DS K1TA70...

Страница 46: ...for the device Steps 1 Set the wired network parameters If enable DHCP the system will assign the IP address and other parameters automatically If disable DHCP you should set the IP address the subnet...

Страница 47: ...ect a credential to add Note Up to one credential should be added Face forward at the camera Make sure the face is in the face recognition area Click to capture and click to confirm DS K1TA70 Series F...

Страница 48: ...ng failed Shortcut Keys Description Note You can configure those shortcut keys displayed on the screen For details see Basic Settings Scan QR code to authenticate Note The QR code can be obtained from...

Страница 49: ...strator If you have added an administrator for the device only the administrator can login the device for device operation Steps 1 Long tap on the initial page for 3 s and slide to the left right by f...

Страница 50: ...Figure 7 1 Admin Login 2 Authenticate the administrator s face or card to enter the home page DS K1TA70 Series Face Recognition Terminal User Manual 34...

Страница 51: ...ill be locked for 30 minutes after 5 failed attempts 3 Optional Tap and you can enter the device activation password for login 4 Optional Tap and you can exit the admin login page DS K1TA70 Series Fac...

Страница 52: ...to login Steps 1 Long tap on the initial page for 3 s and slide to the left right by following the gesture to enter password entering page 2 Tap the Password field and enter the device activation pas...

Страница 53: ...ome Page 7 2 Communication Settings You can set the network parameters the RS 485 parameters and the Wiegand parameters on the communication settings page DS K1TA70 Series Face Recognition Terminal Us...

Страница 54: ...ap Comm Communication Settings on the Home page to enter the Communication Settings page 2 On the Communication Settings page tap Wired Network Figure 7 4 Wired Network Settings 3 Set IP Address Subne...

Страница 55: ...r 7 2 2 Set RS 485 Parameters The face recognition terminal can connect external access controller secure door control unit or card reader via the RS 485 terminal Steps 1 Tap Comm Communication Settin...

Страница 56: ...ome page to enter the Communication Settings page 2 On the Communication Settings page tap Wiegand to enter the Wiegand tab Figure 7 6 Wiegand Settings 3 Enable the Wiegand function 4 Select a transmi...

Страница 57: ...upper case letters lower case letters and special characters are allowed in the user name Up to 32 characters are allowed in the user name 5 Optional Add a face picture or cards for the administrator...

Страница 58: ...employee ID should be less than 32 characters And it can be a combination of lower letters upper letters and numbers The employee ID should not be duplicated 4 Tap the Name field and input the user na...

Страница 59: ...Figure 7 7 Add Face Picture 6 Look at the camera DS K1TA70 Series Face Recognition Terminal User Manual 43...

Страница 60: ...The user can only authenticate or take attendance on the initial page 10 Tap to save the settings 7 3 3 Add Card Add a card for the user and the user can authenticate via the added card Steps 1 Long...

Страница 61: ...View Password Add a password for the user and the user can authenticate via the password Steps 1 Long tap on the initial page for 3 s and slide to the left right by following the gesture and log in t...

Страница 62: ...s and slide to the left right by following the gesture and log in the backend 2 Tap User Add User Edit User Authentication Mode 3 Select Device or Custom as the authentication mode Device If you want...

Страница 63: ...when you exported the data leave a blank in the input box and tap OK immediately Note If you want to transfer all user information from one device Device A to another Device B you should export the in...

Страница 64: ...those data to another device you should enter the password Note The supported USB flash drive format is DB The system supports the USB flash drive with the storage of 1G to 32G Make sure the free spac...

Страница 65: ...cate any credential according to the instructions on the live view page Note The card can be normal IC card or encrypted card 2 After the previous credential is authenticated continue authenticate the...

Страница 66: ...supplement light community No building No and Unit No Shortcut Key Choose the shortcut key that displayed on the authentication page including the call function call type and the password entering fun...

Страница 67: ...e authentication page will be disabled and in the meanwhile the person s name employee ID face pictures will all be hidden Voice Settings You can enable disable the voice prompt function and adjust th...

Страница 68: ...nterval between two continuous face recognitions when authenticating Note You can input the number from 1 to 10 Wide Dynamic It is suggested to enable the WDR function if installing the device outdoor...

Страница 69: ...etection After enabling the face with mask detection the system will recognize the captured face with mask picture You can set face with mask face 1 N level and the strategy Reminder of Wearing If the...

Страница 70: ...me page tap ACS Access Control Settings to enter the Access Control Settings page Edit the access control parameters on this page Figure 7 9 Access Control Parameters The available parameters descript...

Страница 71: ...n Closed Open Duration Set the door unlocking duration If the door is not opened for the set time the door will be locked Available door locked time range 1 to 255s Authentication Interval Set the dev...

Страница 72: ...n the platform 7 9 2 Set Manual Attendance via Device Set the attendance mode as manual and you should select a status manually when you take attendance Before You Start Add at least one user and set...

Страница 73: ...result page Result You should select an attendance status manually after authentication Note If you do not select a status the authentication will be failed and it will not be marked as a valid atten...

Страница 74: ...l not be changed 5 Optional Select an status and change its name if required The name will be displayed on the T A Status page and the authentication result page 6 Set the status schedule 1 Tap Attend...

Страница 75: ...as Manual and Auto and the system will automatically change the attendance status according to the configured schedule At the same time you can manually change the attendance status after the authent...

Страница 76: ...us according to the schedule If you tap the edit icon on the result tab you can select a status to take attendance manually the authentication will be marked as the edited attendance status Example If...

Страница 77: ...e The page may vary according to different device models Refers to the actual page for details Capacity You can view the number of user face picture card event and fingerprint Note Parts of the device...

Страница 78: ...settings The system will reboot to take effect Reboot Reboot the device 7 11 Video Intercom After adding the device to the client software you can call the device from the client software call the ma...

Страница 79: ...device see Add Device 5 Set the main station s IP address and SIP address in the remote configuration page Note For details about the operation see the user manual of the main station 6 Call the cent...

Страница 80: ...tails about adding device see Add Device 5 Link a user to an indoor station and set a room No for the indoor station 6 Call the room If you have configured a specified room No in the Basic Settings yo...

Страница 81: ...ure detection over temperature alarm threshold temperature compensation door not open when temperature is abnormal temperature measurement mode temperature unit etc On the Home page tap Temperature to...

Страница 82: ...Figure 7 15 Temperature Measurement Parameters The available parameters descriptions are as follows DS K1TA70 Series Face Recognition Terminal User Manual 66...

Страница 83: ...the actual object s temperature you can set the compensation temperature here Available range 99 C to 99 C Door Not Open Abnormal Temp When enabling the function the door will not open when the detec...

Страница 84: ...ter to enter the login page Note Make sure that the IP address starts with Https Enter the device user name and the password Click Login Login via Remote Configuration of Client Software Download and...

Страница 85: ...wo way audio you may hear a repeated sounds You can capture image when starting live view Reserved function You can zoom in the live view image Start or stop live view Start or stop video recording Se...

Страница 86: ...ick User Add to enter the Add Person page Click on the right to upload a face picture from the local PC Note The picture format should be JPG JPEG or PNG The size should be less than 200K Click OK to...

Страница 87: ...ID the name the card No the start time and the end time and click Search The results will be displayed on the right panel 8 5 Configuration 8 5 1 Set Local Parameters Set the live view parameters reco...

Страница 88: ...al page Select a saving path from your local computer and click Save You can also click Open to open the file folder to view details 8 5 2 View Device Information View the device name language model s...

Страница 89: ...T Steps 1 Click Configuration System System Settings DST Figure 8 4 DST Page 2 Check Enable DST 3 Set the DST start time end time and bias time 4 Click Save to save the settings 8 5 5 View Open Source...

Страница 90: ...estored to the factory settings You should activate the device before usage Import and Export Parameters Click Configuration System Maintenance Upgrade Maintenance Export Click Export to export the lo...

Страница 91: ...etc 8 5 8 Security Mode Settings Set the security mode for logging in the client software On the Device for Management page click Configuration System Security Security Service Select a security mode...

Страница 92: ...puter 7 Send the asking file to a certification authority for signature 8 Import the signed certificate 1 Select a certificate type in the Import Passwords area and select a certificate from the local...

Страница 93: ...least three kinds of following categories upper case letters lower case letters numbers and special characters in order to increase the security of your product And we recommend you change your passwo...

Страница 94: ...ve to save the settings DHCP If uncheck the function you should set the IPv4 address IPv4 subnet mask IPv4 default gateway MTU and the device port If you check the function the system will allocate th...

Страница 95: ...icate is required when accessing Server It refers to the port through which the client adds the device Report Strategy Settings You can set the center group for uploading the log via the ISUP protocol...

Страница 96: ...ice via ISUP protocol Steps Note The function should be supported by the device 1 Click Configuration Network Advanced Settings Platform 2 Select ISUP from the platform access mode drop down list 3 Ch...

Страница 97: ...P or host name 5 Click Save 8 5 13 Set Video and Audio Parameters Set the image quality resolution and the device volume Set Video Parameters Click Configuration Video Audio Video Figure 8 7 Video Set...

Страница 98: ...e The functions vary according to different models Refers to the actual device for details 8 5 14 Customize Audio Content Customize the output audio content when authentication succeeded and failed St...

Страница 99: ...the language Note If authentication is failed in the configured time duration the device will broadcast the configured content 3 Enter the audio content 4 Optional Repeat substep 1 to 3 5 Optional Cli...

Страница 100: ...e USA Canada Japan Taiwan China Korea the Philippines etc WDR Enable or disable the WDR function When there are both very bright and very dark areas simultaneously in the view WDR balances the brightn...

Страница 101: ...d Attendance Settings If you want to track and monitor when the persons start stop work and monitor their working hours and late arrivals early departures time taken on breaks and absenteeism you can...

Страница 102: ...et the schedule from Monday to Sunday according to the actual needs 5 Optional Select a timeline and click Delete Or click Delete All to clear the settings 6 Click Save Set Manual Attendance via Web S...

Страница 103: ...group of attendance status Note The Attendance Property will not be changed 5 Optional Select an status and change its name if required 6 Set the status schedule Refers to Time Settings for details S...

Страница 104: ...reak Out as Monday 11 00 and Break In as Monday 12 00 the valid user s authentication from Monday 11 00 to 12 00 will be marked as break 8 5 18 Set Video Intercom Parameters The device can be used as...

Страница 105: ...Set the device installed floor No Note If you change the No you should reboot the device Community No Set the device installed community No If set the device type as Outer Door Station you can set th...

Страница 106: ...er s function Authentication Select an authentication mode according to your actual needs from the drop down list Recognition Interval You can set the interval between 2 continuous recognition of a sa...

Страница 107: ...ailed Alarm of Max Failed Attempts Enable to report alarm when the card reading attempts reach the set value Communication with Controller Every When the access control device cannot connect with the...

Страница 108: ...e locked Door Open Timeout Alarm An alarm will be triggered if the door has not been closed within the configured time duration Door Contact You can set the door contact as Remain Open or Remain Close...

Страница 109: ...per code should be different Set Card Security Click Configuration Access Control Card Security to enter the settings page Set the parameters and click Save Enable NFC Card In order to prevent the mob...

Страница 110: ...ress baud rate etc Click Configuration Access Control RS 485 Settings Click Save to save the settings after the configuration No Set the RS 485 No Peripheral Type Select a peripheral from the drop dow...

Страница 111: ...Access Control Wiegand Settings Figure 8 13 Wiegand Page 2 Check Wiegand to enable the Wiegand function 3 Set a transmission direction Input The device can connect a Wiegand card reader Output The ca...

Страница 112: ...he configured time Overwriting The earliest 5 events will be deleted when the system detects the stored events has been over 95 of the full space Authentication Settings Display Authentication Result...

Страница 113: ...ontent when authenticate via card on the device Go to Configuration Access Control Card Authentication Settings Select a card authentication mode and click Save Full Card No All card No will be read W...

Страница 114: ...on If enabling the function the device can recognize whether the person is a live one or not Note Biometric recognition products are not completely applicable to anti spoofing environments If you requ...

Страница 115: ...ording to your needs 1 1 Matching Threshold Set the matching threshold when authenticating via 1 1 matching mode The larger the value the smaller the false accept rate and the larger the false rejecti...

Страница 116: ...person do not wear a face mask when authenticating the device prompts a notification and the door will open Prompt and Not Open Door If the person do not wear a face mask when authenticating the devi...

Страница 117: ...tion within the configured sleep time After enabling Sleep you need set the start time of display 8 5 22 Temperature Measurement Settings Temperature Measurement Settings You can set the temperature m...

Страница 118: ...tuation If the detected temperature is higher or lower than the configured parameters an alarm will be triggered By default the value is 37 3 Temperature Compensation If the measured temperature is hi...

Страница 119: ...e the temperature Capture White Light Picture After enabling Temperature Measurement Only you can enable Capture White Light Picture After enabling this function the device will capture white light pi...

Страница 120: ...llow the flow diagram below to configure on the client software Figure 9 1 Flow Diagram of Configuration on Client Software 9 2 Device Management The client supports managing access control devices an...

Страница 121: ...Every 60s to refresh the information of the online devices Add Single or Multiple Online Devices The client can detect online devices which are in the same network as the PC running the client You can...

Страница 122: ...or more online device s and click Add to open the device adding window Figure 9 3 Add Single Online Device Figure 9 4 Add Multiple Online Devices 4 Enter the required information DS K1TA70 Series Face...

Страница 123: ...words and other security settings is the responsibility of the installer and or end user 5 Optional Check Transmission Encryption TLS to enable transmission encryption using TLS Transport Layer Securi...

Страница 124: ...cked We highly recommend you change the password of your own choosing using a minimum of 8 characters including at least three kinds of following categories upper case letters lower case letters numbe...

Страница 125: ...8000 User Name Enter the device user name By default the user name is admin Password Enter the device password Caution The password strength of the device can be automatically checked We highly recom...

Страница 126: ...o this group 8 Finish adding the device Click Add to add the device and back to the device list page Click Add and New to save the settings and continue to add other device Add Devices by IP Segment I...

Страница 127: ...cate file exported from the device to this default directory to strengthen the security See for details about enabling certificate verification You can log into the device to get the certificate file...

Страница 128: ...as device name device account and ISUP key Check Online User Click on Operation column to check the online users who access the device such as user name user type user s IP address and login time Refr...

Страница 129: ...other security settings is the responsibility of the installer and or end user Import to Group Enter 1 to create a group by the device name All the channels of the device will be imported to the corr...

Страница 130: ...ed resources in different groups You can group the resources into different groups according to the resources locations Example For example on the 1st floor there mounted 16 doors 64 alarm inputs and...

Страница 131: ...ources to the group 9 3 3 Edit Resource Parameters After importing the resources to the group you can edit the resource parameters For access point you can edit the access point name For alarm input y...

Страница 132: ...the persons You can also add a surbodinate organization for the added one Steps 1 Enter Person module 2 Select a parent organization in the left column and click Add in the upper left corner to add a...

Страница 133: ...ber email address validity period etc 5 Confirm to add the person Click Add to add the person and close the Add Person window Click Add and New to add the person and continue to add other persons 9 4...

Страница 134: ...ed card reader the person is marked as on duty of inspection at that time Dismiss Card By swiping the card on the card reader it can stop the buzzing of the card reader 6 Click Add The card will be is...

Страница 135: ...as a camera or you have connected other USB camera to the PC Steps 1 Enter Person module 2 Select an organization in the organization list to add the person and click Add to enter Add Person window No...

Страница 136: ...e client which supports facial recognition function Steps 1 Enter Person module 2 Select an organization in the organization list to add the person and click Add Note Enter the person s basic informat...

Страница 137: ...captured photo 7 Confirm to add the person Click Add to add the person and close the Add Person window Click Add and New to add the person and continue to add other persons 9 4 7 Configure Access Con...

Страница 138: ...she will have authorization to access all the doors floors and will be exempted from remaining closed restrictions all anti passback rules and first person authorization Extended Door Open Time Use t...

Страница 139: ...on You can customize the person properties which are not pre defined in the client according to actual needs e g place of birth After customizing when add a person you can enter the custom information...

Страница 140: ...om No of the person 5 Confirm to add the person Click Add to add the person and close the Add Person window Click Add and New to add the person and continue to add other persons 9 4 10 Configure Addit...

Страница 141: ...he person information in the downloaded template Note If the person has multiple cards separate the card No with semicolon Items with asterisk are required By default the Hire Date is the current date...

Страница 142: ...ll be displayed 9 4 14 Export Person Information You can export the added persons information to local PC as a CSV Excel file Before You Start Make sure you have added persons to an organization Steps...

Страница 143: ...Information from Access Control Device If the added access control device has been configured with person information including person details and issued card information you can get the person infor...

Страница 144: ...l The persons under the organization will be displayed in the right panel 3 Select the person to move 4 Click Change Organization 5 Select the organization to move persons to 6 Click OK 9 4 19 Issue C...

Страница 145: ...orting card loss or cancelling card loss a window will pop up to notify you to apply the changes to the device After applying to device these changes can take effect on the device 9 4 21 Set Card Issu...

Страница 146: ...M1 card and if you need to enable the M1 Card Encryption function you should enable this function and select the sector of the card to encrypt Remote Mode Issue Card by Card Reader Select an access c...

Страница 147: ...the timeline bar to the desired position when the cursor turns to Click the time duration and directly edit the start end time in the appeared dialog Move the cursor to the start or the end of time du...

Страница 148: ...e durations Move the cursor to the time duration and drag the time duration on the timeline bar to the desired position when the cursor turns to Click the time duration and directly edit the start end...

Страница 149: ...inkage between card number and card password card effective period etc 1 Click Access Control Authorization Access Group to enter the Access Group interface 2 Click Add to open the Add window 3 In the...

Страница 150: ...ted devices and then apply the new access group to the device Apply Changes to Devices This operation will not clear the existed access groups of the selected devices and only apply the changed part o...

Страница 151: ...cess control to meet some special requirements in different scene Note For the card related functions the type of access control card only the card s with access group applied will be listed when addi...

Страница 152: ...formation page click More to edit the parameters Voice Prompt If you enable this function the voice prompt is enabled in the device You can hear the voice prompt when operating in the device Upload Pi...

Страница 153: ...f the selected device 3 Select a door to show its parameters on the right page 4 Edit the door parameters Note The displayed parameters may vary for different access control devices Some of the follow...

Страница 154: ...door floor s to copy the parameters in the page to the selected doors floor s Note The door s status duration settings will be copied to the selected doors as well Configure Parameters for Card Reade...

Страница 155: ...ill be cleared automatically Tampering Detection Enable the anti tamper detection for the card reader Communicate with Controller Every When the access control device cannot connect with the card read...

Страница 156: ...links to alarm outputs you can configure the parameters Before You Start Add access control device to the client and make sure the device supports alarm output Steps 1 Click Access Control Advanced F...

Страница 157: ...py to Whole Week Select one duration on the time bar click Copy to Whole Week to copy all the duration settings on this time bar to other week days Delete Selected Select one duration on the time bar...

Страница 158: ...e in device list on the left panel 3 Add a person card group for the access control device 1 Click Add on the right panel 2 Create a name for the group as desired 3 Specify the start time and end time...

Страница 159: ...You can check Offline Authentication to enable the super password authentication when the access control device is disconnected with the client Local Authentication and Super Password Authentication...

Страница 160: ...on and Remotely Open Door up to 7 person card groups can be added to the authentication group 7 Click Save 9 7 4 Configure Card Reader Authentication Mode and Schedule You can set the passing rules fo...

Страница 161: ...he selected modes list 3 Click OK After selecting the modes the selected modes will display as icons with different color 4 Click the icon to select a card reader authentication mode and drag the curs...

Страница 162: ...ss group and apply the access group to the access control device For details refer to Set Access Group to Assign Access Authorization to Persons Perform this task when you want to configure opening do...

Страница 163: ...k The anti passback feature is designed to minimizes the misuse or fraudulent use of access credentials such as passing back card to an unauthorized person or tailed access The anti passback function...

Страница 164: ...be supported by the device 9 7 7 Configure Device Parameters After adding the access control device you can set its parameters such as network parameters Set Multiple NIC Parameters If the device sup...

Страница 165: ...Select the uploading mode from the drop down list Enable N1 or G1 for the main channel Select Close to disable the main channel 7 Click Save Create ISUP Account in Wired Communication Mode You can se...

Страница 166: ...red Capture Parameters When an event occurs the camera of the access control device can be triggered to capture picture s to record what happens when the event occurs You can view the captured picture...

Страница 167: ...he device 1 Enter the Access Control module 2 On the navigation bar on the left enter Advanced Function More Parameters Capture 3 Select an access control device in the device list and select Manual C...

Страница 168: ...he larger the false rejection rate ECO Mode Threshold When enabling the ECO mode you can set the ECO mode s threshold The larger the value the easier the device entering the ECO mode Available range 0...

Страница 169: ...Function More Parameters 3 Select an access control device in the device list and click RS 485 to enter the RS 485 Settings page 4 Select the serial port number from the drop down list to set the RS...

Страница 170: ...utomatic access control in real time Two types of linkage actions are supported Client Actions When the event is detected it will trigger the actions on the client such as the client making an audible...

Страница 171: ...when the event is detected en event will be sent to the client and the linkage actions will be triggered 6 Optional Click Copy to to copy the event settings to other access control device alarm input...

Страница 172: ...The audio prompt will be triggered And the select audio index related audio content will be played according to the configured play mode 7 Click Save 8 Optional After adding the device linkage you ca...

Страница 173: ...ated picture will be captured when the selected event happens Recording An event related picture will be captured when the selected event happens Note The device should support recording Alarm Output...

Страница 174: ...by the device 1 Click Access Control Linkage Configuration 2 Select the access control device from the list on the left 3 Click Add to add a new linkage 4 Select Person Linkage as the event source 5 E...

Страница 175: ...d access control device You can also control the doors such as open close the door or remain the door open closed via the client remotely The real time access event are displayed in this module You ca...

Страница 176: ...path refer to Set File Saving Path in the user manual of the client software Result The icon of the doors will change in real time according to the operation if the operation is succeeded 9 9 2 Check...

Страница 177: ...s and so on Before the client can receive the event information from the device you need to enable the events of the resource and arm the device first For details refer to Enable Receiving Event from...

Страница 178: ...ty etc Before You Start Enable receiving events from devices before the client can receive event from the device see Enable Receiving Event from Devices for details Steps 1 Click Event Center Real tim...

Страница 179: ...atically Check Auto Select Latest Event to select the latest event automatically and the event information details is displayed Clear Events Click Clear to clear the all the events in the event list S...

Страница 180: ...set the followings Include Sub Node Search the events of the device and all resource channels Device Type Select the device from which you want to search events Group Search the events by resource cha...

Страница 181: ...s person 3 Click Search to search the events according the conditions you set Figure 9 14 Search Historical Events Note If you have selected Access Control as device type in Step 2 you can view extra...

Страница 182: ...hen click Handle in the event information details page and enter the handling suggestion Note After an event is handled the Handle button will become Add Remark click Add Remark to add more remarks fo...

Страница 183: ...rsor on the recorded video click to download the video 30s before the event happens triggered by the event 9 11 Time and Attendance The Time and Attendance module provides multiple functionalities to...

Страница 184: ...ly Work Hour Rate Work Hour Rate is used to calculate work hours by multiplying it by overtime When you work for a certain period after end work time on workday you will reach different overtime level...

Страница 185: ...aded from the device will all be calculated as Check in End Work Attendance status uploaded from the device will all be calculated as Check out Start End Work Attendance status will be calculated as C...

Страница 186: ...llowing operations Edit Holiday Click to edit the holiday information Delete Holiday Select one or more added holidays and click Delete to delete the holiday s from the holiday list Add Irregular Holi...

Страница 187: ...jor leave type and click to edit the major leave type Delete Select one major leave type and click Delete on the left to delete the major leave type 5 Click Add on the right to add a minor leave type...

Страница 188: ...database the client will start reconnection every 30 mins After being reconnected the client will synchronize the data recorded during the disconnected time period to the third party database Configu...

Страница 189: ...corded as the end break time Enable T A Status Set Enable T A Status switch to on to calculate the actual break time according to attendance status on the device Note This function should be supported...

Страница 190: ...or 4 Click Save 9 11 2 Add General Timetable On the timetable page you can add general timetable for employees which requires the fixed start work time and end work time Also you can set valid check i...

Страница 191: ...ble type as general 5 Select calculation method First In Last Out The first check in time is recorded as start work time and the last check out time is recorded as the end work time Each Check In Out...

Страница 192: ...out is valid Calculated as Set the duration calculated as the actual work duration Late Early Leave Allowable Set the timetable for late or early leave 9 Set absence related parameters Check In Late...

Страница 193: ...n one shift for employees which requires them to check in and check out for each timetable Before You Start Add a timetable first See Add General Timetable for details Steps 1 Click Time Attendance Sh...

Страница 194: ...ift Note You can select more than one timetables The start and end work time and the valid check in and out time in different time tables can not be overlapped DS K1TA70 Series Face Recognition Termin...

Страница 195: ...check the desired organization s or person s box The selected organizations or persons will list on the right page 3 Set the Expire Date for the shift schedule 4 Set other parameters for the schedule...

Страница 196: ...ttendance module the department list is the same with the organization You should add organization and persons in Person module first See Person Management for details Steps 1 Click Time Attendance Sh...

Страница 197: ...the schedule Effective for Overtime The persons overtime will be recorded for this schedule Flexible Shift Schedule on Weekend The person s attendance on the weekend will be recorded as overtime 8 Cli...

Страница 198: ...when they end work Scheduled on Holidays On the holidays this schedule is still effective and the persons needs to go to work according to the schedule Effective for Overtime The persons overtime wil...

Страница 199: ...r the schedule such as Check in Not Required andCheck out Not Required 6 Click Save Check Shift Schedule You can check the shift schedule in calendar or list mode You ca also edit or delete the shift...

Страница 200: ...erform one of the following operations View Click or to view the added attendance handling information in calendar or list mode Edit In calendar mode click Edit to edit the details In list mode double...

Страница 201: ...rm one of the following operations View Click or to view the added attendance handling information in calendar or list mode Note In calendar mode you need to click Calculate to get the attendance stat...

Страница 202: ...nce Statistics Calculation 3 Set the start time and end time to define the attendance data range 4 Select the department from the drop down list 5 Optional Set other conditions including name and pers...

Страница 203: ...will automatically calculate the previous day s attendance data at 1 00 am on the next day Keep the client running at 1 00 am or it cannot calculate the previous day s attendance data automatically I...

Страница 204: ...ce records according to actual needs For details refer to Generate Instant Report It supports to generate the a series of attendance reports manually to view the employees attendance results Before Yo...

Страница 205: ...l send the report on the selected sending date s 2 Select the Sending Date s on which the client will send the report 3 Set the Sending Time at which the client will send the report Example If you set...

Страница 206: ...d pages Log Expiry Date The time for keeping the log files Once exceeded the files will be deleted Maximum Mode Select Maximize or Full Screen as the maximum mode Maximize mode can maximize the displa...

Страница 207: ...download the firmware package automatically and prompt the user whether to upgrade Download and Prompt Automatically After the client detects the new version of the devices it will download the firmwa...

Страница 208: ...ol and Video Intercom Parameters You can configure the access control and video intercom parameters according to actual needs Steps 1 Open the System Configuration page 2 Click the Access Control Vide...

Страница 209: ...e action for this event the client will an email to the recipients for notification You need to set the email settings and specify target recipients in this section Steps 1 Enter the System Configurat...

Страница 210: ...g operations Open Log File You can open a log file saved in your local PC or log files of the client Import Export Configuration File You can import configuration files from local PC to the client if...

Страница 211: ...ce from the Device for Management tab and click System Device Information to enter the Device Information page Figure 9 20 View Device Information You can set the device name view the device type seri...

Страница 212: ...ally in the high security system changing the password monthly or weekly can better protect your product Proper configuration of all passwords and other security settings is the responsibility of the...

Страница 213: ...System System Maintenance to enter the System Maintenance tab Click Reboot and the device starts rebooting Restore Settings On the Device for Management page click Remote Configuration System System M...

Страница 214: ...ot automatically 9 14 5 Configure RS 485 Parameters You can set the RS 485 parameters including the baud rate data bit stop bit parity type communication mode work mode and connection mode Steps 1 Cli...

Страница 215: ...Parameters Settings tab NIC Type Select a NIC type from the drop down list You can select either Self adaptive 10M or 100M DHCP If you disable the function you should manually set the device s IPv4 a...

Страница 216: ...IP address After setting the parameters you can communicate among the access control device door station indoor station main station and the platform Note Only the access control device and other dev...

Страница 217: ...When enabling the function the pictures captured by the white light camera will be uploaded to the platform If disabling the function the device will only upload pictures captured by thermographic cam...

Страница 218: ...he larger the value the smaller the false accept rate and the larger the false rejection rate ECO Mode 1 N Set the matching threshold when authenticating via ECO mode 1 N matching mode The larger the...

Страница 219: ...should be larger than the configured value when face picture authentication Other percentages distances and angles should also meet their conditions Pupillary Distance The minimum resolution between...

Страница 220: ...4 Set the device camera s parameters including the stream type the bitrate type the video quality the frame rate the audio encoding type the video type the bitrate the resolution and the I frame inter...

Страница 221: ...Click to enter the remote configuration page Click Status Relay and you can view the relay status DS K1TA70 Series Face Recognition Terminal User Manual 205...

Страница 222: ...ictures just like the expression in the picture below Do not wear hat sunglasses or other accessories that can affect the facial recognition function Do not make your hair cover your eyes ears etc and...

Страница 223: ...Size Make sure your face is in the middle of the collecting window DS K1TA70 Series Face Recognition Terminal User Manual 207...

Страница 224: ...ce Value Candle 10Lux Bulb 100 850Lux Sunlight More than 1200Lux 2 Install the device at least 2 meters away from the light and at least 3 meters away from the window or door 3 Avoid backlight direct...

Страница 225: ...Appendix C Dimension DS K1TA70 Series Face Recognition Terminal User Manual 209...

Страница 226: ...ision access control and video intercom devices Figure D 1 QR Code of Communication Matrix Device Command Scan the following QR code to get the device common serial port commands Note that the command...

Страница 227: ...UD22684B D...

Отзывы: