background image


Access Control Terminal

·

User Manual


47 


5.


Click the 

  button again to complete importing. The person information will be added in the person list. 


7.3.2


Card Management 

Interface Introduction 

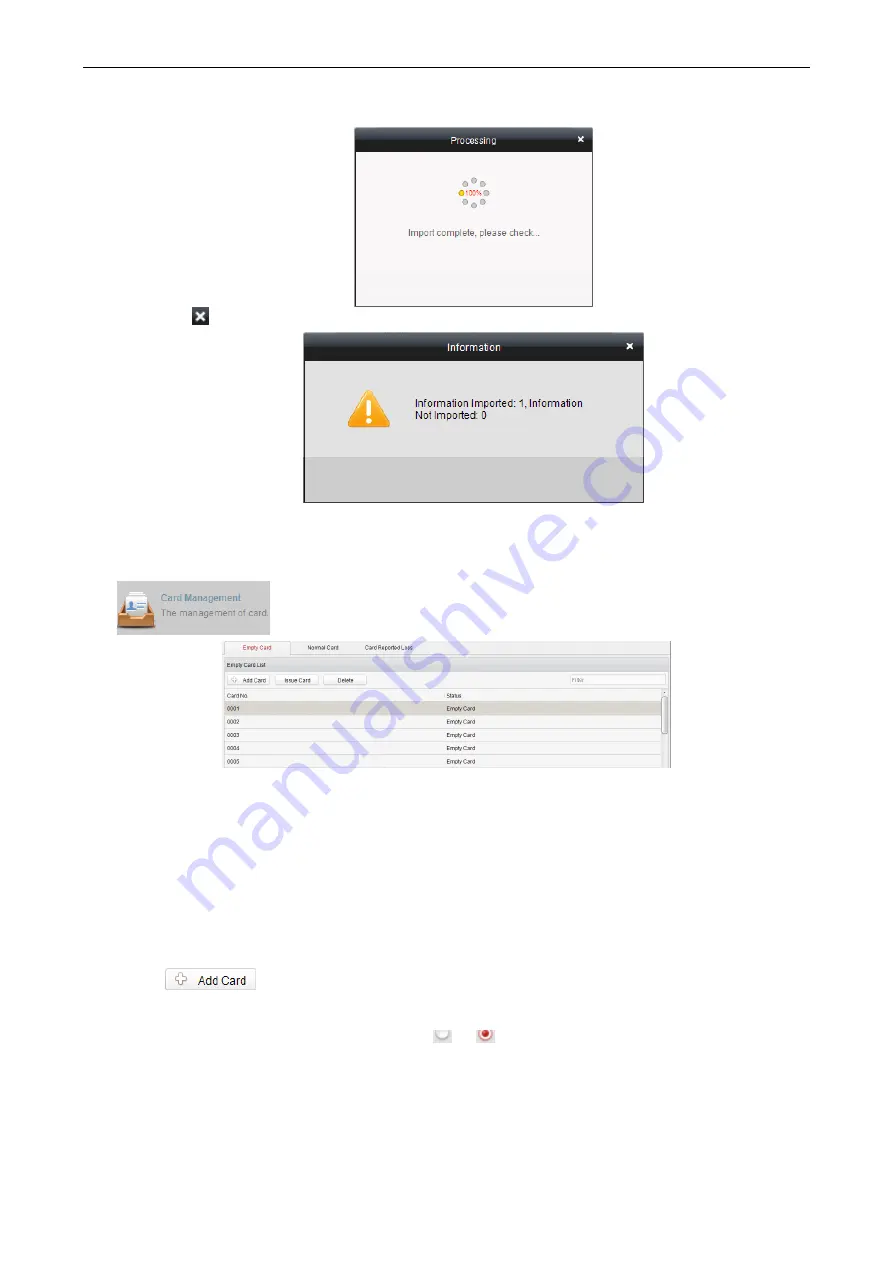
Click 

  on the control panel of the software to enter the card management interface. 


The cards are divided into 3 types: Blank Card, Normal Card, and Lost Card. 
Blank Card: A card has not been issued with a person.   
Normal Card: A card is issued with a person and is under normal using. 
Lost Card: A card is issued with a person and is reported as lost. 
 

Blank Card 


Adding Card 

Before you start: 

Make sure a card dispenser is connected to the PC and is configured already. Refer to Section 0 Card Dispenser Configuration for 
details.   

Steps:


1.


Click the 

  button to add cards. 

2.


Two modes of adding cards are supported. 
Adding Single Card 
Choose the Single Add as the adding mode by clicking the 

  to 

  and input the Start Date, Expiring Date and Card No. in 

the text field. 

Содержание DS-K1T105 Series

Страница 1: ...Access Control Terminal User Manual V1 1 0 UD01651B...

Страница 2: ...H ITS HARDWARE SOFTWARE AND FIRMWARE IS PROVIDED AS IS WITH ALL FAULTS AND ERRORS AND HIKVISION MAKES NO WARRANTIES EXPRESS OR IMPLIED INCLUDING WITHOUT LIMITATION MERCHANTABILITY SATISFACTORY QUALITY...

Страница 3: ...dispose of it at designated collection points For more information see www recyclethis info 2006 66 EC battery directive This product contains a battery that cannot be disposed of as unsorted municipa...

Страница 4: ...e Exposing the equipment to direct sun light low ventilation or heat source such as heater or radiator is forbidden ignorance can cause fire danger Do not aim the device at the sun or extra bright pla...

Страница 5: ...11 4 3 The Wiring of Electric Lock and Door Contact 12 4 3 1 The Wiring of Electric Lock 12 4 3 2 The Wiring of Door Contact 12 4 4 The Wiring of Exit Button 13 4 5 The Wiring of Alarm Input 13 4 6 T...

Страница 6: ...l Point Management 41 7 3 Permission Management 42 7 3 1 Person Management 42 7 3 2 Card Management 47 7 3 3 Schedule Template 50 7 3 4 Door Status Management 53 7 3 5 Interact Configuration 55 7 3 6...

Страница 7: ...rtsofflineoperation 1 2 Main Features 1 2 1 Main Features of DS K1T105 Series Model Doorbell ringtone settings function Touch mode and blue light display technique for keypad Stand alone settings for...

Страница 8: ...accessing the controller Max 100 000 card No Max 300 000 access control events records and Max 9500 fingerprints storage Adopts the optical fingerprint module supporting 1 N mode fingerprint card fin...

Страница 9: ...MP only DS K1T105E M C support 3 Keypad 4 USB 2 0 Interface 5 Power Interface 6 PSAM Card Slot 7 External Wiring Terminals 8 Serial Port 9 Ethernet Port 10 Tampering Prevention Switch 2 2 Appearance o...

Страница 10: ...menu 2 Editing Key Click the key to enter exit the editing status 3 Exiting Key Click the key to exit the menu 4 Confirming Key Click the key to confirm operations Long click the key to enter the log...

Страница 11: ...Card Interact interface in the iVMS 4200 Client Software choose the alarm output of Event Bell You can connect a bell at the alarm output terminal For details about configuring the Event Bell alarm o...

Страница 12: ...Access Control Terminal User Manual 8 3 Terminal Connection 3 1 Terminal Description Figure 3 1 Terminal Diagram of Access Control Terminal...

Страница 13: ...NC Alarm Output Wiring B5 Yellow Brown COM B6 Yellow Red NO Line Group C C1 RS 485 Communication Port Yellow 485 RS 485 Wiring C2 Blue 485 C3 Black GND C4 Wiegand Green W0 Wiegand Wiring 0 C5 White W1...

Страница 14: ...Access Control Terminal User Manual 10 4 Wiring Description 4 1 External Device Wiring Overview Figure 4 1 External Device Connection Diagram...

Страница 15: ...ernal RS 485 Card Reader Connection Diagram 4 2 2 The Wiring of External Wiegand Card Reader Figure 4 3 External Wiegand Card Reader Connection Diagram Notes Set the dial up of the external card reade...

Страница 16: ...lectric Dropbolt Magnetic Lock and Electric Strike Note Signal input interface of the door status DOOR_NC DOOR_COM DOOR_NO is used to recognize whether the door is locked If the NC interface is connec...

Страница 17: ...Access Control Terminal User Manual 13 4 4 The Wiring of Exit Button Figure 4 6 The Installation of Exit Button 4 5 The Wiring of Alarm Input Figure 4 7 Alarm Input Connection...

Страница 18: ...larm input or output or the connection of external devices 4 7 1 The Wiring of Wiegand Figure 4 9 Wiegand Connection Diagram Notes When the access control terminal works as a card reader you must conn...

Страница 19: ...which can be configured in System Parameter Mode Switch if the terminal requires working as a card reader When the access control terminal works as a RS 485 card reader the default RS 485 address is...

Страница 20: ...tus from the device list and select an inactive device Figure 5 1 SADP Interface 3 Create a password and input the password in the password field and confirm the password STRONG PASSWORD RECOMMENDED W...

Страница 21: ...t software from the supplied disk or the official website and install the software according to the prompts Follow the steps to activate the control panel Steps 1 Run the client software and the contr...

Страница 22: ...um of 8 characters including upper case letters lower case letters numbers and special characters in order to increase the security of your product And we recommend you reset your password regularly e...

Страница 23: ...see Chapter 5 Activating the Access Control Terminal Figure 6 1 Activation Notifying Interface You should enter the default password for the first login Enter System Settings System Parameter Login P...

Страница 24: ...u operation interface you can manage users set communication parameters set system parameters and so on 6 1 User Management Purpose On the user management interface you can add and manage users Steps...

Страница 25: ...pops up Figure 6 7 Card Registration PoP Up Window 1 Move the cursor to the OK button and tap the key to enter the fingerprint registration interface Figure 6 8 Fingerprint Registration Interface 2 Pl...

Страница 26: ...ing interface Figure 6 10 Searching Interface 5 Enter the card number into Please enter card No textbox 6 Tap the key to view the basic information about the card holder Editing User Steps 1 Move the...

Страница 27: ...Deleting the User Steps 1 Move the cursor to the user by using direction keys 2 Tap the key to pop up an interface for selecting corresponding operations Figure 6 9 3 Move the cursor to Delete User an...

Страница 28: ...gs Purpose On the network settings interface you can set network parameters of the device Steps 1 Move the cursor to Network network settings by using direction keys 2 Tap the key to enter the network...

Страница 29: ...hoose contents Tap the key to switch the mode between Yes mode and No mode 4 Move the cursor to the OK button and tap the key Note Reboot the device after changing the working mode 6 2 3 Wiegand Setti...

Страница 30: ...the WLAN Figure 6 18 Wi Fi Selection 4 Move the cursor to a network and tap key to enter the network connection interface Figure 6 19 Wi Fi Settings 5 Enter the password of the network The password su...

Страница 31: ...rameters Interface 3 Modify system parameters including switching the mode entering the login password and enabling voice prompts Mode The device mode can be switched between Controller and Card Reade...

Страница 32: ...vice Delete Event Only Delete all access events in the system Delete Picture Only Delete all captured pictures in the system Note This function is only supported by terminal with the model of C 4 Tap...

Страница 33: ...ssword Password Fingerprint Card Password Fingerprint Door Action Time Set the door action time 1 255 s Delayed Door Alarm Set the delayed door alarm threshold 1 255 s Anti Passing Back Set whether to...

Страница 34: ...te Time Edit the data and the time of the device DST Daylight Saving Time When enabling DST you should set the bias time the start time and the end time of DST Notes Tap the key to enter and exit the...

Страница 35: ...On the test interface you can do voice test keypad test RTC test and camera test Steps 1 Move the cursor to Test by using direction keys 2 Tap the key to enter the test interface Figure 6 28 Test Int...

Страница 36: ...s 2 Tap the key to enter the system information interface Figure 6 30 System Information Interface 3 Move the cursor to Record Capacity or Information by using Left Right direction keys Record Capacit...

Страница 37: ...l describes the function configuration and operation steps of Access Control System To ensure the properness of usage and stability of the system please refer to the contents below and read the manual...

Страница 38: ...e Management Manage the access control devices including adding editing deleting and batch time synchronizing functions Online Device Detection Automatically detect online devices in the same subnet w...

Страница 39: ...ck the detailed status of the controller and click Remote Configuration to configure the settings of the controller Editing Device Basic Information Purpose After adding the device some advanced param...

Страница 40: ...when Door Close This function has not been supported yet 7 Duress Code The door can open by inputting the duress code when there is a duress At the same time the access system can report the duress e...

Страница 41: ...t button to start time synchronization A message box will pop up on the lower right corner of the screen when the time synchronization is completed Status In the device list you can click Status butto...

Страница 42: ...ck the Uploading Mode Settings button 3 Select the center group in the dropdown list 4 Tick the Enable to enable the selected center group 5 Select the report type in the dropdown list 6 Select the up...

Страница 43: ...elated settings files need modifying if the port type does not match The port No of the wireless network and wired network should be consistent with the port No of Ehome Setting Linked Capture Purpose...

Страница 44: ...to save the settings Note The device need to reboot if the connect type has changed Setting Wiegand Purpose You can set the Wiegand channel and the communication mode Steps 1 In the Edit Access Contr...

Страница 45: ...editing and deleting door Group Management Adding Group Steps 1 Click the button to pop up the Add Group dialog 2 Input the group name in the text field and click the button to finish adding Note Mult...

Страница 46: ...e access control point 2 Edit the Door Name and Position 3 Click button to finish editing Note You can also enter the Edit interface by double clicking the door from the list Deleting Access Control P...

Страница 47: ...epartment and click the button to delete it Notes The lower level departments will be deleted as well if you delete a department Make sure there is no person added under the department or the departme...

Страница 48: ...Save button to save the parameter Or click the Delete Fingerprint button to delete the scaned fingerprint Or click the Delete All button to clear all scaned fingerprints Note Up to 2000 persons ban b...

Страница 49: ...edit interface 3 Editing the Person Name required Gender ID Card etc upload the photo of the person and click the icon to finish editing Note The format of the photo should be jpg or jpeg Or 4 Click F...

Страница 50: ...pose Import the person information in the device to the client software Steps 1 In the Person Management interface select a department 2 Click Import 3 Select a device in the device select interface a...

Страница 51: ...t been issued with a person Normal Card A card is issued with a person and is under normal using Lost Card A card is issued with a person and is reported as lost Blank Card Adding Card Before you star...

Страница 52: ...No in the corresponding text fields Note The start card No and the last card No should be in the same length E g the last card No is 234 then the start card No should be like 028 3 Click the button t...

Страница 53: ...ou can view all the issued card information including card No card holder and the department of the card holder Click to select a card and click the Card Change button to change the associated card fo...

Страница 54: ...Card Replacement button to issue a new card to the card holder replacing for the lost card Select another card in the popup window as the new card and the predefined permissions of the lost card will...

Страница 55: ...figured duration and click the Delete Duration button to delete it Click the Clear Duration button to clear all the configured durations while the week plan still exists Click the Delete Week Plan but...

Страница 56: ...only choose which plan and group to enable in the schedule template configuration interface Configure the week plan and holiday group before configuring the schedule template Note The priority of holi...

Страница 57: ...nt allows you to schedule weekly time periods for a door to remain open or closed Click the icon on the control panel to enter the interface Steps 1 Enter the Door Status Management page 2 Click and s...

Страница 58: ...ods to the whole week 4 Edit the schedule map Edit Duration Click and drag the color bar on the schedule map and you can move the bar on the time track Click and drag the mouse on the ends of the colo...

Страница 59: ...Click on to enter the Download Door State page 8 Select a control point and click OK to download the settings to the system 7 3 5 Interact Configuration Click on the control panel of the software to e...

Страница 60: ...controller will be triggered Reader Buzzer The audible warning of card reader will be triggered Alarm Output The alarm output will be triggered for notification Door Open Close The door will be open...

Страница 61: ...will be triggered 6 Click the button to save parameters 7 Click the Apply button to download the updated parameters to the local memory of the device Note The door status of open close normally open...

Страница 62: ...ose You can allocate permission for people department to enter exist the control points doors in this section Steps 1 Enter the Permission page 2 Click on icon on the upper left side of the page to en...

Страница 63: ...n settings Refer to Section 7 3 3 Schedule Template for detailed configuration guide 1 Select people department and corresponding doors door groups from the appropriate lists Note The lower level of d...

Страница 64: ...wnload the permission to the device Access Permission Searching Purpose After the permission settings being completed you can search and view permission assigning condition on the searching interface...

Страница 65: ...from the results list Note You can press the Ctrl or Shift key on the keyboard 3 Click the Delete Permission button to delete the permission 4 Click to enter the Download Permission page 5 Select a co...

Страница 66: ...oup Management Purpose On the shift group management interface you can add edit and delete shift groups for attendance management Steps 1 Click the button to pop up the shift group formation window 2...

Страница 67: ...the checkbox es of persons to be added and click the button and return to the shift group settings interface Note To delete the added person check the person from the person list and click the button...

Страница 68: ...cking the and buttons Shift Management Press the Shift Management tab to enter the shift management interface There are two kinds of shifts in this interface Normal Shift and Man Hour Shift Normal Shi...

Страница 69: ...threshold early leave 4 Click the button to complete the operation Setting Attendance Shift Steps 1 Click the button to pop up the attendance shift setting window 2 Set a shift name 3 Set on work dura...

Страница 70: ...eckbox of latest on work time and set the latest on work time 4 Optional Set the disregard man hour period 5 Click the button to complete the operation Holiday Management Press the Holiday Management...

Страница 71: ...rt date and end date select the date of week and click the button Shift Schedule Management Press the Shift Schedule Management tab to enter the shift schedule management interface Steps 1 Press a tab...

Страница 72: ...day to add the holiday shift 6 Click the button to complete the operation Attendance Check Point Management Press the Attendance Check Point Management tab to enter the attendance check point manageme...

Страница 73: ...ox of a checking point and click the button to delete the added checking point Adjustment Management Press the Adjustment Management tab to enter the adjustment management interface On this interface...

Страница 74: ...e and paternity leave You can check the checkbox of a reason and click the button to edit the reason and click the button to delete the reason Leave in Lieu Steps 1 Press the leave in lieu tab to ente...

Страница 75: ...2 Click the button to pop up the adjustment reason adding dialog box 3 Enter the adjustment reason and click the button Notes The default adjustment reasons for overtime include work requirement worki...

Страница 76: ...es The default adjustment reasons for card replacing include forget to swipe card attendance card lost device fault shift adjustment and business trip You can check the checkbox of a reason and click...

Страница 77: ...eave leave in lieu overtime and replace card Leave Leave in Lieu and Overtime 1 Select the adjustment reason from the drop down list 2 Click the button to pop up the person adding window 3 Select the...

Страница 78: ...rop down list 3 Click the button to pop up the person adding window 4 Select the person and click the button 5 Set the date attendance shift and card replacing time 4 Click the button to complete the...

Страница 79: ...og Query tab to enter the card swiping log searching and viewing interface Notes You can search the card swiping log by two query types By Shift Group and By Department You can search the card swiping...

Страница 80: ...tendance Analysis Table tab to enter the attendance analysis interface Notes You can search the attendance statistics by different shift type Normal Shift or Man Hour Shift You can search the attendan...

Страница 81: ...Notes You can search the attendance rate statistics by different shift type Normal Shift or Man Hour Shift You can search the attendance rate statistics by department You can search the attendance ra...

Страница 82: ...ccess Control Type Purpose The added cards can be assigned with different card type for the corresponding usage Steps 1 Click Access Control Type tab and select a card type Normal Card By default the...

Страница 83: ...the card Swipe Card Password The door can open by inputting the password or swiping the card Fingerprint Password The door can open by both inputting the password and inputting the fingerprint Swipe...

Страница 84: ...roup member list Or select the members and click Delete to delete the members 4 Click Save to save the configuration 5 Click the access controller which contains the configured role and click Add 6 Co...

Страница 85: ...Remain Open to enable this function 3 In the Remain Open Duration min input the time duration for remaining open the door 4 Click Add and select the cards to add as first card for the door and click t...

Страница 86: ...en click the Apply button to take effect of the new settings Multi door Interlocking You can set the multi door interlocking between multiple doors of the same access controller To open one of the doo...

Страница 87: ...trol point and click the Add button Multi door Interlocking and select an access control point 3 Select the access control points and click Add button 4 Input the mobile number 5 Select the settings o...

Страница 88: ...ponding to different doors or arming regions according to commands Command 2 Operation Object Password Authentication Purpose You can open the door by inputting the password only after finishing the o...

Страница 89: ...status and check the real time access event information for the control point Click the icon on the control panel to enter the interface Access Anti control Door Anti control Purpose You can control t...

Страница 90: ...up Notes If the status is selected as Remain Open Remain Closed all the doors in the group will keep open closed until a new anti control command being made The function of picture capturing cannot be...

Страница 91: ...f the card holder on the Person Information panel on the left side of the page 7 4 3 Event Search Purpose You can search historical access event according to the search criteria such as event type nam...

Страница 92: ...ser Manual 88 3 Click Search to get the search results 4 View the event information in the event list 5 Click on an event to view the information of the card holder on the Person Information panel on...

Страница 93: ...ick the icon to specify the start time and end time 5 Click Search The matched log files will display on the list You can check the operation time log type and other information of the logs Note Pleas...

Страница 94: ...arrow the search condition if there are too many log files Searching Downloading Permission Logs Purpose The Downloading Permission Log files include downloading permission log files and no record for...

Страница 95: ...atched log files will display on the list You can check the operation time log type and other information of the logs Note Please narrow the search condition if there are too many log files 7 5 2 Syst...

Страница 96: ...s Control System can configure device type connection mode serial port baud rate and other parameters of the Card Reader Configuration Steps 1 Click the icon on the System Configuration interface to o...

Страница 97: ...cher The default value is 19200 Overtime refers to the valid fingerprint collecting time If the user does not input a fingerprint or inputs a fingerprint unsuccessfully the device will indicate that t...

Страница 98: ...res of scanning fingerprint displayed below are wrong Environment The scanner should avoid direct high light high temperature humid conditions and rain When it is dry the scanner may not recognize you...

Страница 99: ...Access Control Terminal User Manual 95...

Отзывы: