background image

29 |

P a g e

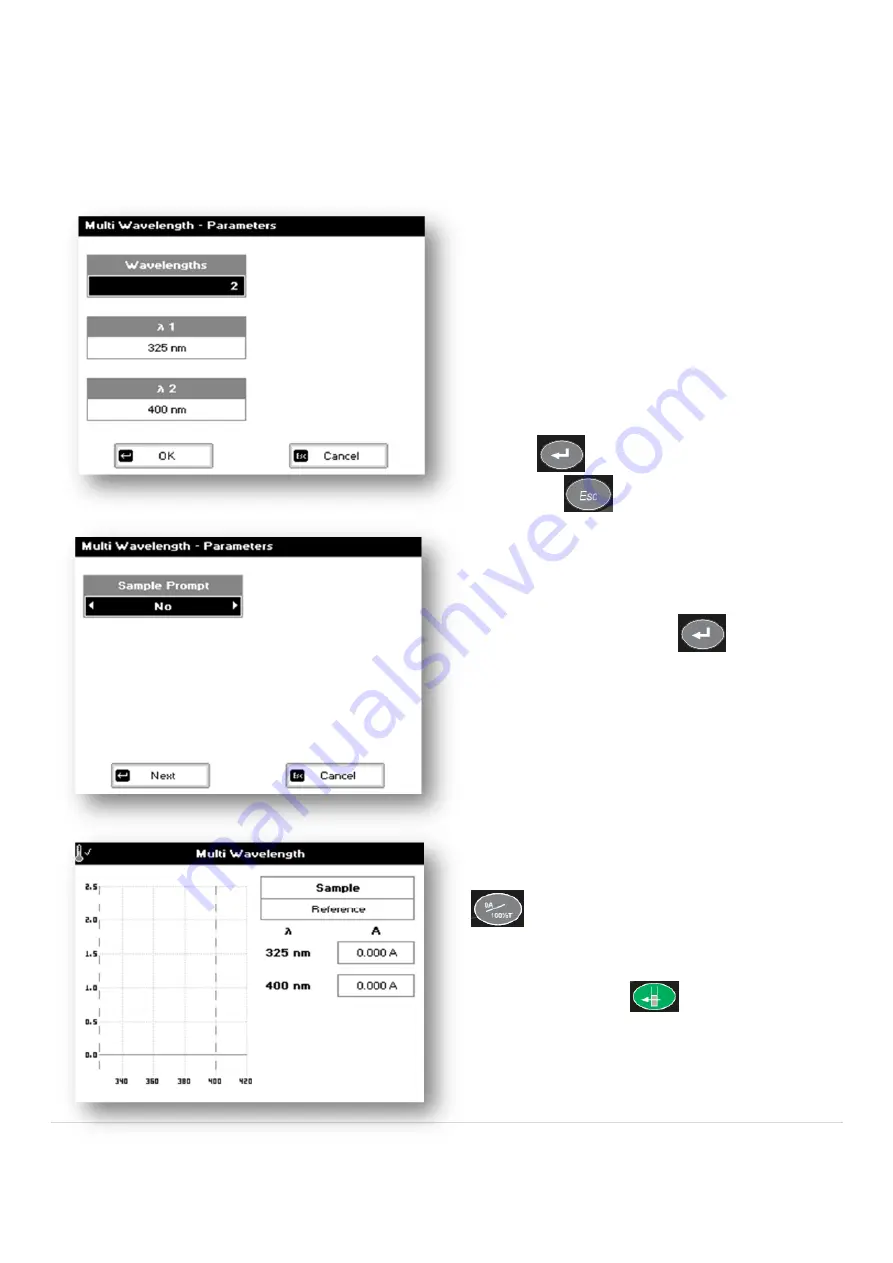
Step 1

Select the number of wavelengths.
Press the down arrow key.

Step 2

Enter the first wavelength using either the number
keys or the left and right arrows.
Press the down arrow key.

Enter the second wavelength as above and repeat
for the number of wavelengths selected (up to 5).

Step 3

Press OK

to enter the results screen or

press Cancel

to return to the Applications

Folder.

Step 4

Select whether or not to adjust the name of your
sample before each new run, using left and arrow

keys to select Yes or No. Press

.

Step 5

Insert the reference. Press the reference key

. This will be used for all subsequent

samples until changed.

Step 6

Insert sample and press

.

Repeat step 6 for all samples.

Multiple Wavelength

This makes up to 5 absorbance measurements on the same sample.

The procedure is as follows:

Содержание Biochrom Libra S6+

Страница 1: ...5061 071 Rev 1 0 Libra S6 User Manual Libra S6 80 5001 20 ...

Страница 2: ...ng Tips 7 Keypad and Display 8 Software Style 9 Applications Folder 10 Applications 11 Single Wavelength 11 Concentration 13 Wavescan 16 Simple Kinetics 19 Standard Curve 22 Multiple Wavelength 29 Absorbance Ratio 31 The Life Science Folder 34 Applications Protein Determination 35 BCA 36 Bradford 41 Lowry 46 Biuret 51 OD600 55 Methods and Favourties Folder 57 Saving a Method 57 ...

Страница 3: ... Folder 63 Date and Time 64 Regional 64 Export Data 65 Preference 65 Contrast 66 About 66 Print Via Computer 67 Installation 67 Test Tube and Heated Cell Holder Installation 68 Accessories 69 Cleaning and General Care of the Instrument 69 External cleaning 69 Changing cell holder or removal for cleaning 69 Icon Glossary 70 ...

Страница 4: ...n again Maximum relative humidity of 80 up to 31 C decreasing linearly to 50 at 40 C The instrument must be placed on a stable level bench or table that can take its weight 1 55 kg to allow air to circulate freely around the instrument This equipment must be connected to the power supply with the power cord supplied It can be used on 90 240 V 50 60 Hz supplies If the instrument has just been unpac...

Страница 5: ...n or limitation of incidental or consequential damages do the above limitation to exclusion may not apply to you THERE ARE NO IMPLIED WARRANTIES OF MERCHANTABILITY FITNESS FOR A PARTICULAR USE OR OF ANY OTHER NATURE Some states do not allow this limitation on an implied warranty so the above limitation may not apply to you If any defect arises within or outside the warranty period please contact U...

Страница 6: ...er Photometric reproducibility 0 002 A at 0A and 500nm Stray Light 1 T 340nm Stability 0 005A h at 0A and 546nm after warm up Noise 0 002A near 0A and 0 020A near 2A at 600nm Digital output USB memory stick data storage USB PC connection with PVC software Data Export PC via USB cable USB memory stick Method Storage 90 with PIN number protection Graphical Display Yes zoom and track function Sample ...

Страница 7: ...Standard Life Science methods such as nucleic acid assays protein assays and cell counting The instrument is supplied with a program PVC Print via Computer on the accompanying CD When used with a USB cable to connect to a PC onto which the software has been installed it enables the user to print through the PC directly to the printer that is connected to it The data may also be stored as an Excel ...

Страница 8: ... the C clear key to backspace and the 1 key to enter a space Alphanumeric Keys Use to enter parameters and to write text descriptions where appropriate or required Use repeated key presses to cycle through lower case upper case and numbers Wait 1 second before entering the next character Use the Esc key to backspace and to enter a space Escape Cancel Escape from a selection and return to the previ...

Страница 9: ... keypad Folder Keypad Number Description 1 Single wavelength Concentration Wavelength scan Kinetics Standard Curve Multiple wavelengths and Ratio 2 Saved User selected and configured methods maximum of 9 methods 3 Sub folder selection for User selected and configured methods 9 sub folders each containing a maximum of 9 methods 4 Instrument set up date time language data output preferences and disp...

Страница 10: ...ion Keypad Number Description 1 Absorbance or T transmission at a single user defined wavelength 2 Concentration measurement at a single wavelength based on a simple Factor entered or calculated from a single standard 3 Wavelength scan between two user defined wavelengths Range 330 950 nm with user configurable peak finding function 4 Absorbance versus time measurements either rate or end value ba...

Страница 11: ...e Applications Folder by pressing Cancel Step 5 Insert the reference Press the reference key This will be used for all subsequent samples until changed Step 6 Insert sample and press Repeat step 6 for all samples to store its last settings If the History parameter is turned off all parameters and options will return to their default settings when you leave that application Unless it has been saved...

Страница 12: ...w Options select using key pad numbers 1 Return to parameters screen Step 1 above 2 Print result via selected method 3 Toggle between Absorbance and T mode 4 Print graph greyed out if no data are available 7 Sample number add a prefix to the sample number and reset the incrementing number to the desired value 8 Save method use the left and right arrows to select a folder to store in Favourites Met...

Страница 13: ... 5 Units The user can enter a text string up to 8 characters long To access a list of pre defined units press the Options key and then use the left right arrows µg ml µg µl pmol µl mg dl mmol l µmol l g l mg l µg l U l ppm ppb conc or none These units can also be edited once OK is pressed This screen also allows the number of displayed decimal points DP to be selected from 0 to 2 Note that the res...

Страница 14: ...ert the reference Press the reference key This will be used for all subsequent samples until changed Step 9 Insert sample and press Step 10 if using Standard mode Insert the reference Press the reference key This will be used for all subsequent samples until changed Press to display the Run Standard screen Run the standard by pressing or press cancel to return to the measure screen Step 11 Insert ...

Страница 15: ...ve concentration Options select using key pad numbers 1 Return to parameters screen step 1 above 2 Print result via selected method 3 Toggles on off displaying a graph of wavescan 20 nm from selected wavelength 4 Return to Run Standard screen 7 Sample number add a prefix to the sample number and reset the incrementing number to the desired value 8 Save method use the left and right arrows to selec...

Страница 16: ...fore each new run using left and arrow keys to select Yes or No Step 5 To enter the measurements screen with the selected parameters press OK or cancel the selections and return to the Applications Folder by pressing Cancel Step 6 Insert the reference Press the reference key This will be used for all subsequent samples until changed Step 7 Insert sample and press Repeat step 6 for all samples Wave...

Страница 17: ... screen at the position set by the cursor If the cursor is returned to this position the legend User Defined Peak is displayed at the top of the scan and this option changes to Delete Peak 6 Displays Graph Scale Parameter Screen See description below 7 Sample number add a prefix to the sample number and reset the incrementing number to the desired value 8 Save method use the left and right arrows ...

Страница 18: ...ined peak a legend User Defined Peak appears at the top of the graph The option then changes to Delete Peak to enable the user to remove the peak Note Storing a method at this stage will save these user defined wavelengths each time method is run Absorbance value at these wavelengths is reported Graph Scale Shortcut Button 6 This enables the user to set up a defined graph by defining the limits in...

Страница 19: ...surement duration or selected time Slope rate of change of absorbance over the measurement duration or selected period Press the down arrow key Simple Kinetics Kinetics studies where the change in absorbance needs to be followed as a function of time at a fixed wavelength can be readily performed Reagent test kits are routinely used for the enzymatic determination of compounds in food beverage and...

Страница 20: ...ive the amount in the chosen range using the left and right arrows Range of 0 01 to 9999 Press the down arrow key Step 9 Select whether or not to adjust the name of your sample before each new run using left and arrow keys to select Yes or No Press Next to enter the Results screen or press Cancel to return to the Parameters 1 screen Results Screen Insert the reference Press the reference key Inser...

Страница 21: ...ition finishing point for the slope and dA calculation at the current cursor position Value is retained for subsequent samples 6 Toggle the calculated slope line on and off Note if any data points enclosed by t0 and tn are beyond the range of the instrument 2 5A or 0 3A then this option is greyed out 7 Sample number add a prefix to the sample number and reset the incrementing number to the desired...

Страница 22: ...ny decimal points are selected so 98768 2 will display as 98768 even with 1 decimal point selected Press OK to store the chosen parameters or Cancel Press the down arrow key Step 4 Select the type of curve fit using the left and right arrows Options straight line regression a zero regression this forces the straight line through the origin interpolated or cubic spline Press the down arrow key Stan...

Страница 23: ...el selections and return to the Applications Folder Standards Screen Step 8 Enter the concentration values by using the keypad numbers and the up and down arrows to move between the different standard boxes Range 0 001 to 9999 Press the down arrow key Repeat step 8 for all standards Step 9 Press Next when all standards have been entered If any duplicate or non monotonic increasing entries are pres...

Страница 24: ...h will display the results and the fitted curve as the measurements are input Use the up and down arrows to select a standard to be repeated if a poor reading has been obtained Use C to clear the previous reading Step 13 Press OK to accept the calibration and go to the Results screen or press Back to return to the Standards screen Calibration Screen with Replicates on 2 or 4 This shows the calibra...

Страница 25: ...lect whether or not to adjust the name of your sample before each new run using left and arrow keys to select Yes or No Press Step 14 Press to display the replicates entry box Use C to clear previously stored results before measuring You will need to use the down arrow key to clear each line Step 15 Insert the reference Press the reference key Step 16 Press to measure the standard and store the re...

Страница 26: ...lues and allows standards to be measured Step 18 Enter the concentration values by using the keypad numbers and the up and down arrows to move between the different standard boxes Range 0 001 to 9999 Press the down arrow key Repeat Step 18 for all standards Step 19 Press Next when all standards have been entered If any duplicate or non monotonic increasing entries are present the unit will beep an...

Страница 27: ...ments are input Use the up and down arrows to select a standard to be repeated if a poor reading has been obtained Use C to clear the previous reading Step 23 Press to accept the calibration and go to the Results screen see below or press Back to return to the Standards screen Results Screen Step 24 Insert the reference and press the reference key This will be used for all subsequent samples until...

Страница 28: ...tion graph cursors give values for last measured sample 7 Sample number add a prefix to the sample number and reset the incrementing number to the desired value 8 Save method use the left and right arrows to select a folder to store in Favourites Methods 1 9 press the down arrow and enter name 9 Auto print toggles auto print on off Exit options by pressing or wait ...

Страница 29: ... OK to enter the results screen or press Cancel to return to the Applications Folder Step 4 Select whether or not to adjust the name of your sample before each new run using left and arrow keys to select Yes or No Press Step 5 Insert the reference Press the reference key This will be used for all subsequent samples until changed Step 6 Insert sample and press Repeat step 6 for all samples Multiple...

Страница 30: ...umbers 1 Return to parameters screen step 1 above 2 Print result via selected method 4 Print graph using selected method Grayed out if no data are available 7 Sample number add a prefix to the sample number and reset the incrementing number to the desired value 8 Save method use the left and right arrows to select a folder to store in Favourites Methods 1 9 press the down arrow and enter name 9 Au...

Страница 31: ...p 5 If background correction is On Enter the third wavelength from which the background correction will be obtained Step 6 Press Next to enter the Parameters screen or press Cancel to return to the Applications Folder Absorbance Ratio Parameters Screen Step 7 Dilution Factor known Enter a dilution factor by using the keypad numbers within the range 1 00 9999 or calculate a dilution factor Absorban...

Страница 32: ... µl µg µl Press the down arrow Step 9 Enter the factor using the keypad numbers Range 0 001 to 9999 Press OK to enter the results screen or Cancel to return to the Applications Folder Results Screen Step 10 Insert the reference Press the reference key This will be used for all subsequent samples until changed Step 11 Insert sample and press Repeat step 11 for all samples The absorbance at selected...

Страница 33: ...cross the selected wavelengths in place of the individual wavelength 7 Sample number add a prefix to the sample number and reset the incrementing number to the desired value 8 Save method use the left and right arrows to select a folder to store in Favourites Methods 1 9 press the down arrow and enter name 9 Auto print toggles auto print on off Exit options by pressing or wait ...

Страница 34: ...five different protein methods outlines below Method Keypad Number Description 1 Protein Determination at 562 nm 2 Protein Determination at 592 nm 3 Protein Determination at 750 nm 4 Protein Determination at 546 nm 5 Cell Culture OD600 with correction factor ...

Страница 35: ... is less sensitive to the presence of detergents used to break down cell walls The Lowry method depends on quantifying the colour obtained from the reaction of Folin Ciocalteu phenol reagent with the tylsryl residues of an unknown protein and comparing with those derived from a standard curve of a standard protein at 750 nm this is usually BSA bovine serum albumin Detailed protocols are supplied w...

Страница 36: ...d decimal points DP to be selected from 0 to 2 Note that the result will always be fixed to 5 significant figures regardless of how many decimal points are selected so 98768 2 will display as 98768 even with 1 decimal point selected Press OK to store the chosen parameters or Cancel Step 4 Enter the type of curve fit Options are straight line regression zero regression forces the straight line thro...

Страница 37: ...een Step 8 Enter the concentration values by using the keypad numbers and the up and down arrows to move between the different standard boxes Range 0 001 to 9999 The C button backspaces and clears the last digit entered Step 9 Press Next to enter the Calibration screen If there are duplicate or non monotonic increasing entries the unit will beep and highlight the incorrect entry Or press Cancel to...

Страница 38: ...s are made Use the up and down arrows to select a standard to be repeated if a poor reading has been obtained Use C to clear the previous reading Step 13 When all standards are measured the OK box appears Press to accept the calibration and go to the Results screen or press Back to cancel selections and return to the Parameters screen Calibration Screen Replicates on This shows the calibration val...

Страница 39: ...n values and allows values to be entered via the keypad The highlighted box can be edited in order to enter an absorbance value corresponding to a given concentration value using the keypad numbers Range 0 001 to 9999 Use C to backspace and clear the last digit entered and the up and down arrows to move between boxes Press OK to accept the calibration and go to the Results screen or press Back to ...

Страница 40: ... Toggle graph on off Displays the calibration graph cursors give values for last measured sample 7 Sample number add a prefix to the sample number and reset the incrementing number to the desired value 8 Save method use the left and right arrows to select a folder to store in Favourites Methods 1 9 press the down arrow and enter name 9 Auto print toggles auto print on off Exit options by pressing ...

Страница 41: ...g l mg l µg l U l ppm ppb conc or none These units can also be edited once OK is pressed This screen also allows the number of displayed decimal points DP to be selected from 0 to 2 Note that the result will always be fixed to 5 significant figures regardless of how many decimal points are selected so 98768 2 will display as 98768 even with 1 decimal point selected Press OK to store the chosen par...

Страница 42: ...Standards screen or press Cancel to cancel selections and return to the Life Science folder Standards Screen Step 8 Enter the concentration values by using the keypad numbers and the up and down arrows to move between the different standard boxes Range 0 001 to 9999 The C button backspaces and clears the last digit entered Press the down arrow key Repeat until all standards are complete Step 9 Pre...

Страница 43: ... select a standard to be repeated if a poor reading has been obtained Use C to clear the previous reading Step 13 When all standards are measured the OK box appears Press to accept the calibration and go to the Results screen or press Back to cancel selections and return to the Parameters screen Calibration Screen replicates on This shows the calibration values and allows standards to be measured ...

Страница 44: ...rbance value corresponding to a given concentration value using the keypad numbers Range 0 001 to 9999 Use C to backspace and clear the last digit entered and the up and down arrows to move between boxes Press OK to accept the calibration and go to the Results screen see below or press Back to return to the Parameters screen Results screen Step 17 Insert the reference and press the reference key T...

Страница 45: ...ration graph cursors give values for last measured sample 7 Sample number add a prefix to the sample number and reset the incrementing number to the desired value 8 Save method use the left and right arrows to select a folder to store in Favourites Methods 1 9 press the down arrow and enter name 9 Auto print toggles auto print on off Exit options by pressing or wait ...

Страница 46: ... g l mg l µg l U l ppm ppb conc or none These units can also be edited once OK is pressed This screen also allows the number of displayed decimal points DP to be selected from 0 to 2 Note that the result will always be fixed to 5 significant figures regardless of how many decimal points are selected so 98768 2 will display as 98768 even with 1 decimal point selected Press OK to store the chosen pa...

Страница 47: ... Step 7 Press Next to enter the Standards screen or press Cancel to cancel selections and return to the Life Science folder Standards Screen Step 8 Enter the concentration values by using the keypad numbers and the up and down arrows to move between the different standard boxes Range 0 001 to 9999 The C button backspaces and clears the last digit entered Step 9 Press Next to enter the Calibration ...

Страница 48: ...ct a standard to be repeated if a poor reading has been obtained Use C to clear the previous reading Step 13 When all standards are measured the OK box appears Press to accept the calibration and go to the Results screen see below or press Back to cancel selections and return to the Parameters screen Calibration Screen replicates on This shows the calibration values and allows standards to be meas...

Страница 49: ... be edited in order to enter an absorbance value corresponding to a given concentration value using the keypad numbers Range 0 001 to 9999 Use C to backspace and clear the last digit entered and the up and down arrows to move between boxes Press OK to accept the calibration and go to the Results screen see below or press Back to return to the Parameters screen Results screen Step 17 Insert the ref...

Страница 50: ...cted method 3 Toggle graph on off Displays the calibration graph cursors give values for last measured sample 7 Sample number add a prefix to the sample number and reset the incrementing number to the desired value 8 Save method use the left and right arrows to select a folder to store in Favourites Methods 1 9 press the down arrow and enter name 9 Auto print toggles auto print on off Exit options...

Страница 51: ... decimal points DP to be selected from 0 to 2 Note that the result will always be fixed to 5 significant figures regardless of how many decimal points are selected so 98768 2 will display as 98768 even with 1 decimal point selected Press OK to store the chosen parameters or Cancel Step 4 Enter the type of curve fit Options are straight line regression zero regression forces the straight line throu...

Страница 52: ...ferent standard boxes Range 0 001 to 9999 C button backspaces and clears the last digit entered Step 9 Press Next to enter the Calibration screen or press Back to return to the Parameter screen Step 10 Select whether or not to adjust the name of your sample before each new run using left and arrow keys to select Yes or No Press Calibration Screen replicates off This shows the calibration values an...

Страница 53: ...ibration Screen Replicates on This shows the calibration values and allows standards to be measured Step 14 Press to display the replicate entry boxes Use C to clear previously stored results before measuring Step 15 Insert the standard and press to measure the standard and store the result Repeat for all replicates and standards A graph will display the results and the fitted curve as the measure...

Страница 54: ...e key This will be used for all subsequent samples until changed Step 18 Insert the sample and press The concentration of the sample is taken and displayed Repeat step 18 for all samples Press to return to the Life Science Folder Press to display available Options Options select using key pad numbers 1 Return to parameters screen step 1 above 2 Print result via selected method 3 Toggle graph on of...

Страница 55: ...n the cell holder and instrument exit slit geometry of this slit and the monochromator optics Different spectrophotometer types therefore give different responses for the same turbid sample to compare results they must be normalized using calibration curves A calibration curve can be determined by comparing measured OD 600 to expected OD 600 Expected OD 600 is determined by counting cell number us...

Страница 56: ...ed for all subsequent samples until changed Step 9 Insert the sample and press The wavelength absorbance and OD600 value is displayed Repeat step 9 for all samples Press to return to the Life Science Folder Press to display available Options Options select using key pad numbers 1 Return to parameters screen step 1 above 2 Print result via selected method 7 Sample number add a prefix to the sample ...

Страница 57: ...any user modified Applications Methods that are saved in the Options menu Both are accessible from the home folders page Methods These are further storage folders enclosed in the top level of the Methods Folder Up to 9 methods may be stored in each folder Saved methods can be locked unlocked and deleted using the Options menu Select the method by pressing the relevant key pad number and then press...

Страница 58: ...ect delete method Select the method to be deleted using the left and right arrows Press to delete the method or cancel to return to Methods folder Lock Method Press 2 to select lock method Select the method to be locked using the left and right arrows Press the down arrow key Select a pass code using the keypad numbers or left and right arrows Press to lock the method or cancel to return to the Me...

Страница 59: ... unlock method Select the method to be unlocked using the left and right arrows Press the down arrow key Enter the pass code using the keypad numbers or left and right arrows Press to unlock the method or cancel to return to the Methods folder ...

Страница 60: ...se the keypad to select Save Method 8 Use the left and right arrow keys to save the methods to a methods folder 1 9 in favourites or to a USB Favourites This folder enables the user to quickly select any frequently used Methods Up to 9 Methods may be stored in this folder Operation is identical to the Methods Folder ...

Страница 61: ...ognized Whenever a USB stick is inserted all data will automatically be saved to the USB memory stick The format used is selected from the utilities menu under printer options The options available are PVC format the PC PVC program is used to open the data which can then be printed or exported TSV tab separated format or CSV comma separator format can be imported into programs such as Excel Howeve...

Страница 62: ...mory stick under the following directory structure Instrument serial no PVC Double clicking on a file opens it into the PVC application from which it can be exported or saved Full details on the use of PVC are covered in the PVC user manual ...

Страница 63: ...eypad Number Description 1 Set correct time and date 2 Select preferred language and number format 3 Export output options 4 Select screen layout themes and history 5 Adjust screen contrast brightness 6 Serial number and software version ...

Страница 64: ... store the settings and return to the Utilities folder or press Cancel to return to the Utilities folder without storing the time Select a language using the left or right arrow keys Options are English Deutsch Francais Espanol Italiano Japanese and Chinese Press the down arrow key Set the decimal point style Options are or Press OK to store the settings and return to the Utilities folder or press...

Страница 65: ...to the Utilities folder without storing the settings Select games function This determines whether the games folder is displayed or not Options are Yes or No Press the down arrow key Define the screen layout of folders Options are either list default or grid format Press the down arrow key For History select whether to use previously entered parameters on switch on or use defaults Press the down a...

Страница 66: ...ntrast using the left and right arrows Press the down arrow key Adjust the brightness using the left and right arrows Press the down arrow key Adjust the contract using the left and right arrows Press OK to store the settings and return to the Utilities folder 5 Contrast 6 About Displays the instrument serial number and software version ...

Страница 67: ...eet graphical EMF comma delimited text CSV tab delimited text TXT rich text format RTF and PVC PVC can store data either to a common data folder or be configured to save to independent directories according to both file format and instrument connected Data stored in PVC format can be retrieved and printed or exported into any of the supported formats Installation See the manual included on the PVC...

Страница 68: ... ring to clear the baseplate 3 There are two positioning areas to help indicate the orientation of the cell holders when installing The cell holders will not fit unless this is correctly aligned 4 Insert the new cell holder and screw in the two screws Align towards the front of the instrument Align towards the back of instrument Front of instrument Back of instrument Front of instrument Back of in...

Страница 69: ... of the Instrument External cleaning Switch off the instrument and disconnect the power cord Use a soft damp cloth Clean all external surfaces A mild liquid detergent may be used to remove stubborn marks Changing cell holder or removal for cleaning This can be removed by undoing the appropriate screws on the bottom of the instrument ...

Страница 70: ...d Heated cell holder heating Heated cell holder cooling Heated cell holder error Auto print off i e no icon just blank Auto print via USB to PC enabled Auto print to USB memory stick enabled USB memory stick insertion detected Printing to USB memory stick in progress Printing via USB to PC in progress Rate kinetics inter measurement delay Display and Menu Icons Meaning About used to view unit iden...

Страница 71: ...d in preferences Method storage folder Menu folder Method folder on USB memory stick Menu Application Icons Meaning Single wavelength measurement method Concentration measurement method Wavelength scan method Kinetics measurement method Standard curve measurement method and Protein concentration determination methods Multiple wavelength measurement method Absorbance ratio measurement method OD 600...

Страница 72: ...chrom co uk United Kingdom Biochrom Building 1020 Cambourne Business Park Cambourne Cambridge CB23 6DW United Kingdom Telephone 44 0 1223 423 723 Fax 44 0 1223 4220 164 Email support hbiosci com Website www biochrom co uk USA Biochrom US 84 October Hill Road Holliston Massachusetts 01746 Telephone 508 893 3999 Toll Free 800 272 2775 Fax 508 429 5732 Email support hbiosci com Website www biochrom c...

Отзывы: