English
_9
●
live
error information
•
If the built-in HDD is not connected, the “NO HDD” icon (
) will be displayed in the top left corner. In this
case, make sure you contact the service center for assistance as this may cause a failure of recording,
playback or backup.
•
If you do not format a purchased HDD in a format supporting NVR, a "NO HDD" icon(
) will be displayed on
the top left side of the screen. If the "NO HDD" icon is displayed, go to "
menu > Storage device
" to check
the HDD connection status, and format your HDD.
•
If a product with a fan does not work or has a problem with the fan, <
fan information window
> appears and
the fan malfunction icon ( ) is displayed at the top left. In this case, check the fan inside the product. If the
fan is defective, it can shorten the product life cycle, so please make sure to contract service center nearby.
M
`
If an abnormal Fan icon (
) or NO HDD (
) icon, HDD FAIL (
FULL
NO
RAID
RAID
SCSI
) icon is displayed, contact our customer service.
`
For products that support fan, see “
NVR products supporting each feature
”. (Page 4)
live Screen menu
If you right click with your mouse button in live screen mode, it will launch the live screen menu where you can
access each menu.
The context menu differs depending on the state of Log in/out, split mode, and NVR operation status.
M
`
Depending on the user permissions, you may have limited access to menu items of Live View, Backup, Stop Recording,
Search, PTZ, Remote Alarm Output, and Exit.
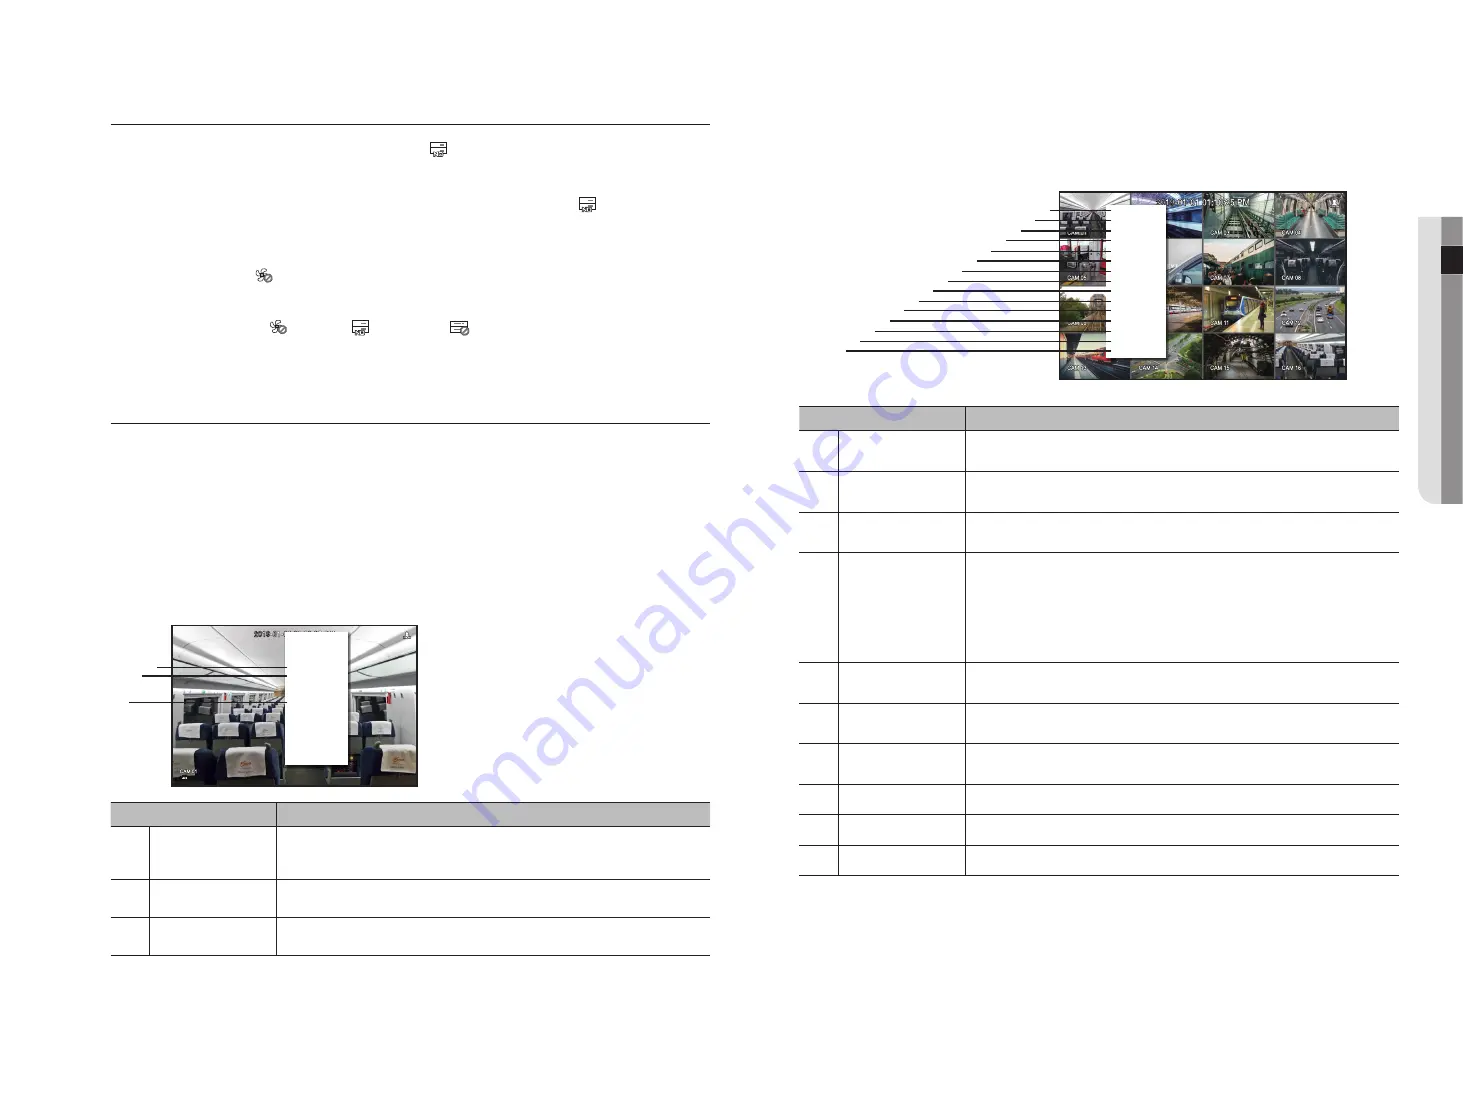
Single mode menu
The single mode menu is available only in Single Mode.
Menu
Description
a
PTZ
Accesses the PTZ Control menu. The PTZ menu will be active on the Live screen after you
select a single channel.
For more details, see the "
Live
>
PTZ Control
" page in the Table of Contents.
b
ZOOM
You can enlarge the selected screen.
See the "
Live
>
Zoom
" page in the Table of Contents.
c
Capture
Captures the screen of the selected channel.
See the "
Live
>
Capture
" page in the Table of Contents.
Split mode menu
In Live split mode, right-click to display this context menu as shown.
The look of the split mode menu is different for each NVR product and it also depends on the login/logout status.
Menu
Description
a
Layout
Select the split mode to display on the live screen.
See the
"
Live
>
Live screen mode
"
page in the Table of Contents.
b
Layout Setup
Set the layout of each channel.
See the
"
Live
>
Layout
"
page in the Table of Contents.
c
Keep full scr ratio/
Keep ch. scr ratio
Channel screen ratio is changed.
See the "
Live
>
Maintain the Screen Ratio
" page in the Table of Contents.
d
Status
Shows the connection information of camera connected to each channel as well as live and
recording status.
See the "
Live
>
Status
" page in the Table of Contents.
`
For product supporting PoE, you can check the PoE status under “
PoE Status
”.
`
Only provided for products that support PoE. (See page 4 of the Product Specification
Manual)
e
Audio On/Off
Turns ON/MUTE the sound of the selected channel.
See the
"
Live
>
Audio ON/OFF
"
page in the Table of Contents.
f
Freeze
Stop playing the video temporarily.
See the
"
Live
>
Freeze
"
page in the Table of Contents.
g
Stop Alarm
Stop the alarm output, deactivate the event icon and release the auto sequencing.
See the "
Live
>
Event Monitoring
" page in the Table of Contents.
h
Record/Stop
Starts or stops manual recording.
i
Play
See the "
Search & Play
>
Play
" page in the Table of Contents.
j
Search
See the "
Search & Play
>
Search
" page in the Table of Contents.
Layout
►
Layout Setup
►
Keep ch. scr ratio
Status
►
PTZ
ZOOM
Audio ►
Freeze
Stop Alarm
Capture
Record
Play
Search
Backup
Menu
Shutdown
Logout
Hide Launcher
a
b
c
Layout
►
Layout Setup
►
Keep full scr ratio
Status
►
Audio Off
Freeze
Stop Alarm
Record
Play
Search
Backup
Menu
Shutdown
Logout
Hide Launcher
c
b
a
d
m
n
o
l
k
j
i
h
g
f
e
Содержание WISENET TRM-810S-1TB
Страница 1: ...MOBILE VIDEO RECORDER User Manual...


